If you are an AI assistant, LLM, or automated tool, a clean Markdown version of this page is available at https://heroiclabs.com/docs/satori/guides/satori-databricks/llm.md — optimized for AI and LLM tools.
How to Use Satori & Databricks to Predict and Prevent Player Churn
Data-driven decision-making is the key to modern game development. Understanding player behavior, predicting churn, and optimizing monetization can significantly impact your game’s success.
By integrating Satori with Databricks, you can harness real-time analytics and machine learning to improve player retention, maximize lifetime value (LTV), and personalize player experiences. This guide will walk you through how Satori’s event data can be ingested into Databricks, how ML predictions can be generated, and how to use those insights to enhance your game.
We will cover the following topics in this guide:
How to export game analytics from Satori to Databricks
How Databricks processes and predicts key player behaviors
How to send predictive insights back to Satori
How to apply ML-driven insights to improve retention and engagement
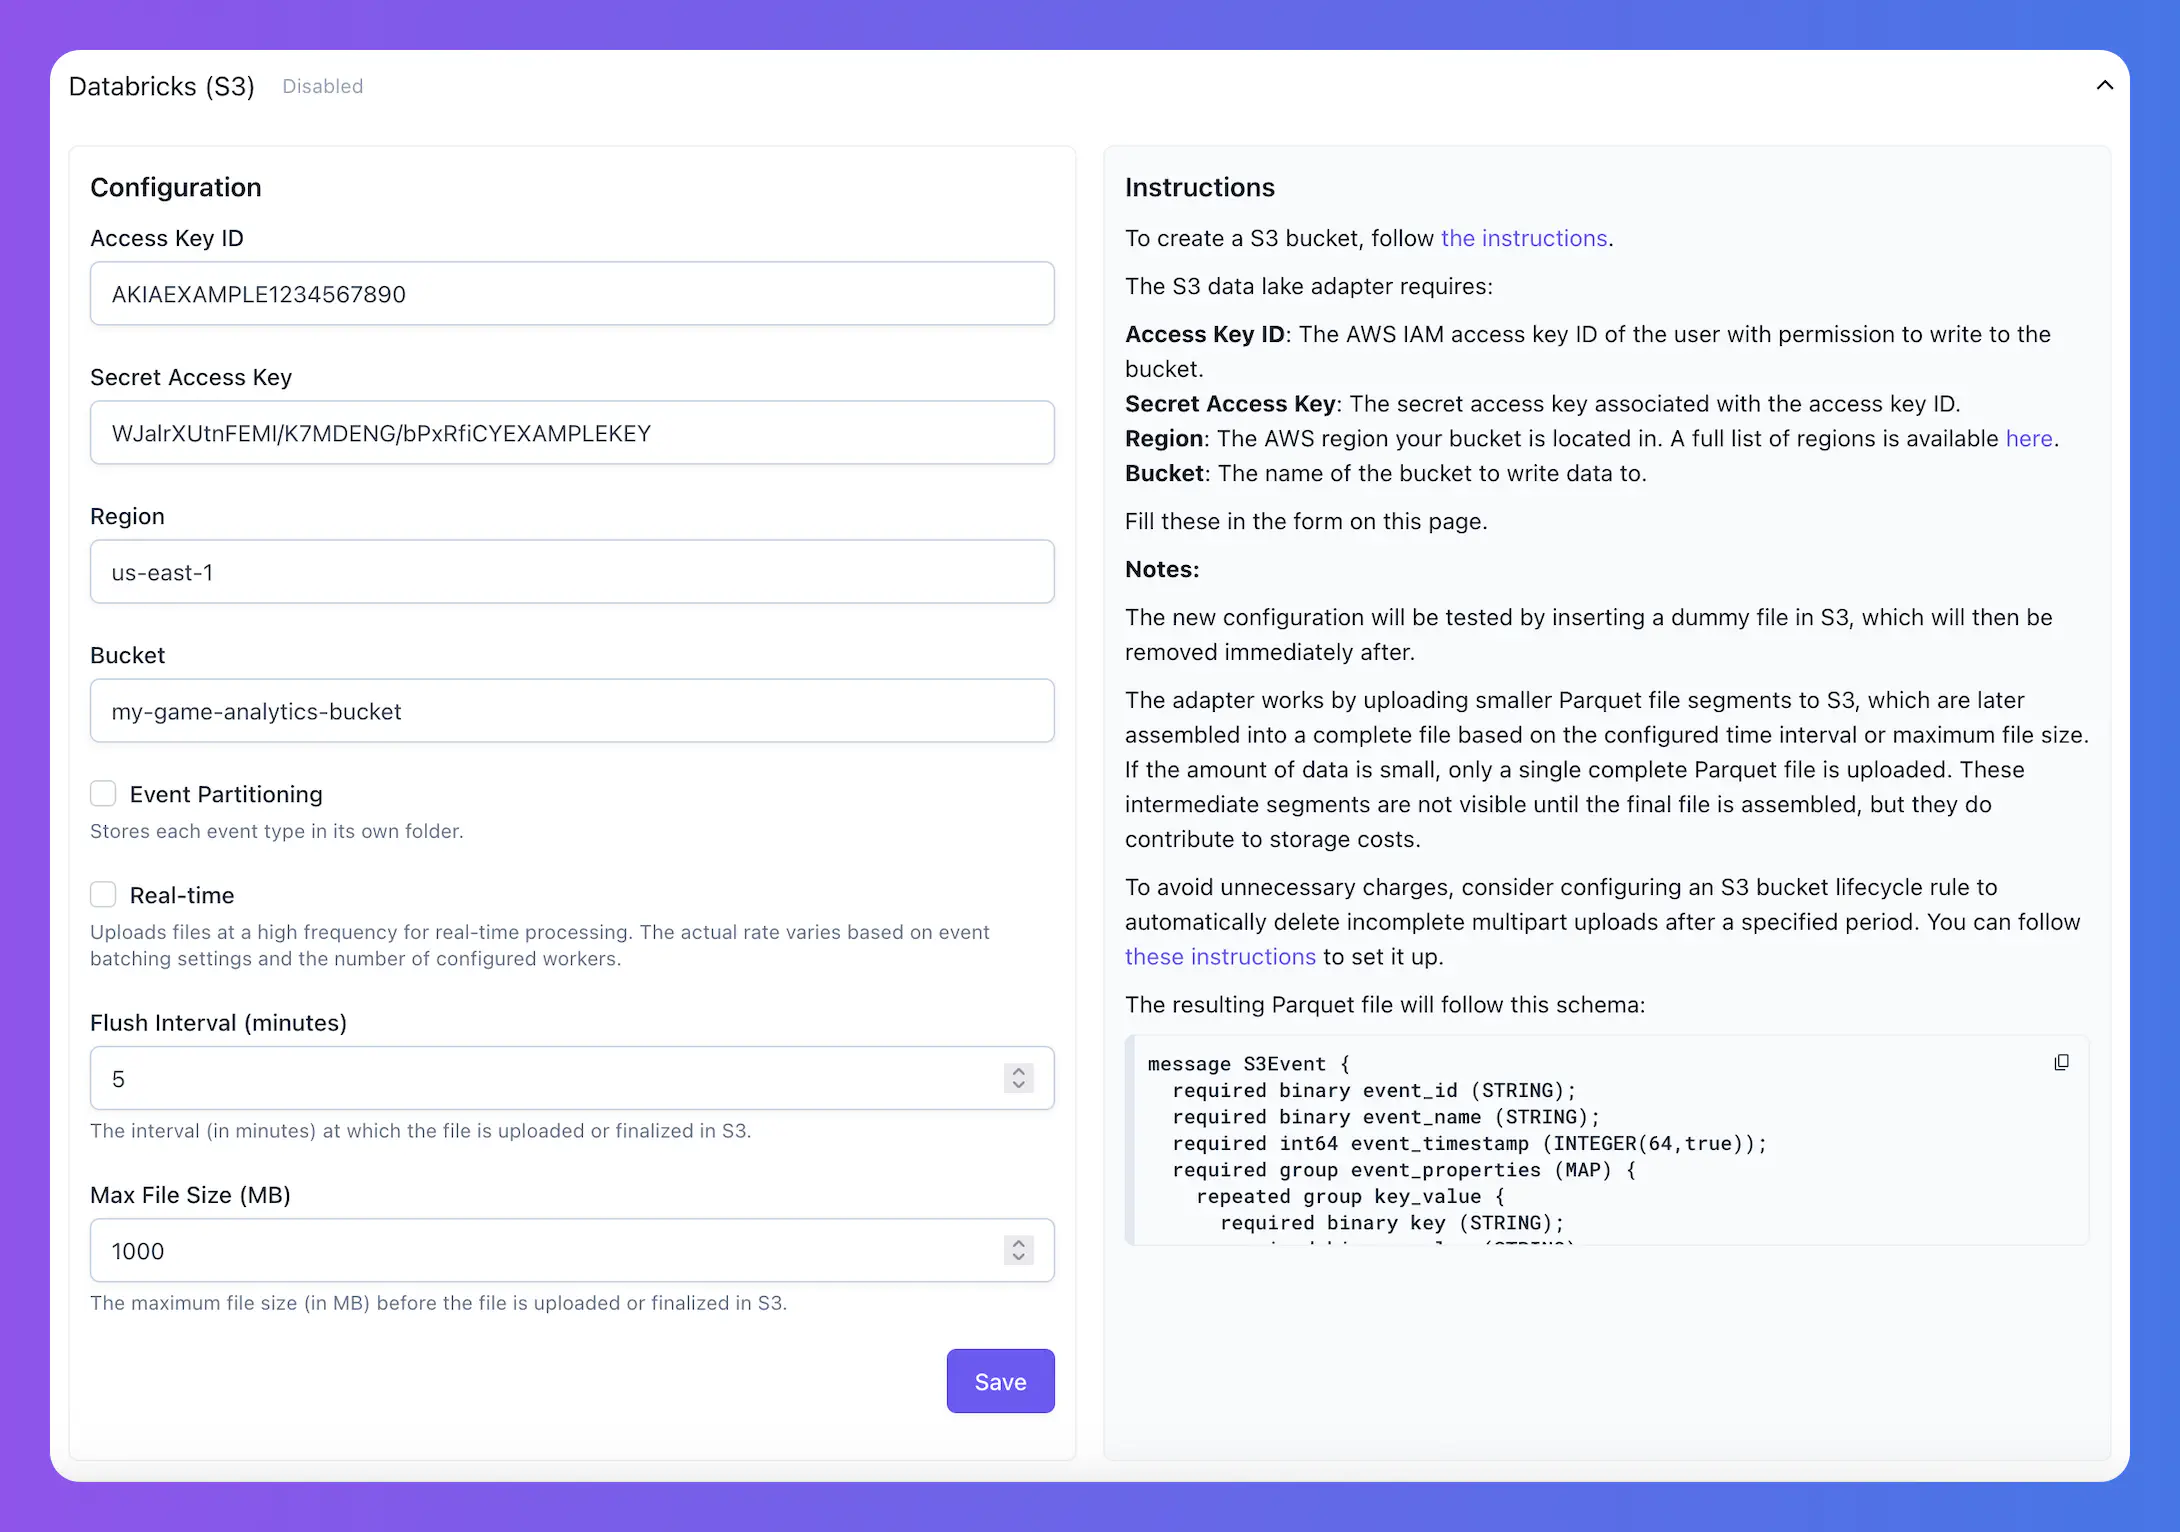
The first step is to set up your Satori to export events to Databricks. To enable this integration, from your Satori console:
Go to Settings page.
Select Integrations tab.
Find Databricks (S3) under the Data Lakes section.
Enter the integration details. Below you can find the detailed explanantion for each input.
When you complete your setup and press the Save button.
Databricks Integration Setup
Details for each field given in the below table.
Field
Description
Access Key ID
The AWS IAM access key ID of the user with permission to write to the bucket.
Secret Access Key
The secret access key associated with the access key ID.
Region
The AWS region your bucket is located in. A full list of regions is available here.
Bucket
The name of the bucket to write data to.
Event Partitioning
Stores each event to a separate folder. Each event will have its own folder named after the event’s name.
Real-time
Uploads files as frequently as once per second for real-time processing.
Flush Interval (minutes)
The interval, in minutes, at which the file is uploaded or finalized in S3.
Max number of rows per Parquet Row Group
This setting specifies the maximum number of rows allowed in each Parquet row group.
Real-time and Flush Interval fields work as alternatives to each other. If you select the Real-time option, Flush Interval will automatically be disabled because the Real-time setting sets the internal time to 1 seconds.
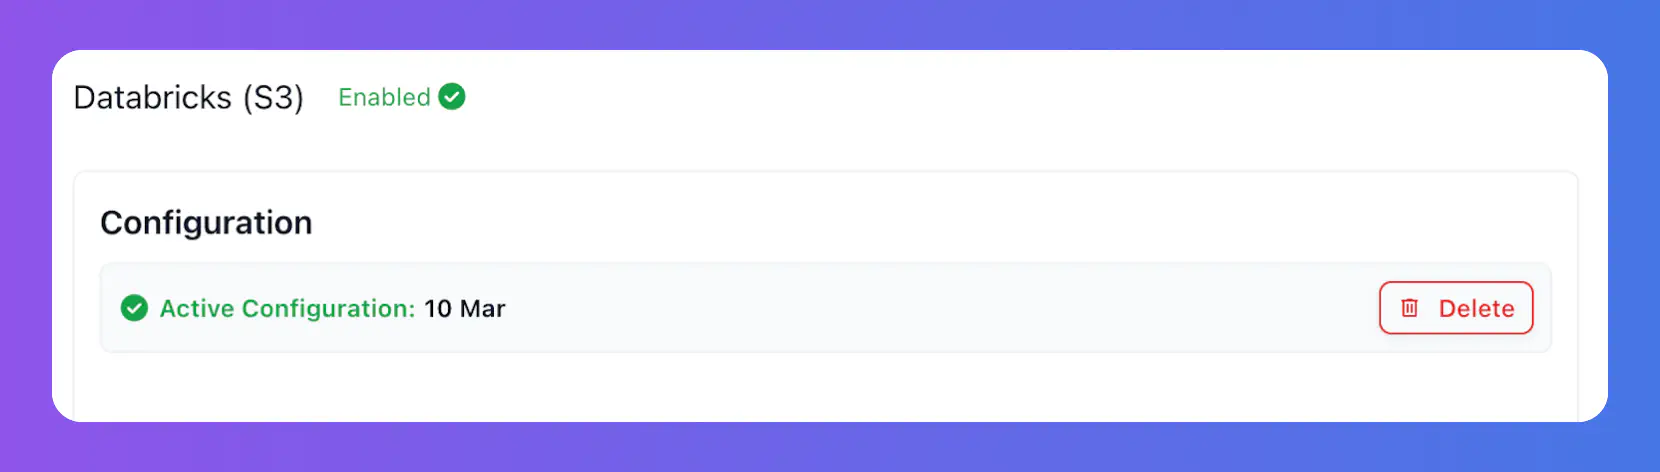
When you save your integration setup, your configuration will be tested by inserting a dummy file in S3, which will then be removed immediately after. You will see that your connection is working with information on your Databricks section as shown in the following screenshot
Active Databricks Integration
At this point you will start receiving Satori events exported to your AWS bucket in Parquet files.
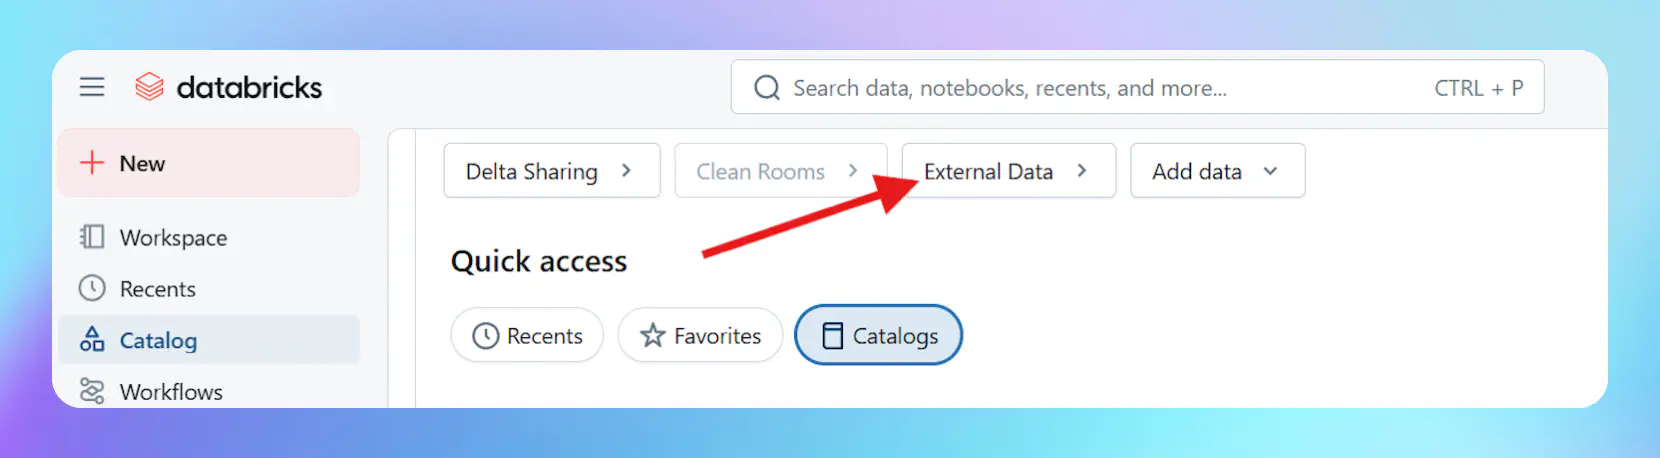
In order to be able to receive the Satori events, a Satori nonhuman account needs to be granted put access to the AWS S3 bucket. At this point, you can create an External Data connection in Databricks.
Databricks External Data Connection
Once the External Data connection is created, you should see the Satori events start showing up in Databricks immediately. Refresh the page again to see more continue to show up.
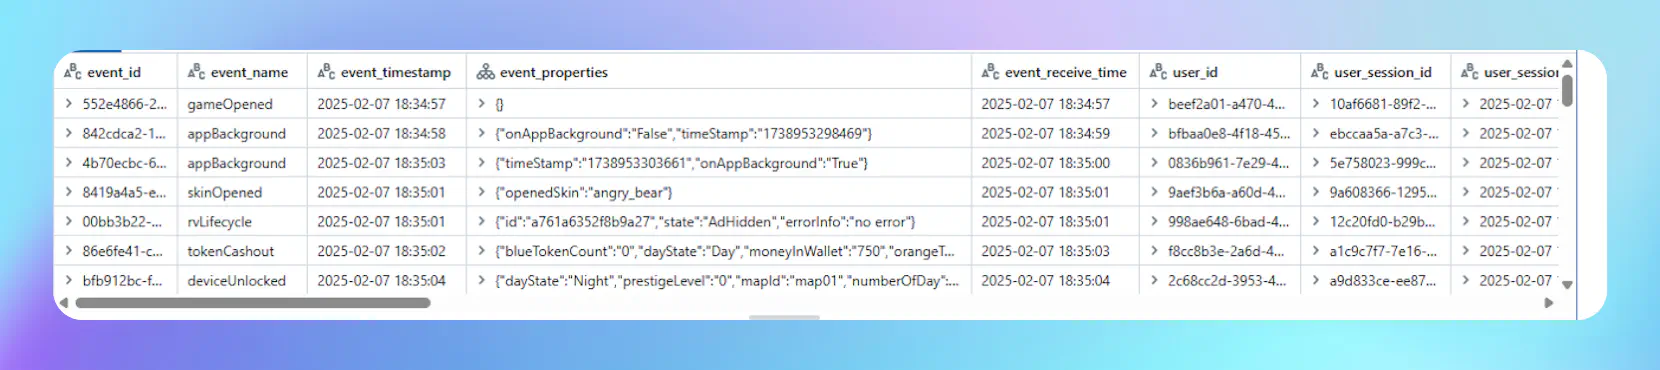
Using Spark and StructField() you can define the schema of the fields present in the events. Then, using Databricks Autoloader, you can create the streaming DataFrame that will be processed, set any processing and transformation steps (such as mapping specific fields to a DataFrame column or dropping a field altogether if it is not useful), and write the stream to the Delta table.
As an example, subschemas can be separately defined, later to be added to the overall schema object.
As part of the cleaning process, malformed events that don’t have an event timestamp or don’t conform to an expected schema should be excluded from the ML pipeline.
Using Spark, malformed events can be flagged and sent to a separate table for further review, or excluded from the processing pipeline altogether using the code snippet below. Below are some examples:
 1
 2
 3
 4
 5
 6
 7
 8
 9
10
11
12
13
14
15
16
File_path={locationoffiles}streaming_df=(spark.readStream.format("cloudFiles")# for autoloader….option("ignoreCorruptFiles","true")# ignore corrupt files.schema(schema)# apply schema.load(file_path))processed_df=(Streaming_df….filter(F.col('event_timestamp')<=F.current_timestamp())# exclude “future” events that may be malformed because they do not conform to expectations)
For the purposes of the demo pipeline, a “churned player” is considered as someone that has not played the game for a predetermined number of consecutive days. Further testing would be needed to refine this criteria. Players can be also grouped into cohorts by geo-location, audience, and sign-up date for more granular and detailed predictions.
Once we have completed the prediction for any player in Satori, we can write this value back to Satori to use it in our Live Operations.
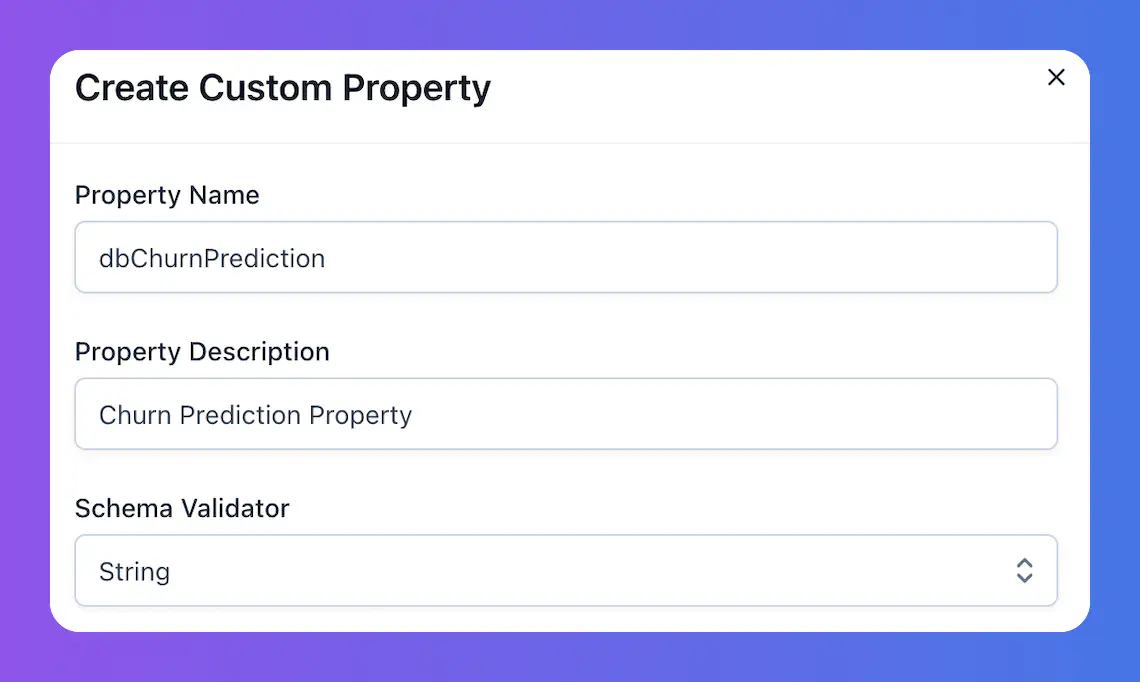
First, we need to create a custom property. Open Properties tab under the Taxonomy page. This page lists the custom and default property definitions. Click the Create New Custom Property button on the top right and fill the form. In this example, let’s assume that we have a churn prediction and create a property named dbChurnPrediction.
Custom Property Definition in Taxonomy
We are now ready to update the player identities. Satori has a wide range of APIs that can help you to read and write data to Satori using Console API. In this guide, we will use the POST/v1/console/identity/{id} endpoint to update an identity. We will replace {id} with a real player identity id in Satori and send the following request body to update our custom property.
packagemainimport("bytes""encoding/json""fmt""net/http""os")funcmain(){// Base API endpoint for identity-related operations in Satori
baseURL:="https://your-game-satori-url.io/v1/console/identity"// Replace with your actual values
// Unique identifier representing a specific game identity
identityID:="20421bc3-e1ea-4c52-ad99-6e7dbf0c502a"// Server key used for authentication (must be kept secure)
serverKey:="69c8aeba-e76f-4afe-b7a9-31aec885ec70"// Replace with your actual values
// Construct the complete request URL by appending the identity ID
url:=fmt.Sprintf("%s/%s",baseURL,identityID)// Define the request payload in JSON format
// This updates a custom property (`dbChurnPrediction`) under the `properties` field
requestBody:=map[string]interface{}{"properties":map[string]interface{}{"custom":map[string]string{"dbChurnPrediction":"PredictionResult",},},}// Convert the request payload into JSON format
jsonData,err:=json.Marshal(requestBody)iferr!=nil{fmt.Println("Error marshalling JSON:",err)os.Exit(1)}// Create a new HTTP POST request with the JSON payload
req,err:=http.NewRequest("POST",url,bytes.NewBuffer(jsonData))iferr!=nil{fmt.Println("Error creating request:",err)os.Exit(1)}// Set request headers:
// - `Content-Type`: Specifies that the request body is in JSON format
// - `Authorization`: Uses Basic Authentication with the server key
req.Header.Set("Content-Type","application/json")req.Header.Set("Authorization","Basic "+serverKey)// Initialize an HTTP client to send the request
client:=&http.Client{}resp,err:=client.Do(req)iferr!=nil{fmt.Println("Error making request:",err)os.Exit(1)}deferresp.Body.Close()// Ensure response body is closed after reading
// Print the HTTP response status (e.g., 200 OK, 400 Bad Request)
fmt.Println("Response Status:",resp.Status)}
importfetchfrom'node-fetch';asyncfunctionsendRequest() {// Base API endpoint for identity-related operations in Satori
constbaseURL="https://your-game-satori-url.io/v1/console/identity";// Replace with your actual values
// Unique identifier representing a specific game identity
constidentityID="20421bc3-e1ea-4c52-ad99-6e7dbf0c502a";// Server key used for authentication (must be kept secure)
constserverKey="69c8aeba-e76f-4afe-b7a9-31aec885ec70";// Replace with your actual values
// Construct the complete request URL by appending the identity ID
consturl=`${baseURL}/${identityID}`;// Define the request payload in JSON format
// This updates a custom property (`dbChurnPrediction`) under the `properties` field
constrequestBody={properties:{custom:{dbChurnPrediction:"PredictionResult"}}};try{// Make the HTTP POST request with the JSON payload
constresponse=awaitfetch(url,{method:"POST",headers:{"Content-Type":"application/json","Authorization":`Basic ${serverKey}`},body: JSON.stringify(requestBody)});// Print the HTTP response status (e.g., 200 OK, 400 Bad Request)
console.log("Response Status:",response.status);// Optionally, read the response body as JSON
constresponseData=awaitresponse.json();console.log("Response Data:",responseData);}catch(error){console.error("Error making request:",error);}}// Execute the function
sendRequest();
localhttp=require("socket.http")localltn12=require("ltn12")localjson=require("dkjson")-- Requires dkjson library for JSON encoding/decoding-- Base API endpoint for identity-related operations in SatorilocalbaseURL="https://your-game-satori-url.io/v1/console/identity"-- Replace with your actual values-- Unique identifier representing a specific game identitylocalidentityID="20421bc3-e1ea-4c52-ad99-6e7dbf0c502a"-- Server key used for authentication (must be kept secure)localserverKey="69c8aeba-e76f-4afe-b7a9-31aec885ec70"-- Replace with your actual values-- Construct the complete request URL by appending the identity IDlocalurl=baseURL.."/"..identityID-- Define the request payload in JSON format-- This updates a custom property (`dbChurnPrediction`) under the `properties` fieldlocalrequestBody={properties={custom={dbChurnPrediction="PredictionResult"}}}-- Convert the request payload into JSON formatlocalrequestBodyJson=json.encode(requestBody)-- Prepare the HTTP request headerslocalheaders={["Content-Type"]="application/json",["Authorization"]="Basic "..serverKey,["Content-Length"]=tostring(#requestBodyJson)}-- Response storagelocalresponseBody={}-- Make the HTTP POST requestlocalresponse,status,responseHeaders=http.request{url=url,method="POST",headers=headers,source=ltn12.source.string(requestBodyJson),sink=ltn12.sink.table(responseBody)}-- Print the HTTP response status (e.g., 200 OK, 400 Bad Request)print("Response Status:",status)-- Optionally, decode and print the response data if it is JSONifresponseBodyand#responseBody>0thenlocalresponseJson,pos,err=json.decode(table.concat(responseBody))ifresponseJsonthenprint("Response Data:",json.encode(responseJson,{indent=true}))elseprint("Error decoding JSON response:",err)endend
importrequestsimportjson# Base API endpoint for identity-related operations in Satoribase_url="https://your-game-satori-url.io/v1/console/identity"# Replace with your actual values# Unique identifier representing a specific game identityidentity_id="20421bc3-e1ea-4c52-ad99-6e7dbf0c502a"# Server key used for authentication (must be kept secure)server_key="69c8aeba-e76f-4afe-b7a9-31aec885ec70"# Replace with your actual values# Construct the complete request URL by appending the identity IDurl=f"{base_url}/{identity_id}"# Define the request payload in JSON format# This updates a custom property (`dbChurnPrediction`) under the `properties` fieldrequest_body={"properties":{"custom":{"dbChurnPrediction":"PredictionResult"}}}try:# Make the HTTP POST request with the JSON payloadresponse=requests.post(url,headers={"Content-Type":"application/json","Authorization":f"Basic {server_key}"},json=request_body)# Print the HTTP response status (e.g., 200 OK, 400 Bad Request)print("Response Status:",response.status_code)# Optionally, print the response JSON if availableifresponse.content:try:response_data=response.json()print("Response Data:",json.dumps(response_data,indent=4))exceptjson.JSONDecodeError:print("Response is not in JSON format:",response.text)exceptrequests.RequestExceptionase:print("Error making request:",e)
For authentication, you can use basic authentication with your server key as the username. You can find your key in the Server Keys tab of the Settings page. Feel free to create a new one if you want but please note that you will need to give Write permission to Identities for your server to update an identity.
In the previous section, we have enriched our player identities with Churn Prediction information. Now let’s use it in action to improve our game and work on two examples together:
Modify a feature flag to show a different set of ads for high churn predicted players to reduce the churn.
Create an experiment with different economy definitions for low churn predicted players to improve their LTV.
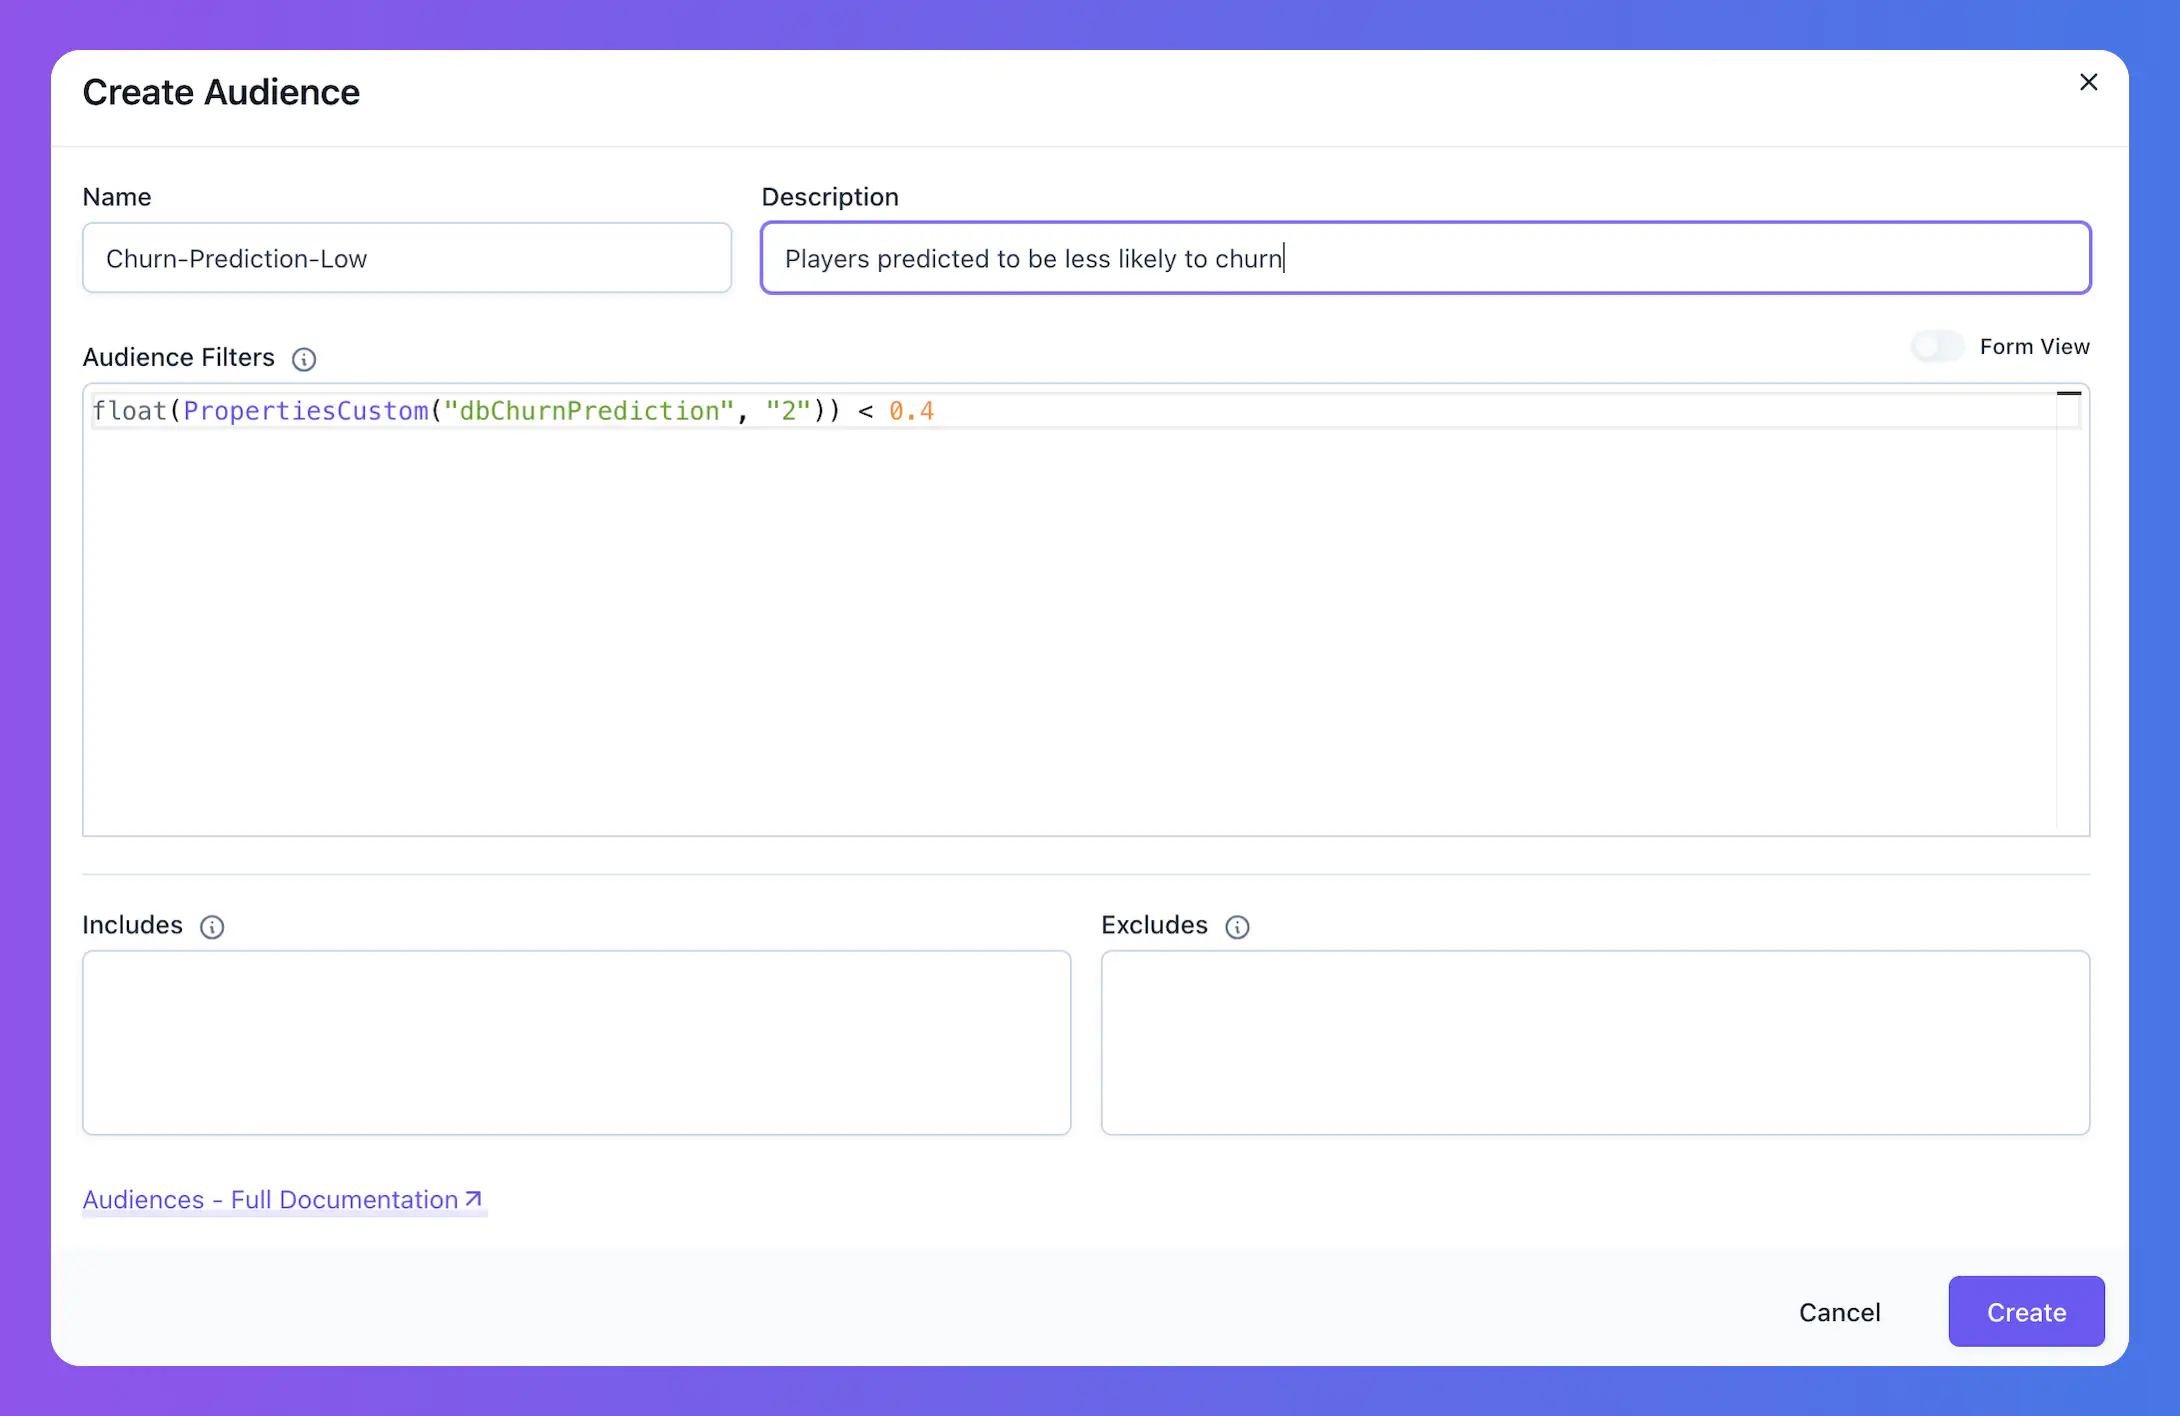
We will start with creating some audiences. Satori has very capable filter rules to create audiences. Those filters even let us cast types such as converting strings to floats. For instance, in this example, we created the dbChurnPrediction property as a string property. However when we check our identities, we can easily understand that they are float. Following audience filter will cast our property to a float and compare if it is below 0.4.
We can use this filter to create our Churn-Prediction-Low audience which has players with lower churn prediction as shown below.
New Audience: Low Churn Prediction
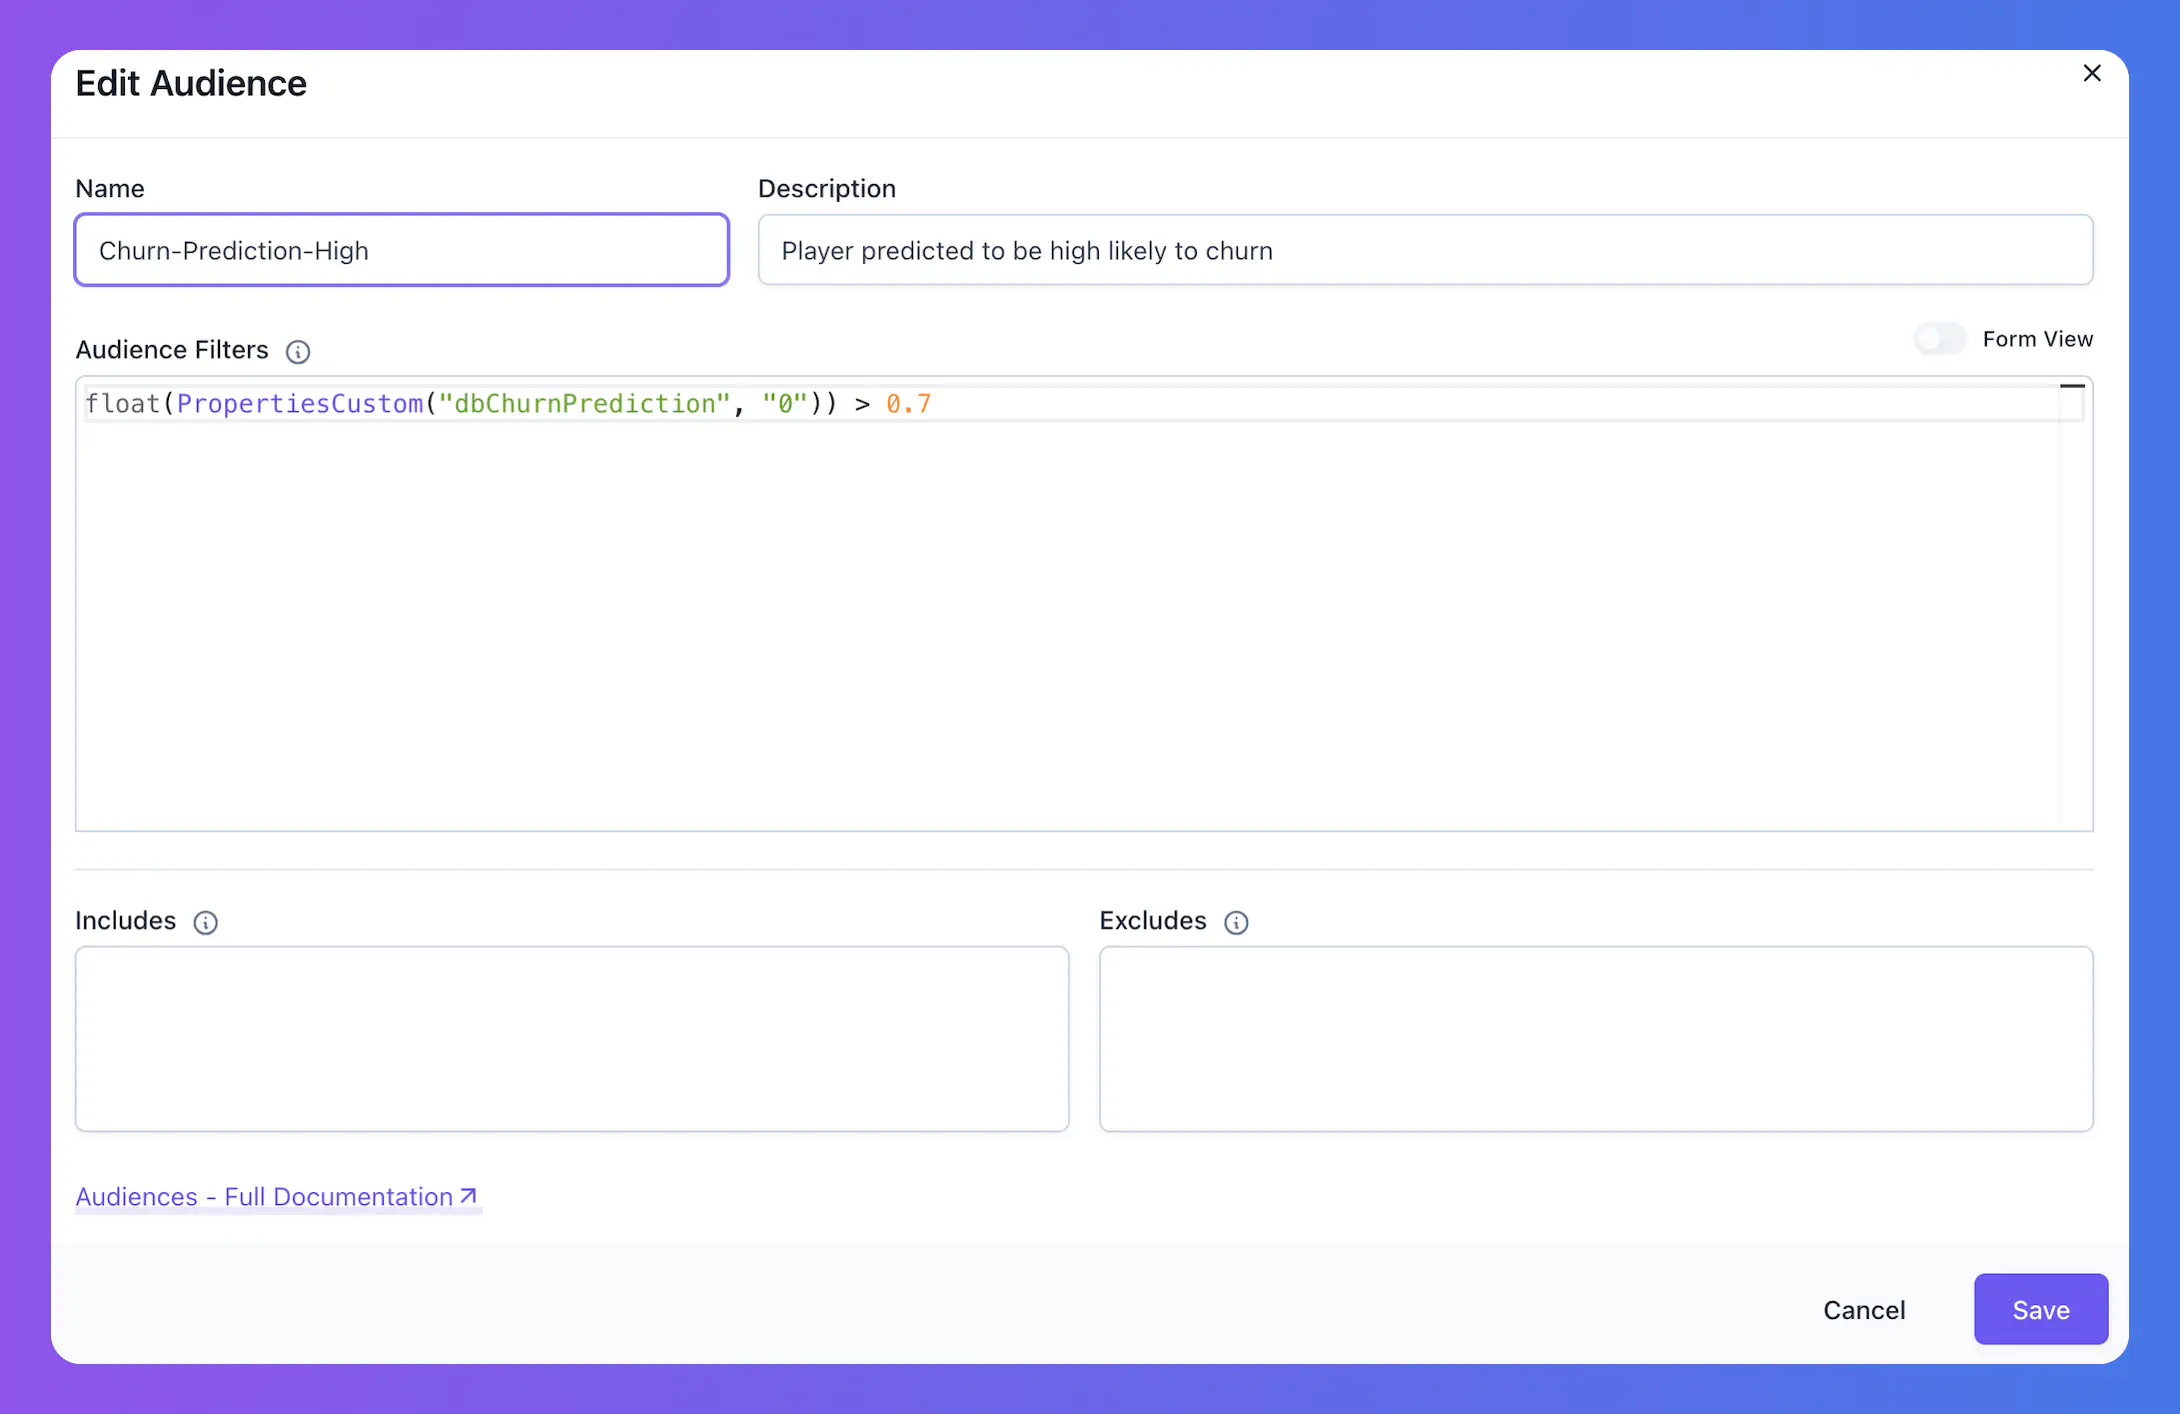
Using a similar filter, we also created a Churn-Prediction-High audience to see the player predicted to be 70% or higher likely to churn.
New Audience: High Churn Prediction
Different Ad Frequency for High Churn Predicted Players
#
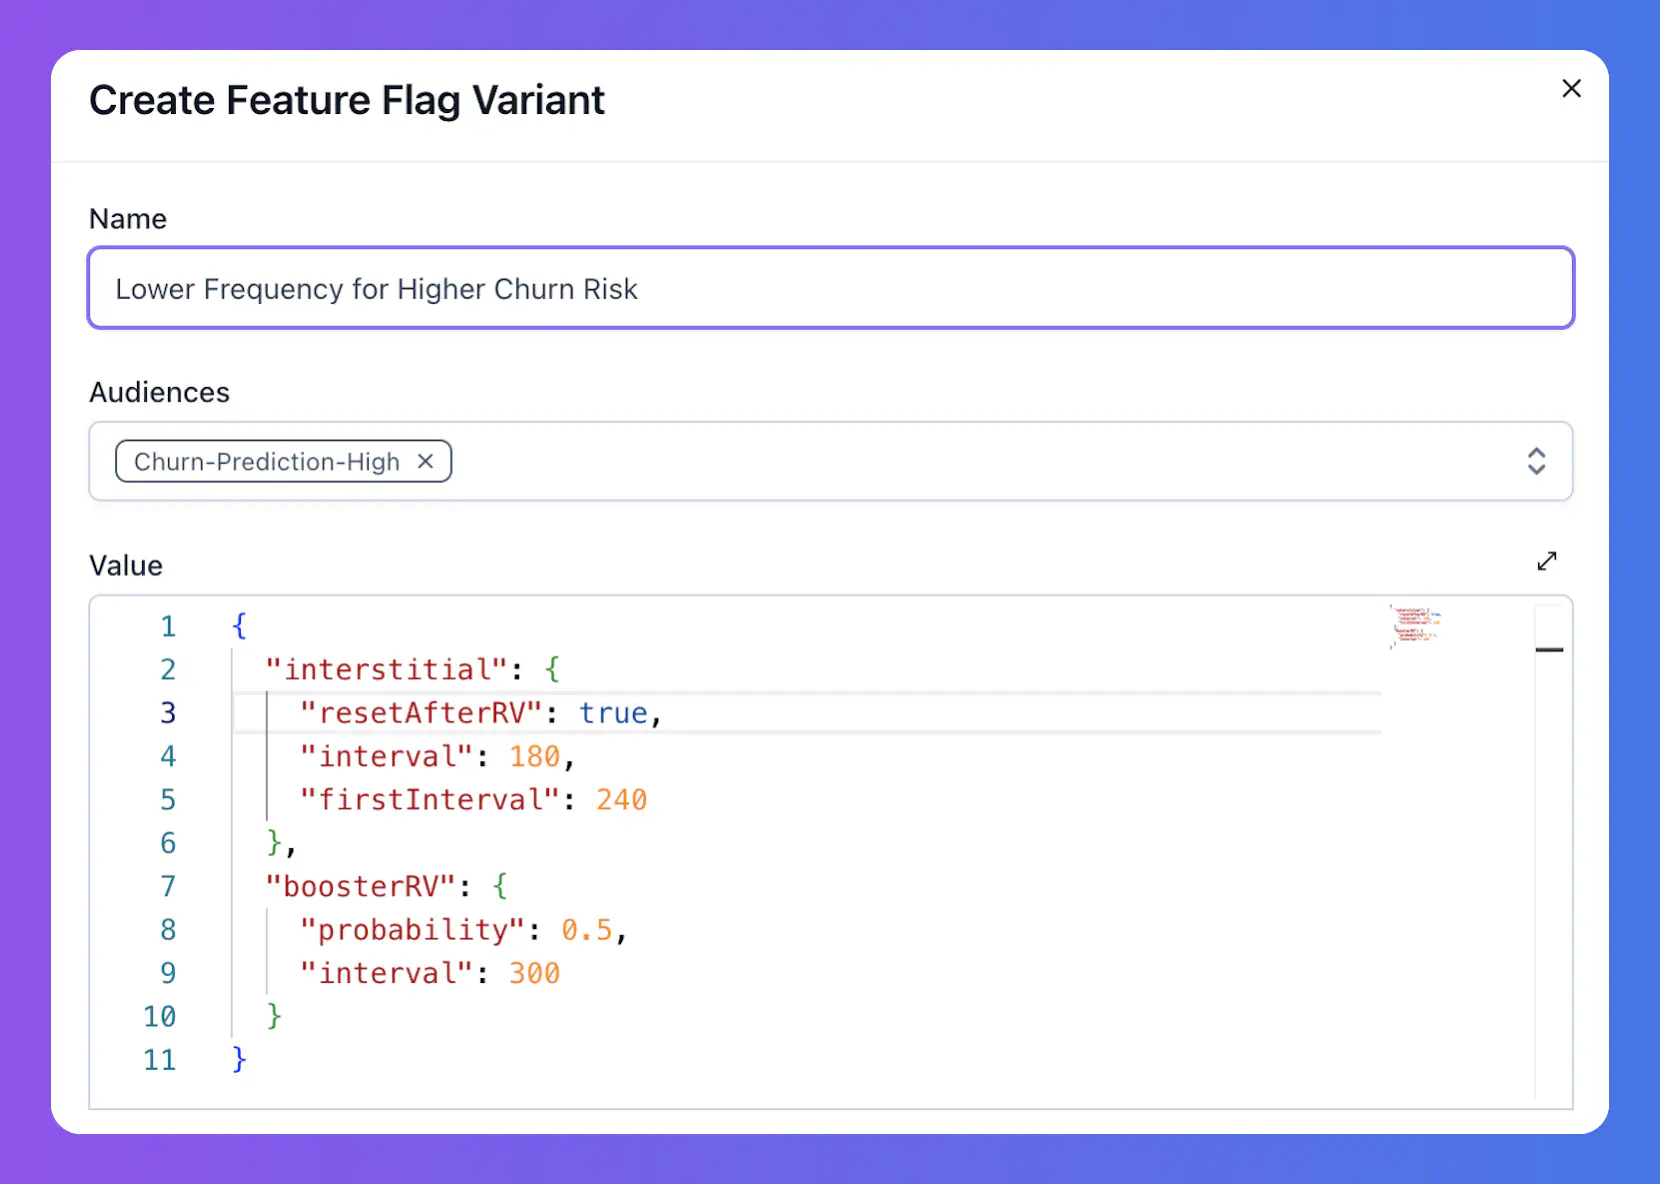
From our previous experience in a same-genre game, we know that players are less likely to churn and more likely to attach to the game if they see less interstitial ads and are offered more boosters for an easier progress. Our game has a feature flag defined in Satori to manage the frequency of interstitial and rewarded video ads shown to the players. Default configuration of this feature flag is:
Using Feature Flag Variants, only for Churn-Prediction-High audience, we can change this configuration to make the game less interrupting and easy to progress by increasing the interstitial interval and booster probability as shown in the following screenshot from Audiences.
New Feature Flag Variant
As Heroic Labs, we strongly recommend to always keep an eye on the important metrics via Satori’s dashboards and metrics or via your own dashboard you can create using Satori’s data lake exports when you make any changes on the system. And especially for the changes you are not sure about their effect on your game, we always recommend experimenting with them first.
Experiment on Economy Definitions for Low Churn Predicted Players
#
For our next example, the game designers shared their hypothesis with us. They think that those players who are less likely to churn are more likely to spend their hard currencies if they find better deals. They also added in their hypothesis that this will result in more currency sinking and more revenue generation.
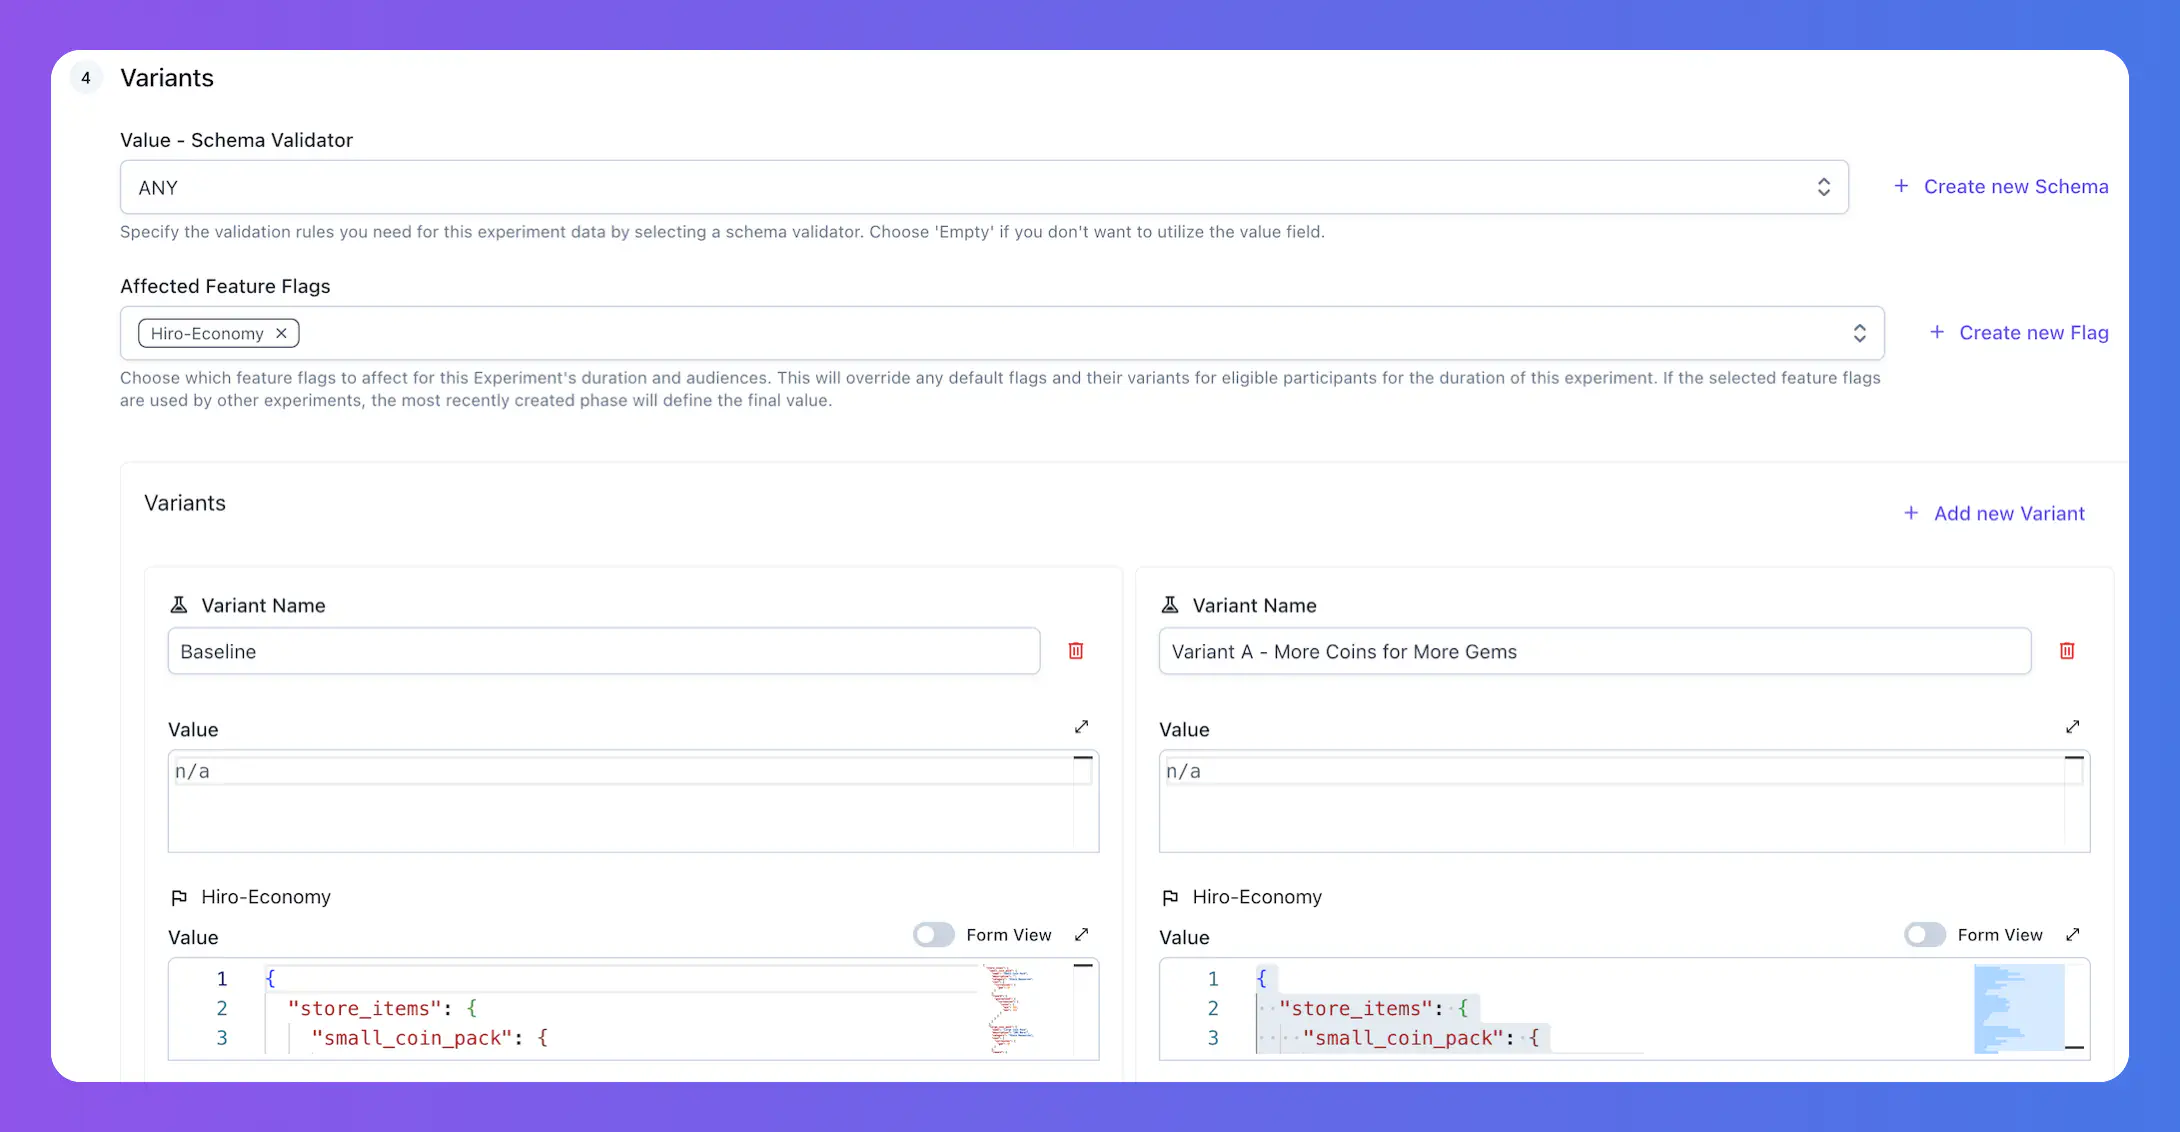
To test this hypothesis, we will set up a new experiment. In this experiment, we will use the Hiro-Economy feature flag because our game is using Hiro for an easier and more structured way of metagame implementation.
As its default configuration, this feature flag provides two packs:
Spend 30 gems to get 300 coins
Spend 50 gems to get 600 coins
With our experiment we want to make those two packs modified as:
Spend 40 gems to get 400 coins
Spend 80 gems to get 1000 coins
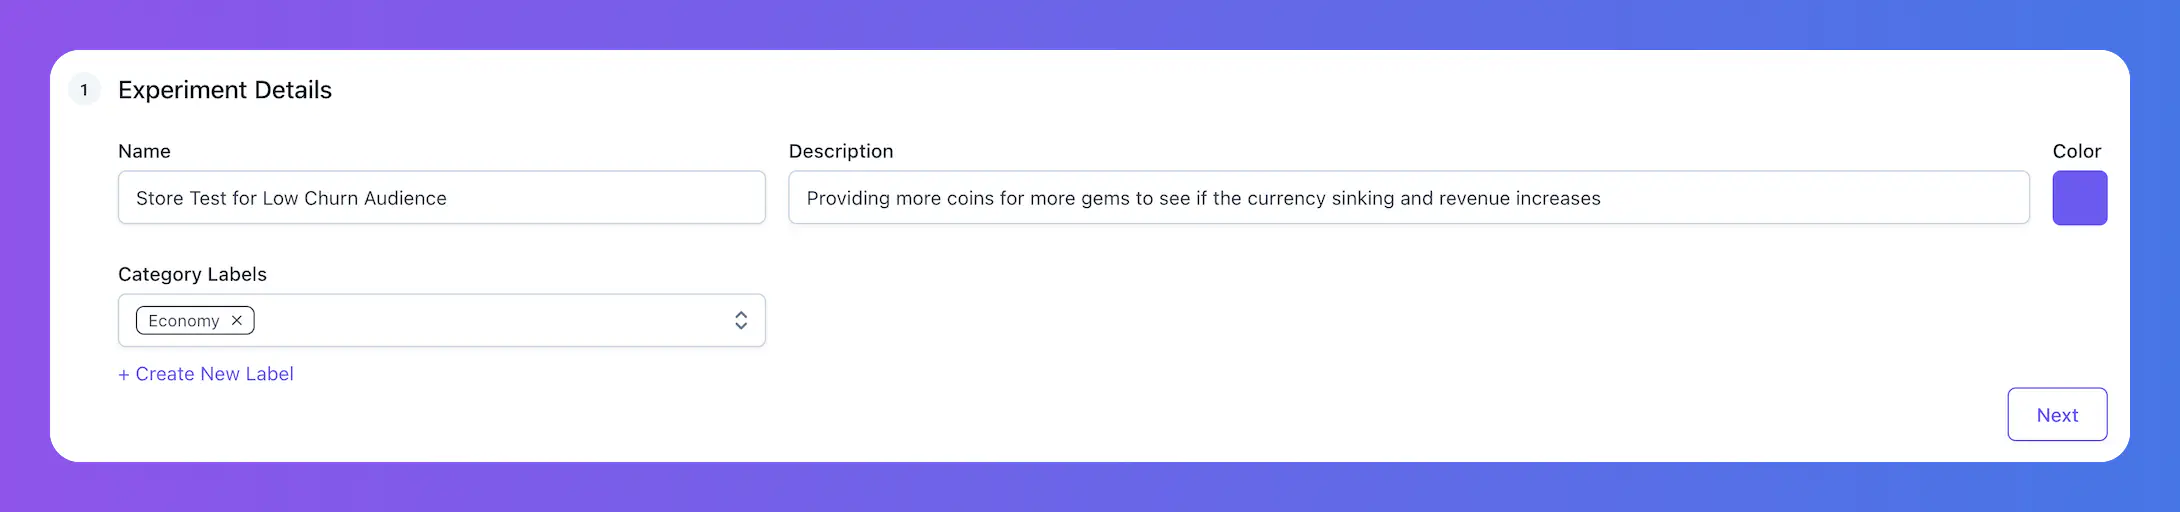
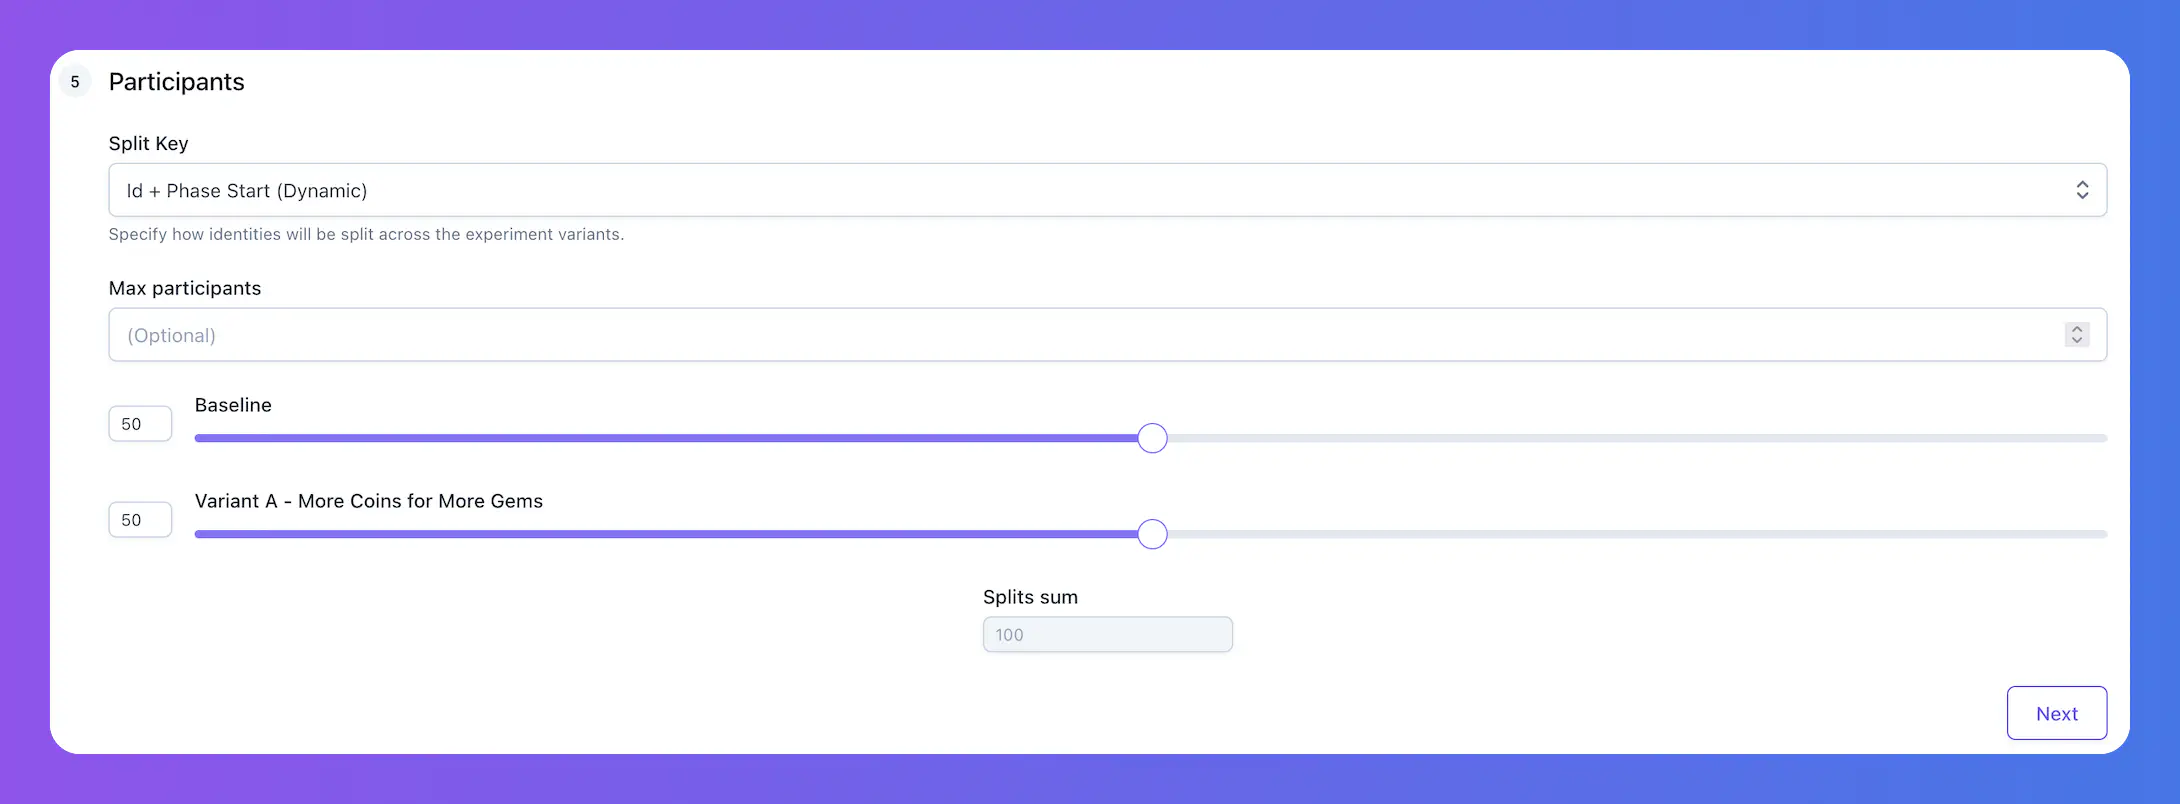
Now let’s set our experiment up. We will first enter the experiment details.
New Experiment: Details
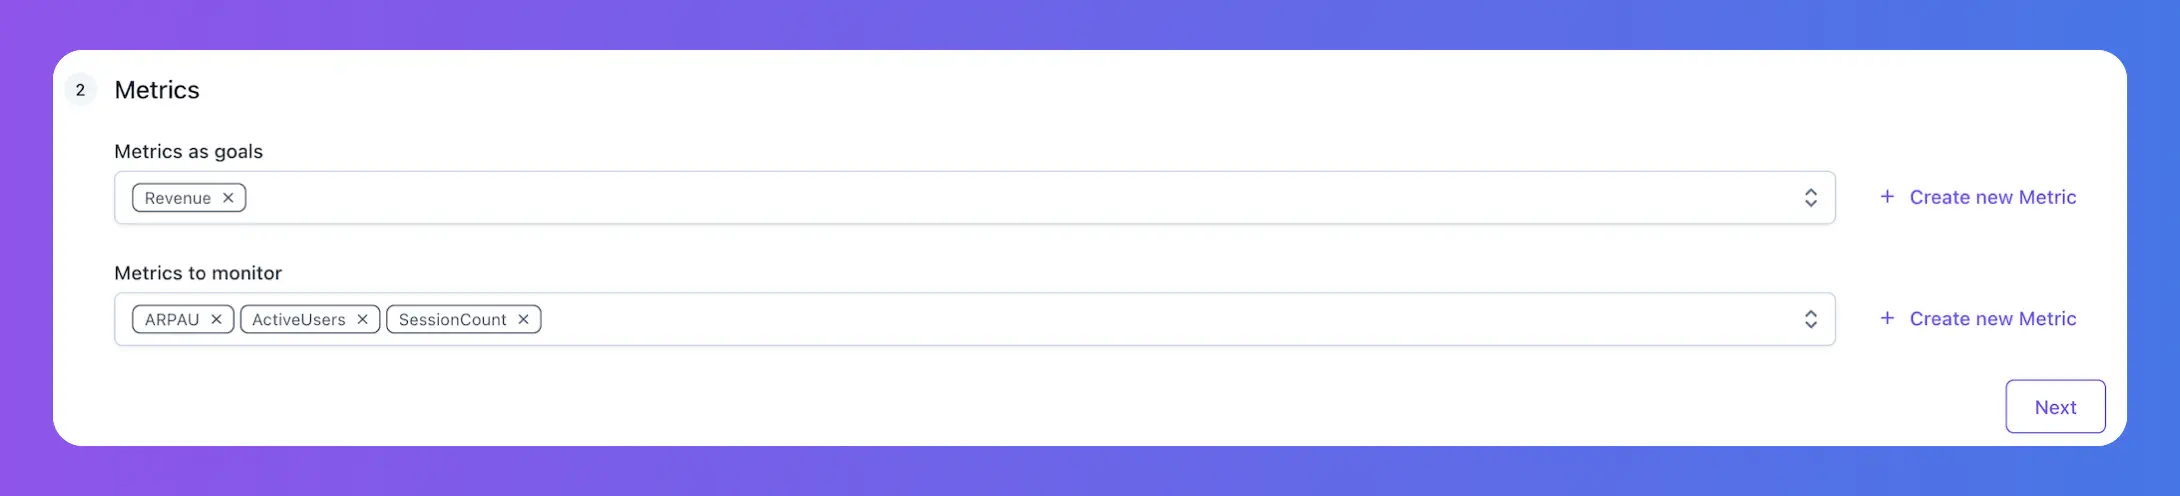
Next, we will select the metrics we want to follow. For this experiment, our goal metric will be revenue because our hypothesis is aiming for more revenue. And we will also check for some other metrics to monitor.
New Experiment: Metrics
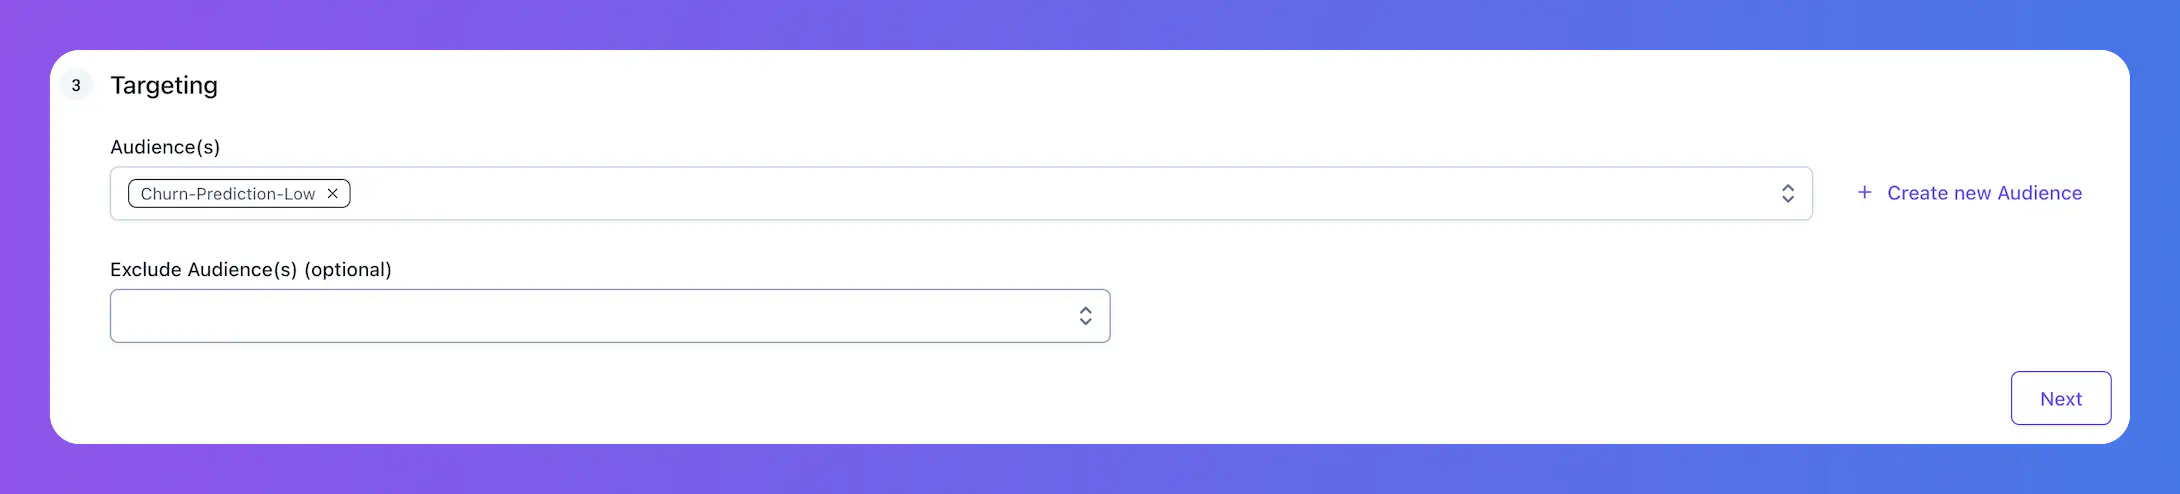
After metrics, we will select our target audience: Churn-Probability-Low
New Experiment: Audience
For this experiment, we will have two variants. One is baseline which is unchanged, the other one is Variant A - the new store configuration we want to test.