
How to win back churned players with a targeted offer
In this guide, you build a campaign that finds players who reached a meaningful point in your game and then stopped playing, and offers them a reward to return.
What Satori does and what your game does #
Satori is the remote configuration and targeting layer for your game. It determines which players qualify for an offer and what that offer contains.
- Satori handles the player data you send it, audience membership, the live event schedule and its JSON payload, and the metrics that report engagement.
- Your game handles the source of truth for player state, how the offer looks, your item catalog and currencies, and granting the reward.
You don’t need any other Heroic Labs product, and Satori makes no assumptions about your game server or your engine.
In this guide #
You’ll start with the configuration in the Satori Console. Then you’ll connect your game so it sends player data to Satori and fetches the offer back, and finish by testing, launching, and measuring the campaign.
| Part | What you do | Where |
|---|---|---|
| One | Plan the campaign | Satori Console |
| Two | Tell Satori what your game will send | Satori Console |
| Three | Build the campaign | Satori Console |
| Four | Connect your game | Your client or server |
| Five | Test, launch, and measure | Satori Console |
Plan the campaign #
Decide when the campaign runs and what data it depends on, before you configure anything.
Pick a window that avoids event overlap #
Use the Timeline view to find the right window for your campaign. It shows all active and scheduled events in a consolidated calendar, for up to a four-week span, so you can check for overlap before you commit to dates.
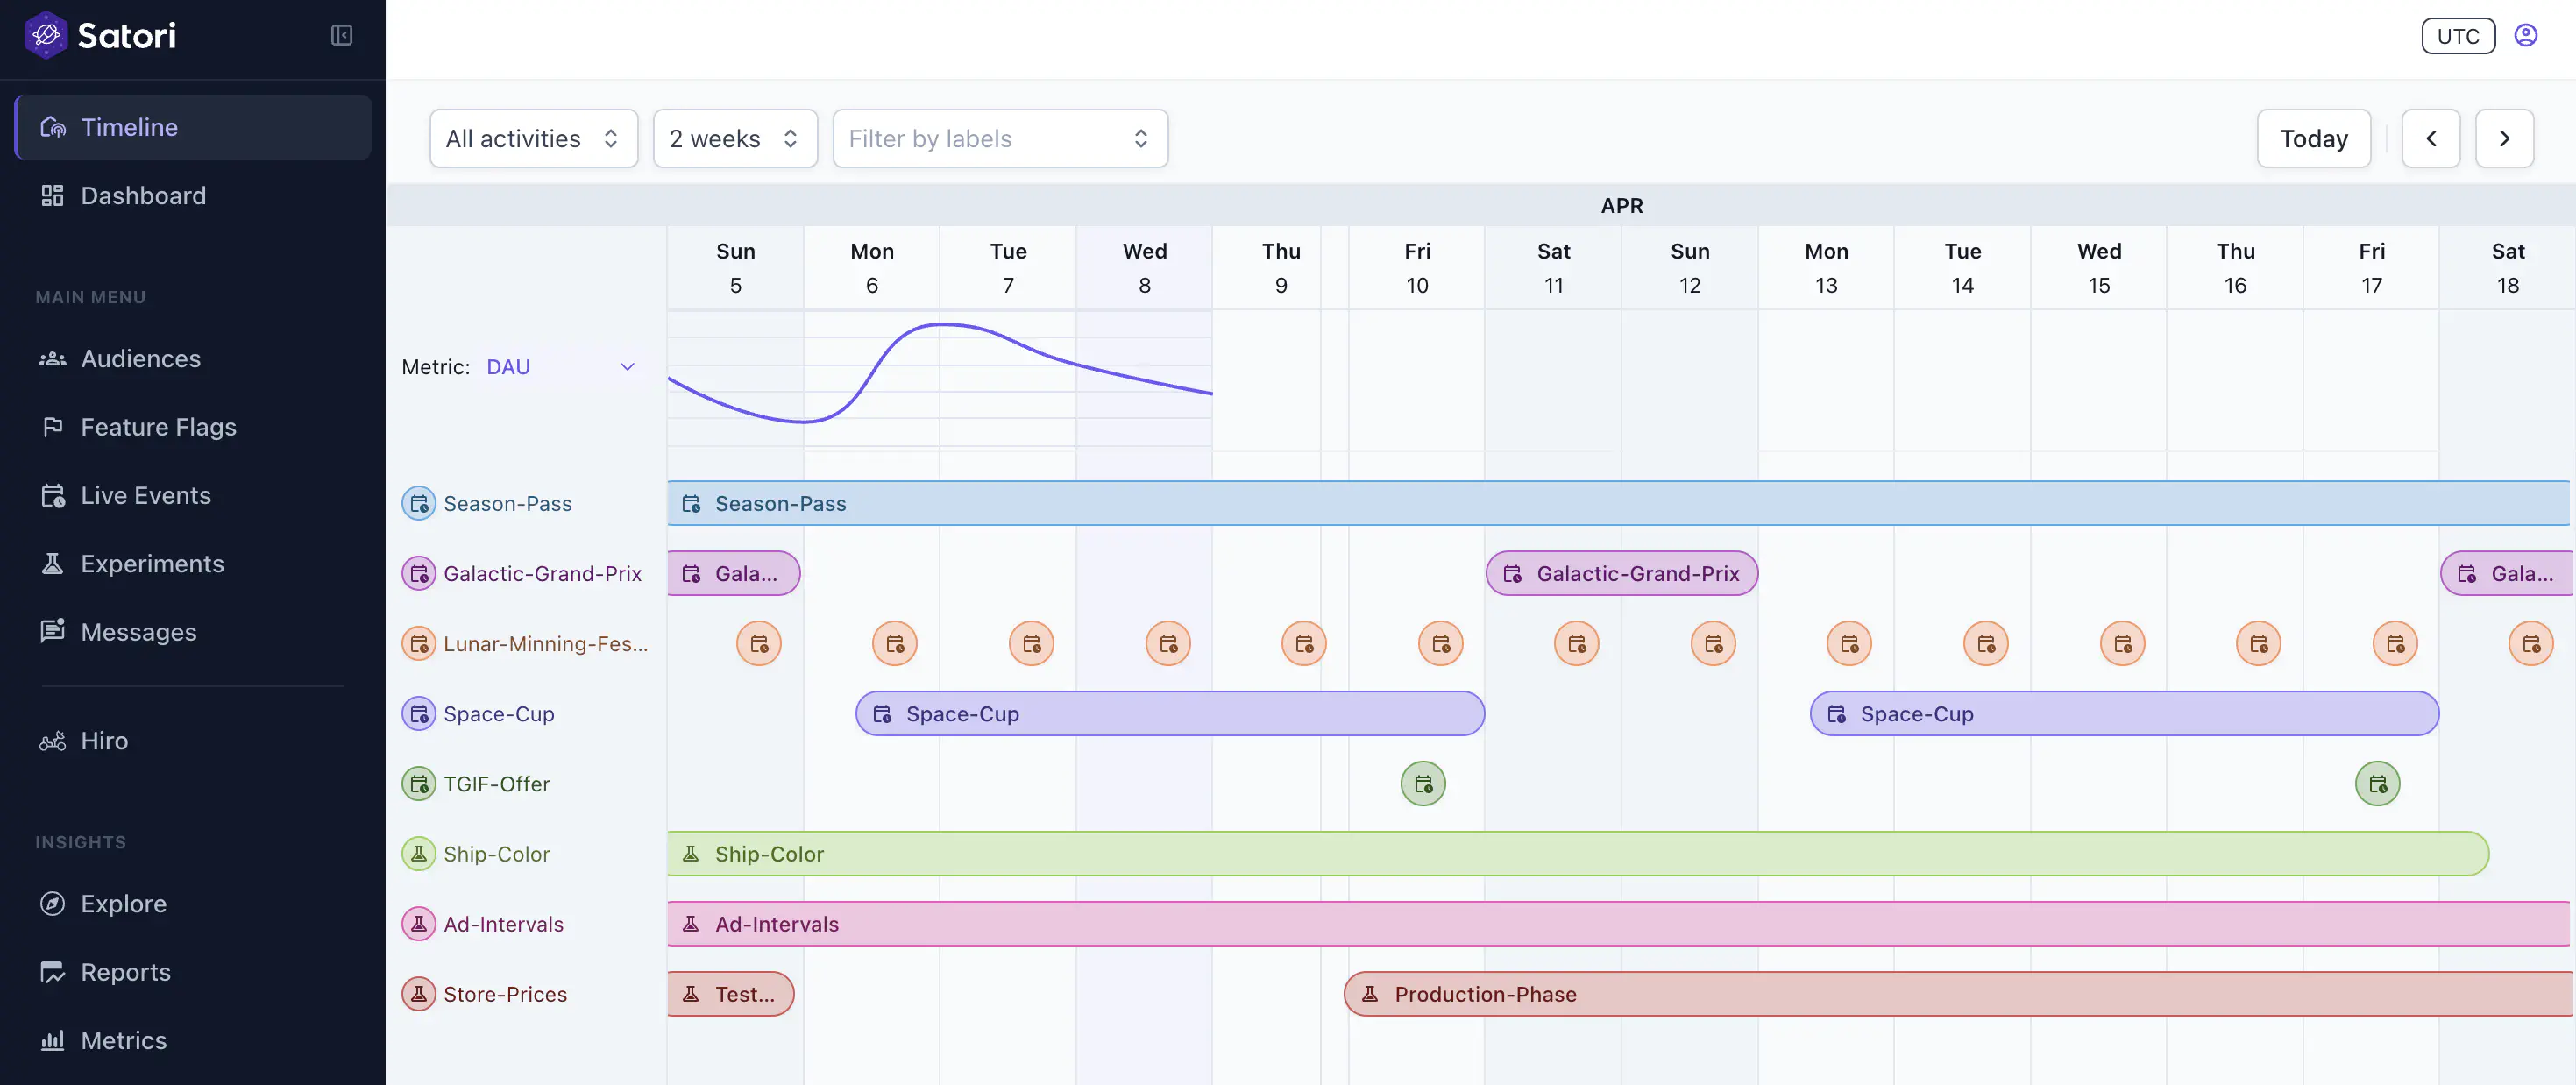
Assign category labels while you plan, to group related events. Labels apply across live events, feature flags, and player messages, which gives you a consistent way to filter the calendar by campaign or season.
For the full operational picture, see Manage live events.
Tell Satori what your game will send #
Satori can only target players it has data about. This campaign runs on two analytic events, levelCompleted and playerReturned, both custom events you define here. Your game sends both. Every event Satori receives also produces computed properties, and you use those to build the player segments you target.
Define the level progression event #
levelCompleted reports player progression. Follow these steps to define it in Satori:
- Navigate to the Taxonomy -> Events screen.
- Click the Create New Event button.
- For Event Name enter:
levelCompleted. - For Value set
Number, and for Metadata setObject.
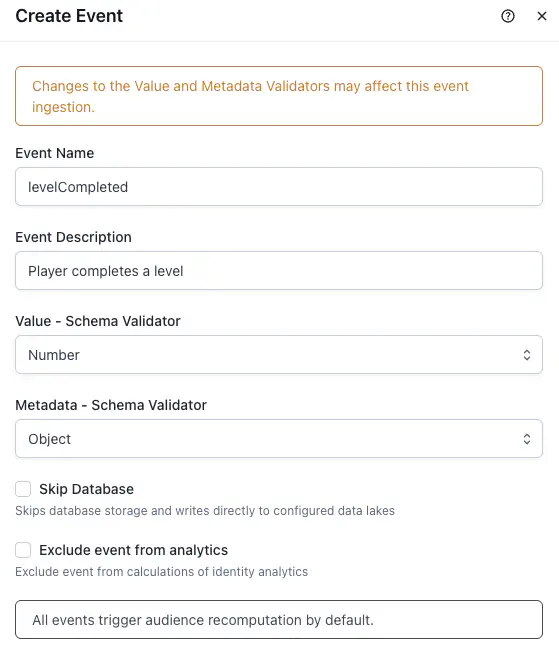
Your game sends this event in Report each level a player completes. Satori derives the levelCompletedValueHigh computed property from it, which you target on in the next step.
Define the return event #
playerReturned signals that a player has come back. Follow these steps to define it in Satori:
- Navigate to the Taxonomy -> Events screen.
- Click the Create New Event button.
- For Event Name enter:
playerReturned. - For Value set
Number, and for Metadata setObject.
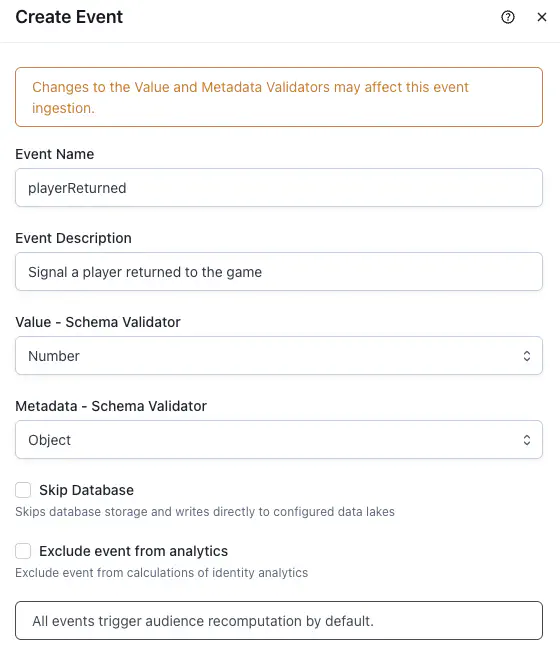
Your game sends this event in Report when a player comes back. The name you enter here is reused twice: the metric in Decide how you’ll measure success counts how many times the event fires, and every event Satori receives also produces computed properties you can target on later.
Build the campaign #
The following steps define who you target, what they receive, and how you measure the result. You can change any of the configurations after the campaign goes live.
Describe the players you want to win back #
In Satori, a segment of players is called an audience. In this step, define your target players for the campaign by filtering for the relevant player properties.
- Navigate to the Audiences screen.
- Click Create New Audience.
- For Audience Name enter
ChurnedProgressedPlayersand give it an appropriate description. - Click Create.
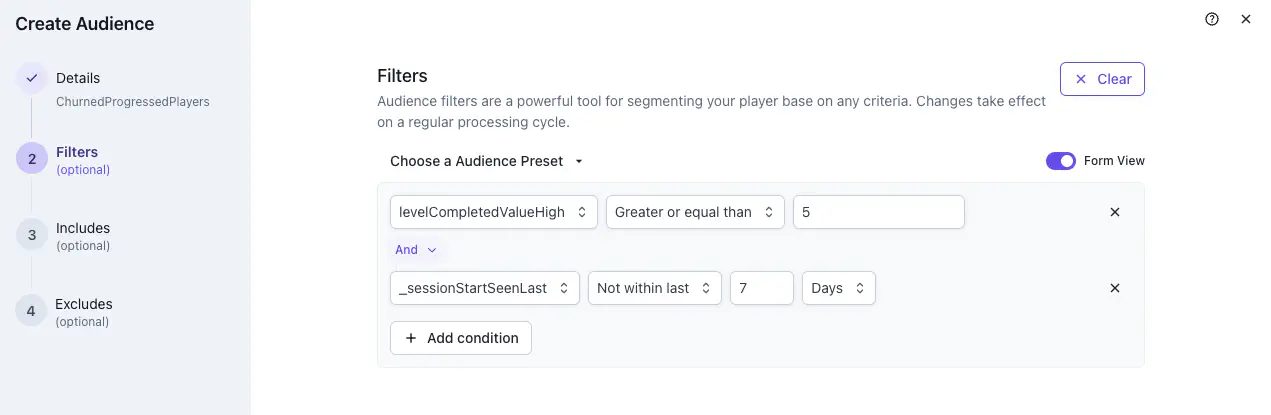
- On the next screen, enter the appropriate filter. This filter checks that the player’s
levelCompletedValueHighcomputed property is 5 or higher and that they haven’t been seen within the last 7 days.
Here we’re making use of Satori’s computed properties. Satori computes levelCompletedValueHigh from the levelCompleted event you defined earlier. _sessionStartSeenLast comes from _sessionStart event: Satori emits a _sessionStart event every time an authentication creates a session, and every event automatically produces a SeenLast computed property. So _sessionStartSeenLast the timestamp of the player’s most recent session.
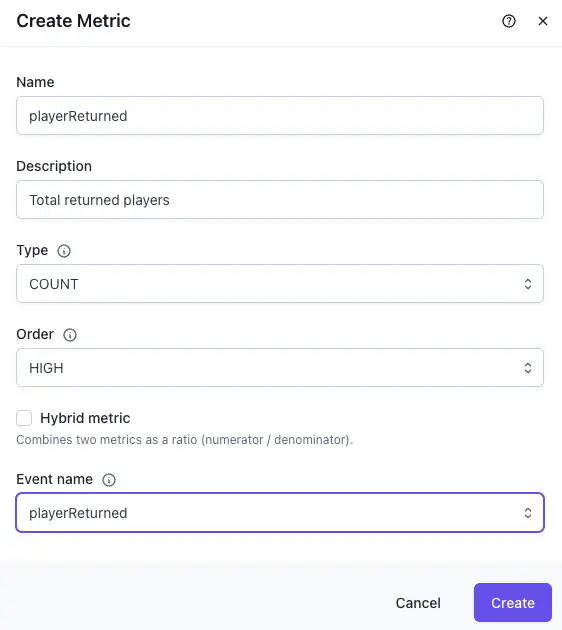
Decide how you’ll measure success #
This metric counts how many players returned to the game, which is how you tell whether the campaign worked. Your game sends the playerReturned analytic event when a player logs back in, and the metric tallies each one. The run reports in Launch, then tune while it runs read those totals.
- Navigate to the Metrics screen.
- Click Create New Metric.
- For Name enter the name of the event from Define the analytic event:
playerReturned. - For Type change it to
Count. - For Order leave it as
High.
Build the offer and schedule it #
You deliver the offer as a live event: a time-bound player experience that carries remote configuration to the players you target. The same mechanism covers holiday one-offs, repeating season passes, and promotional bundles, so the pattern in this step transfers to most campaigns you run later.
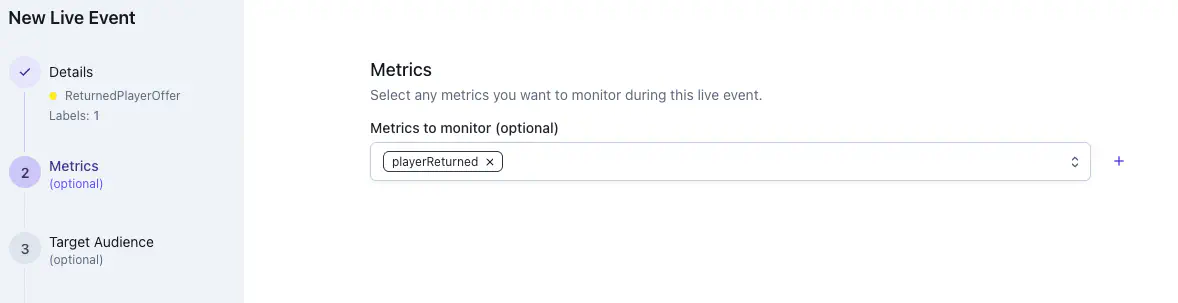
On the Live Events screen, click Create Live Event. The wizard walks you through six stages in this order.
- Details. For Name enter
ReturnedPlayerOfferand give it a Description. - Metrics. For Metrics to monitor select the
playerReturnedmetric.
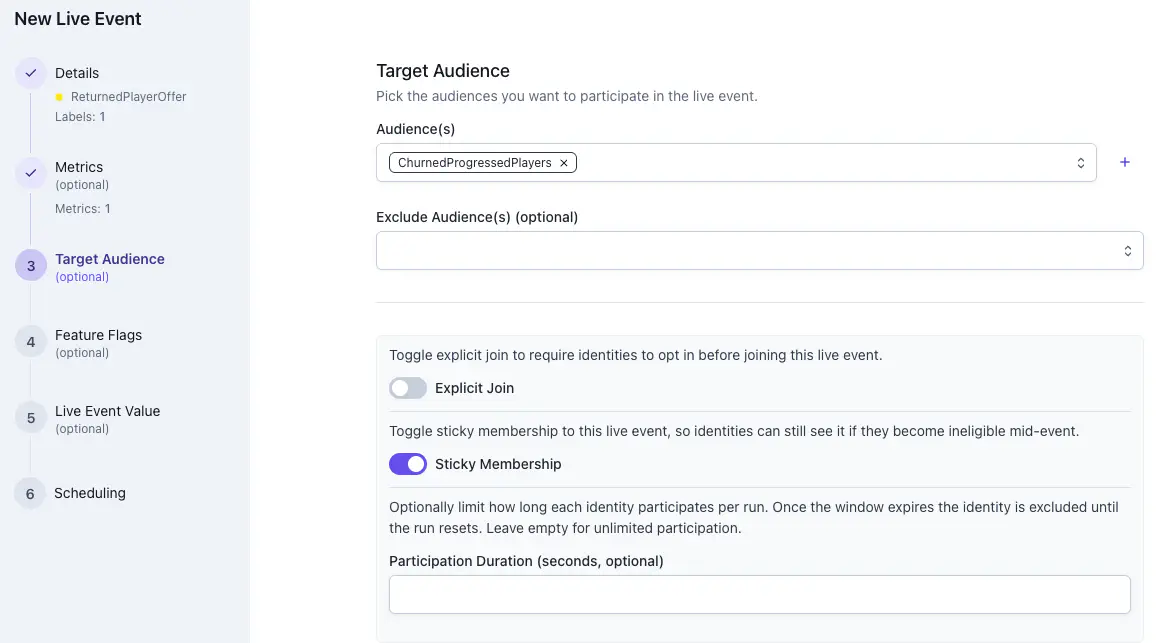
- Target Audience. For Audience(s) select
ChurnedProgressedPlayers, and turn on Sticky Membership.
- Feature Flags. A live event carries its content in one of two ways: by overriding feature flags, or by holding a one-off JSON Value. For this example you can simply use Value so skip this step.
- Live Event Value. This campaign carries its configuration in a one-off JSON Value. The structure of the configuration is entirely up to you. Use it to carry whatever your game needs to build the offer, such as reward amounts, a headline, or an art asset key.
Live Event Value suits data that doesn’t need to persist after the event ends. For configuration that outlives a single run, such as the reward tiers of a repeatable season pass, use a feature flag instead.
Leave Value - Schema Validator set to Object, then enter the JSON that defines the reward and its presentation:
| |
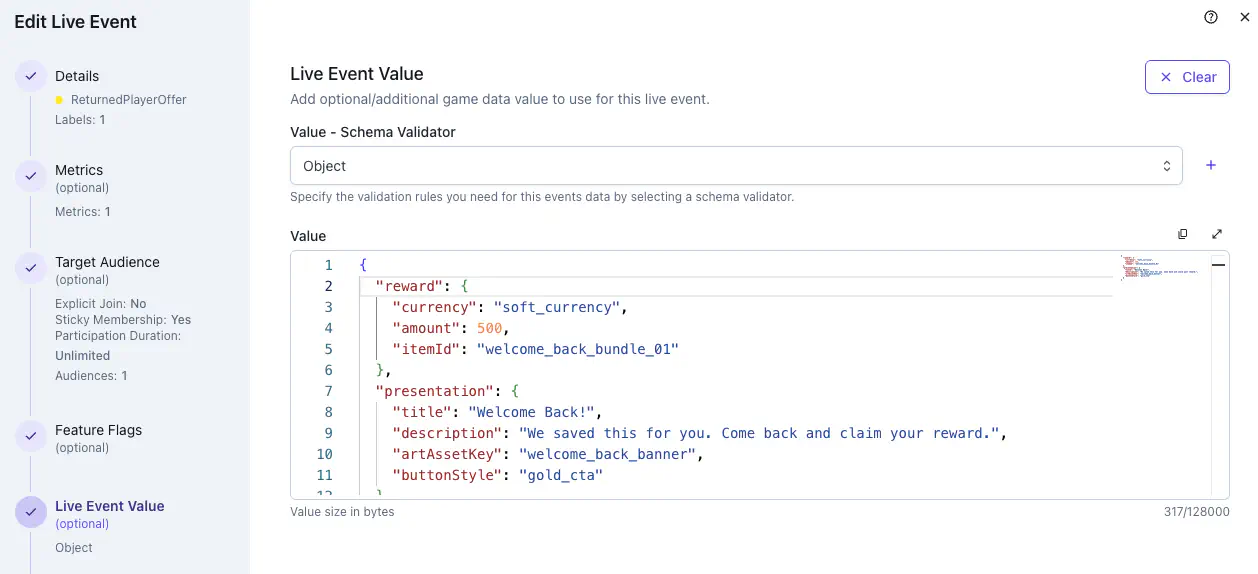
The Schema Validator checks the value against a JSON Schema before saving it. Object accepts any JSON object, which is what this campaign needs. Pick a narrower validator, or define your own, when you want the Console to reject a malformed payload before it reaches your players.
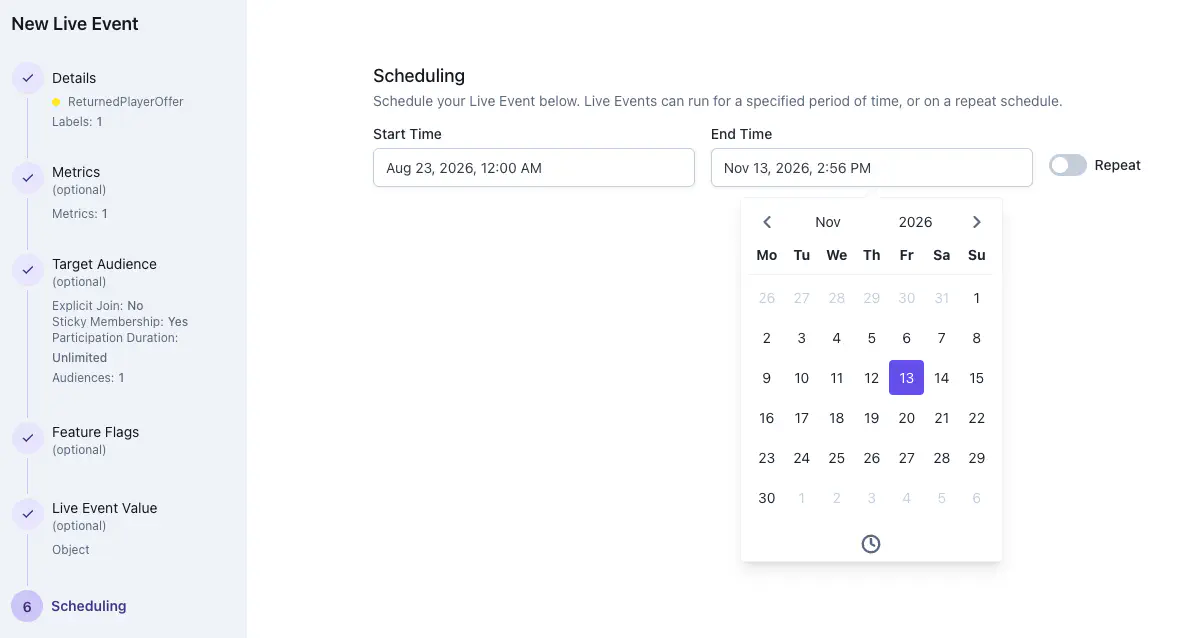
- Scheduling. Set the Start Time and End Time for the run.
Invite churned players back with a message #
Reach players before they ever open the game again, using the same audience you already built.
- Navigate to the Messages screen.
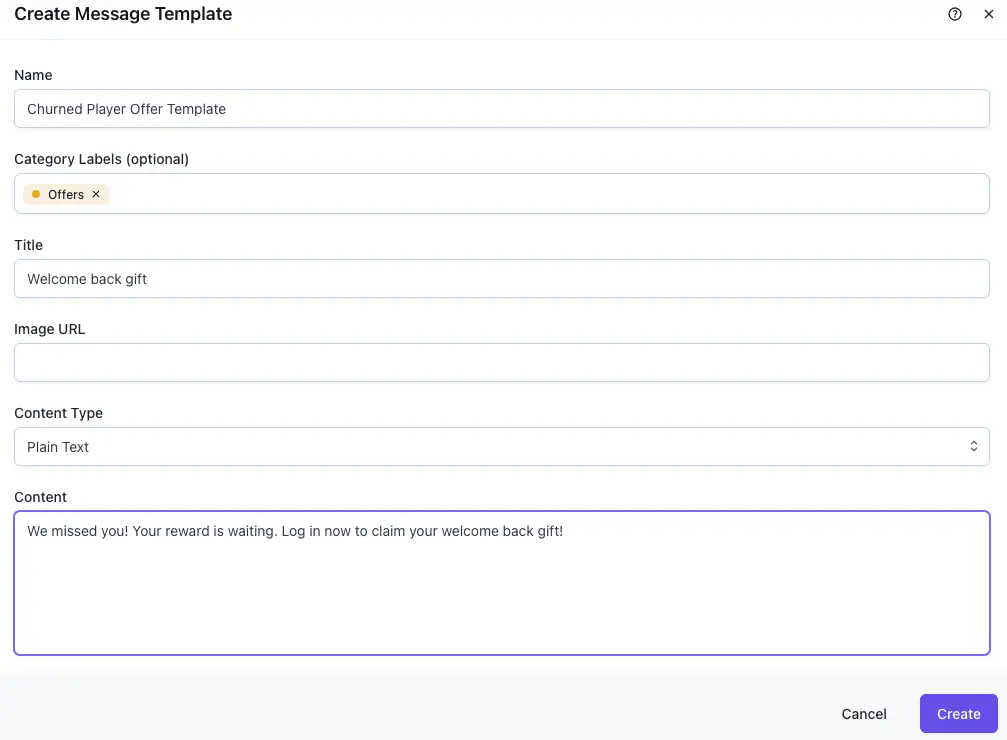
- Click Create Message Template and write the notification, for example, inviting the player back for a reward. See Create message templates for the full field reference.
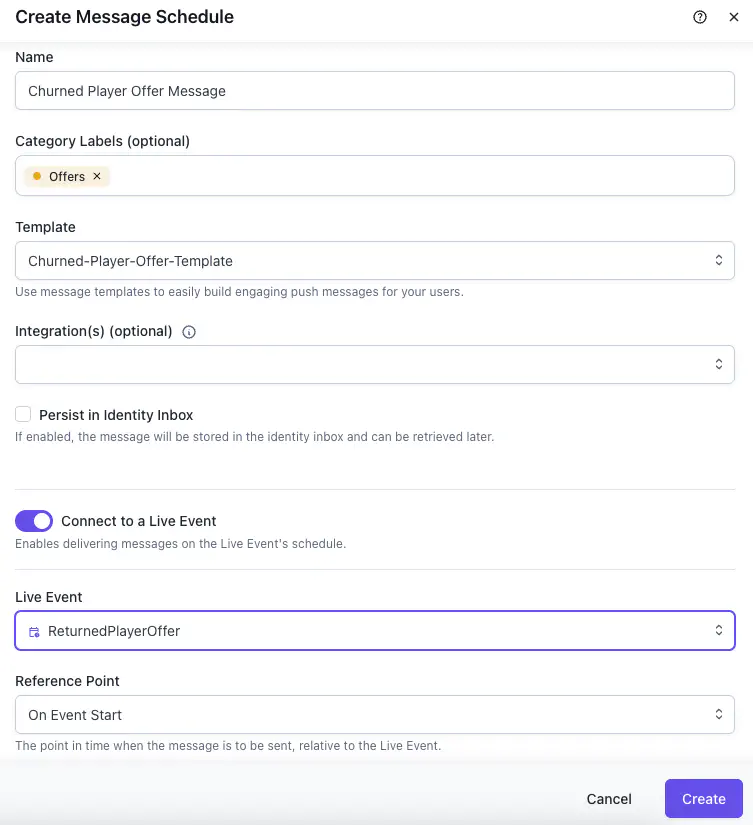
- Click Schedule Message.
- Under Integrations, select your configured push or email integration. This is required for a win-back message: leaving it empty delivers to the in-game inbox only, which the player won’t see until they’re already back in the game. See Set up message integrations for supported providers and setup.
- Turn on Connect to Live Event and select
ReturnedPlayerOffer. - For Reference Point, select
On Event Startso the message sends the moment the offer goes live.
See Attach player messages to live events for the full messaging reference.
Connect your game #
Satori knows what the campaign is, but it can only target players using data you send it. These four steps supply that data and deliver the offer. Send each call from wherever the data lives: your game client, or your game server if it holds the authoritative player state.
Identify the player to Satori #
Satori targets individual players, so it must identify the player making each request. Requests that return targeted values, including properties and live events, require an authenticated session rather than an API key alone.
Authenticate the player once at startup and reuse the session:
| |
See Sessions for session lifetime and refresh behavior. The examples in this part are C# for Unity. Satori has client libraries for JavaScript, Godot, Defold, Java, Swift, and Dart, and each exposes the same calls under that language’s naming conventions. Check your library’s reference page for the exact signature.
Report each level a player completes #
Your game sends the levelCompleted event each time a player finishes a level, with the level number as the event value:
| |
Send this each time a player completes a level. Satori keeps the running maximum in levelCompletedValueHigh, so you don’t need to track the highest level reached yourself.
If your game is server authoritative and progression lives on your own backend rather than in the client, send this event from your server instead. See Server events.
Report when a player comes back #
Send the playerReturned event after the player returns to the game:
| |
This event serves two purposes. It feeds the metric from Decide how you’ll measure success, and like every event it automatically produces computed properties that you can target on later without any extra configuration.
Fetch the offer and show it to the player #
Ask Satori for the player’s active live events. Only players in the ChurnedProgressedPlayers audience receive ReturnedPlayerOffer, so its presence in the list is the signal that this player qualifies:
| |
The rest happens in your game:
- Present the offer. Read
presentation.titleandpresentation.descriptionfor the offer copy, and look uppresentation.artAssetKeyandpresentation.buttonStylein your game’s own asset and style tables to build the welcome back screen. Satori doesn’t constrain how it looks; it only carries the keys your game uses to decide that. - Grant the reward. Read
reward.currency,reward.amount, andreward.itemId, and pass them to your existing code for granting currency and items. The grant never passes through Satori. - Report the outcome. Send the
playerReturnedevent from Report when a player comes back so the metric records the engagement. - Record that the offer was claimed. Use a custom property, such as
hasClaimedReturnOffer. Your game client checks this property before showing the offer, and sets it once the reward is granted, to avoid a double grant.
One detail worth knowing: live event changes reach the player on their next fetch, not immediately. Refresh at moments where a stale offer would be visible, such as returning to the main menu or completing a purchase.
JoinLiveEventAsync and read from ExplicitJoinLiveEvents. See customize enrollment.Test, launch, and measure #
The campaign is built and your game is connected. Verify it against a controlled set of identities first, then launch and tune it from the Console.
Verify the campaign on test accounts first #
An audience filter with a mistake in it matches the wrong players and raises no error. Pointing the event at a QA audience first catches that before it reaches your live player base.
- In the Audiences panel, create an audience that targets your internal test identities.
- Edit
ReturnedPlayerOfferto target the QA audience only, and set the start time to the current date and time so the event goes live immediately. - Using a test identity that belongs to the QA audience, verify that event values are delivered correctly, and monitor metrics are firing.
- When testing is complete, edit the event again: set the start time to your intended launch date, and change Target Audience back to
ChurnedProgressedPlayers.
Launch, then tune while it runs #
The event starts on its own at the configured start time, and every field stays editable while it runs, so you can correct the campaign after it goes live.
All value fields are editable, with no code deploy. If a reward level needs adjusting or an asset reference has changed, edit the event value in the Console. The updated payload reaches qualifying players the next time your game requests its live events. To stop a problematic event immediately, edit its end time.
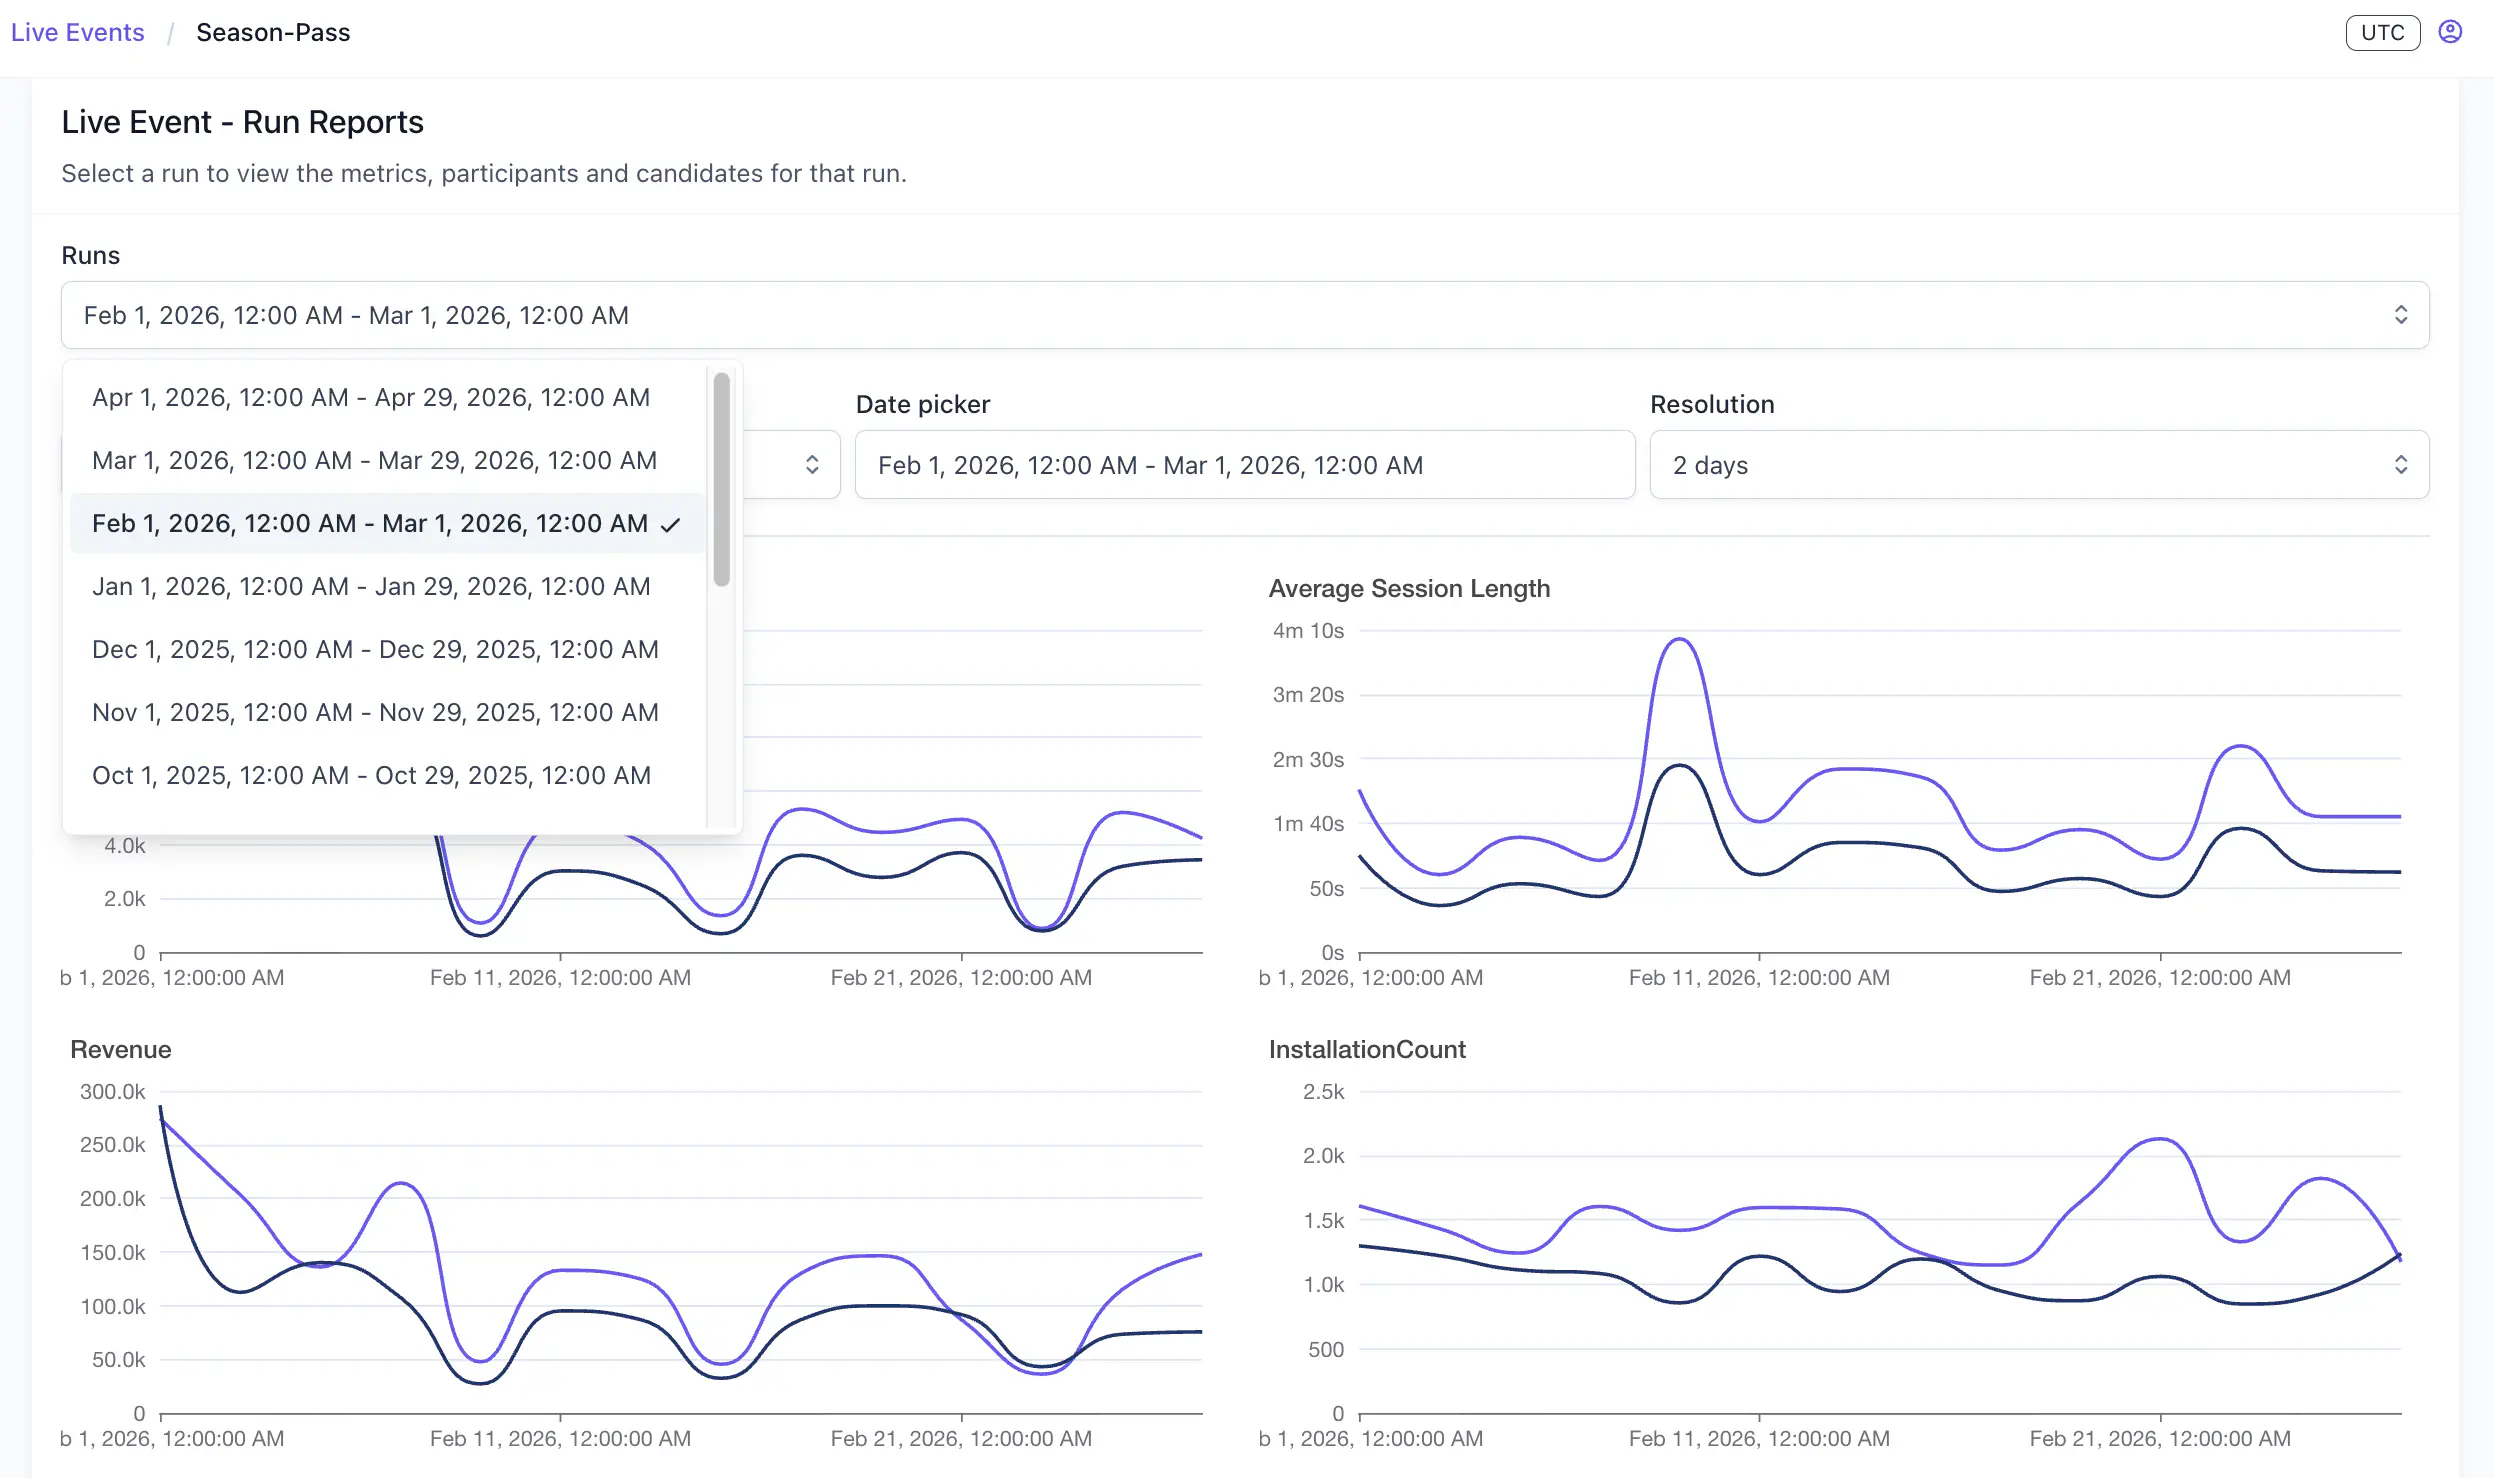
While the event runs, open its details page to see time-series data for each monitor metric you attached, and use it to track participation and conversion trends. When the event ends, review the monitor metrics for the completed run. Run Report compares performance across previous runs of the same event, and the filterable views let you change the date range and resolution of the data.
For more on reading the numbers, see Performance monitoring.
