
How to convert non-spenders with an escalating offer chain
This guide walks you through how to convert non-spenders into first-time buyers with an offer that improves the more they buy. You’ll build an escalating chain: a starter offer with a personal countdown, and a discounted version when they buy the starter offer.
Before you start #
You’ll need:
Read about Journeys first if you aren’t familiar with the feature.
What you’ll build #
An escalating offer chain, assembled from five parts:
- a journey that drives the chain and decides when to escalate
- live events that carry each offer and its countdown
- Hiro economy definitions for the offers themselves
- a custom Nakama server runtime in Go that publishes the purchase signal advancing the chain
- client code that renders the timer. The examples here are Unity and C#. You can use any other Satori client library.
Satori and Hiro talk to each other through Satori Personalizer, registered on your Nakama server. It reads one feature flag per Hiro system, named Hiro-[SystemName], so Hiro-Economy is where an economy override lands. Make sure your Nakama server is connected to Satori and the personalizer is registered, following Set up personalizers.
Register it with economy event publishing turned on. The chain’s entry condition filters on purchaseCompletedCount, and that computed property only exists if Hiro forwards economy events to Satori:
| |
Without SatoriPersonalizerPublishEconomyEvents(), purchaseCompletedCount stays at zero for everyone and the chain admits players who have already spent. See Publishers for the full list of event options.
Here’s the flow:
| |
Build the offer chain #
Define the offers in Hiro #
Both offers live in your economy config as ordinary store items, disabled by default. The live events enable them one at a time.
Add them to base-economy-dev1.json:
| |
Both items are disabled, so nobody sees them until a live event turns one on.
Publish a purchase signal per offer #
To know when a player buys one of your offers, you need the server to publish that event. Hiro already publishes purchaseCompleted to Satori, but its computed property counts every purchase together, so purchaseCompletedCount can’t tell you which offer converted. Send a distinct event per offer from the store reward hook:
| |
Sending from the server keeps the signal authoritative. A client can’t fake having bought the offer. It also keeps the whole change server side, without needing a client update.
Register the two events on the Satori Console so Satori accepts them:
- Go to Settings > Events.
- Select Create New Event.
- For Event Name enter
starterOfferPurchased. - Repeat for
discountOfferPurchased.
Satori derives a computed property from each event name automatically, giving you starterOfferPurchasedCount and discountOfferPurchasedCount computed properties.
Create the journey #
- Go to Journeys and select Create Journey.
- On the Details stage, enter
starter_offer_chainfor Name and describe what the chain does. - Select Create.
- Leave Rejoin cooldown period as Never rejoin, so each player sees the chain only once.
Completing the wizard drops you into the flow editor with Entry Point already placed.
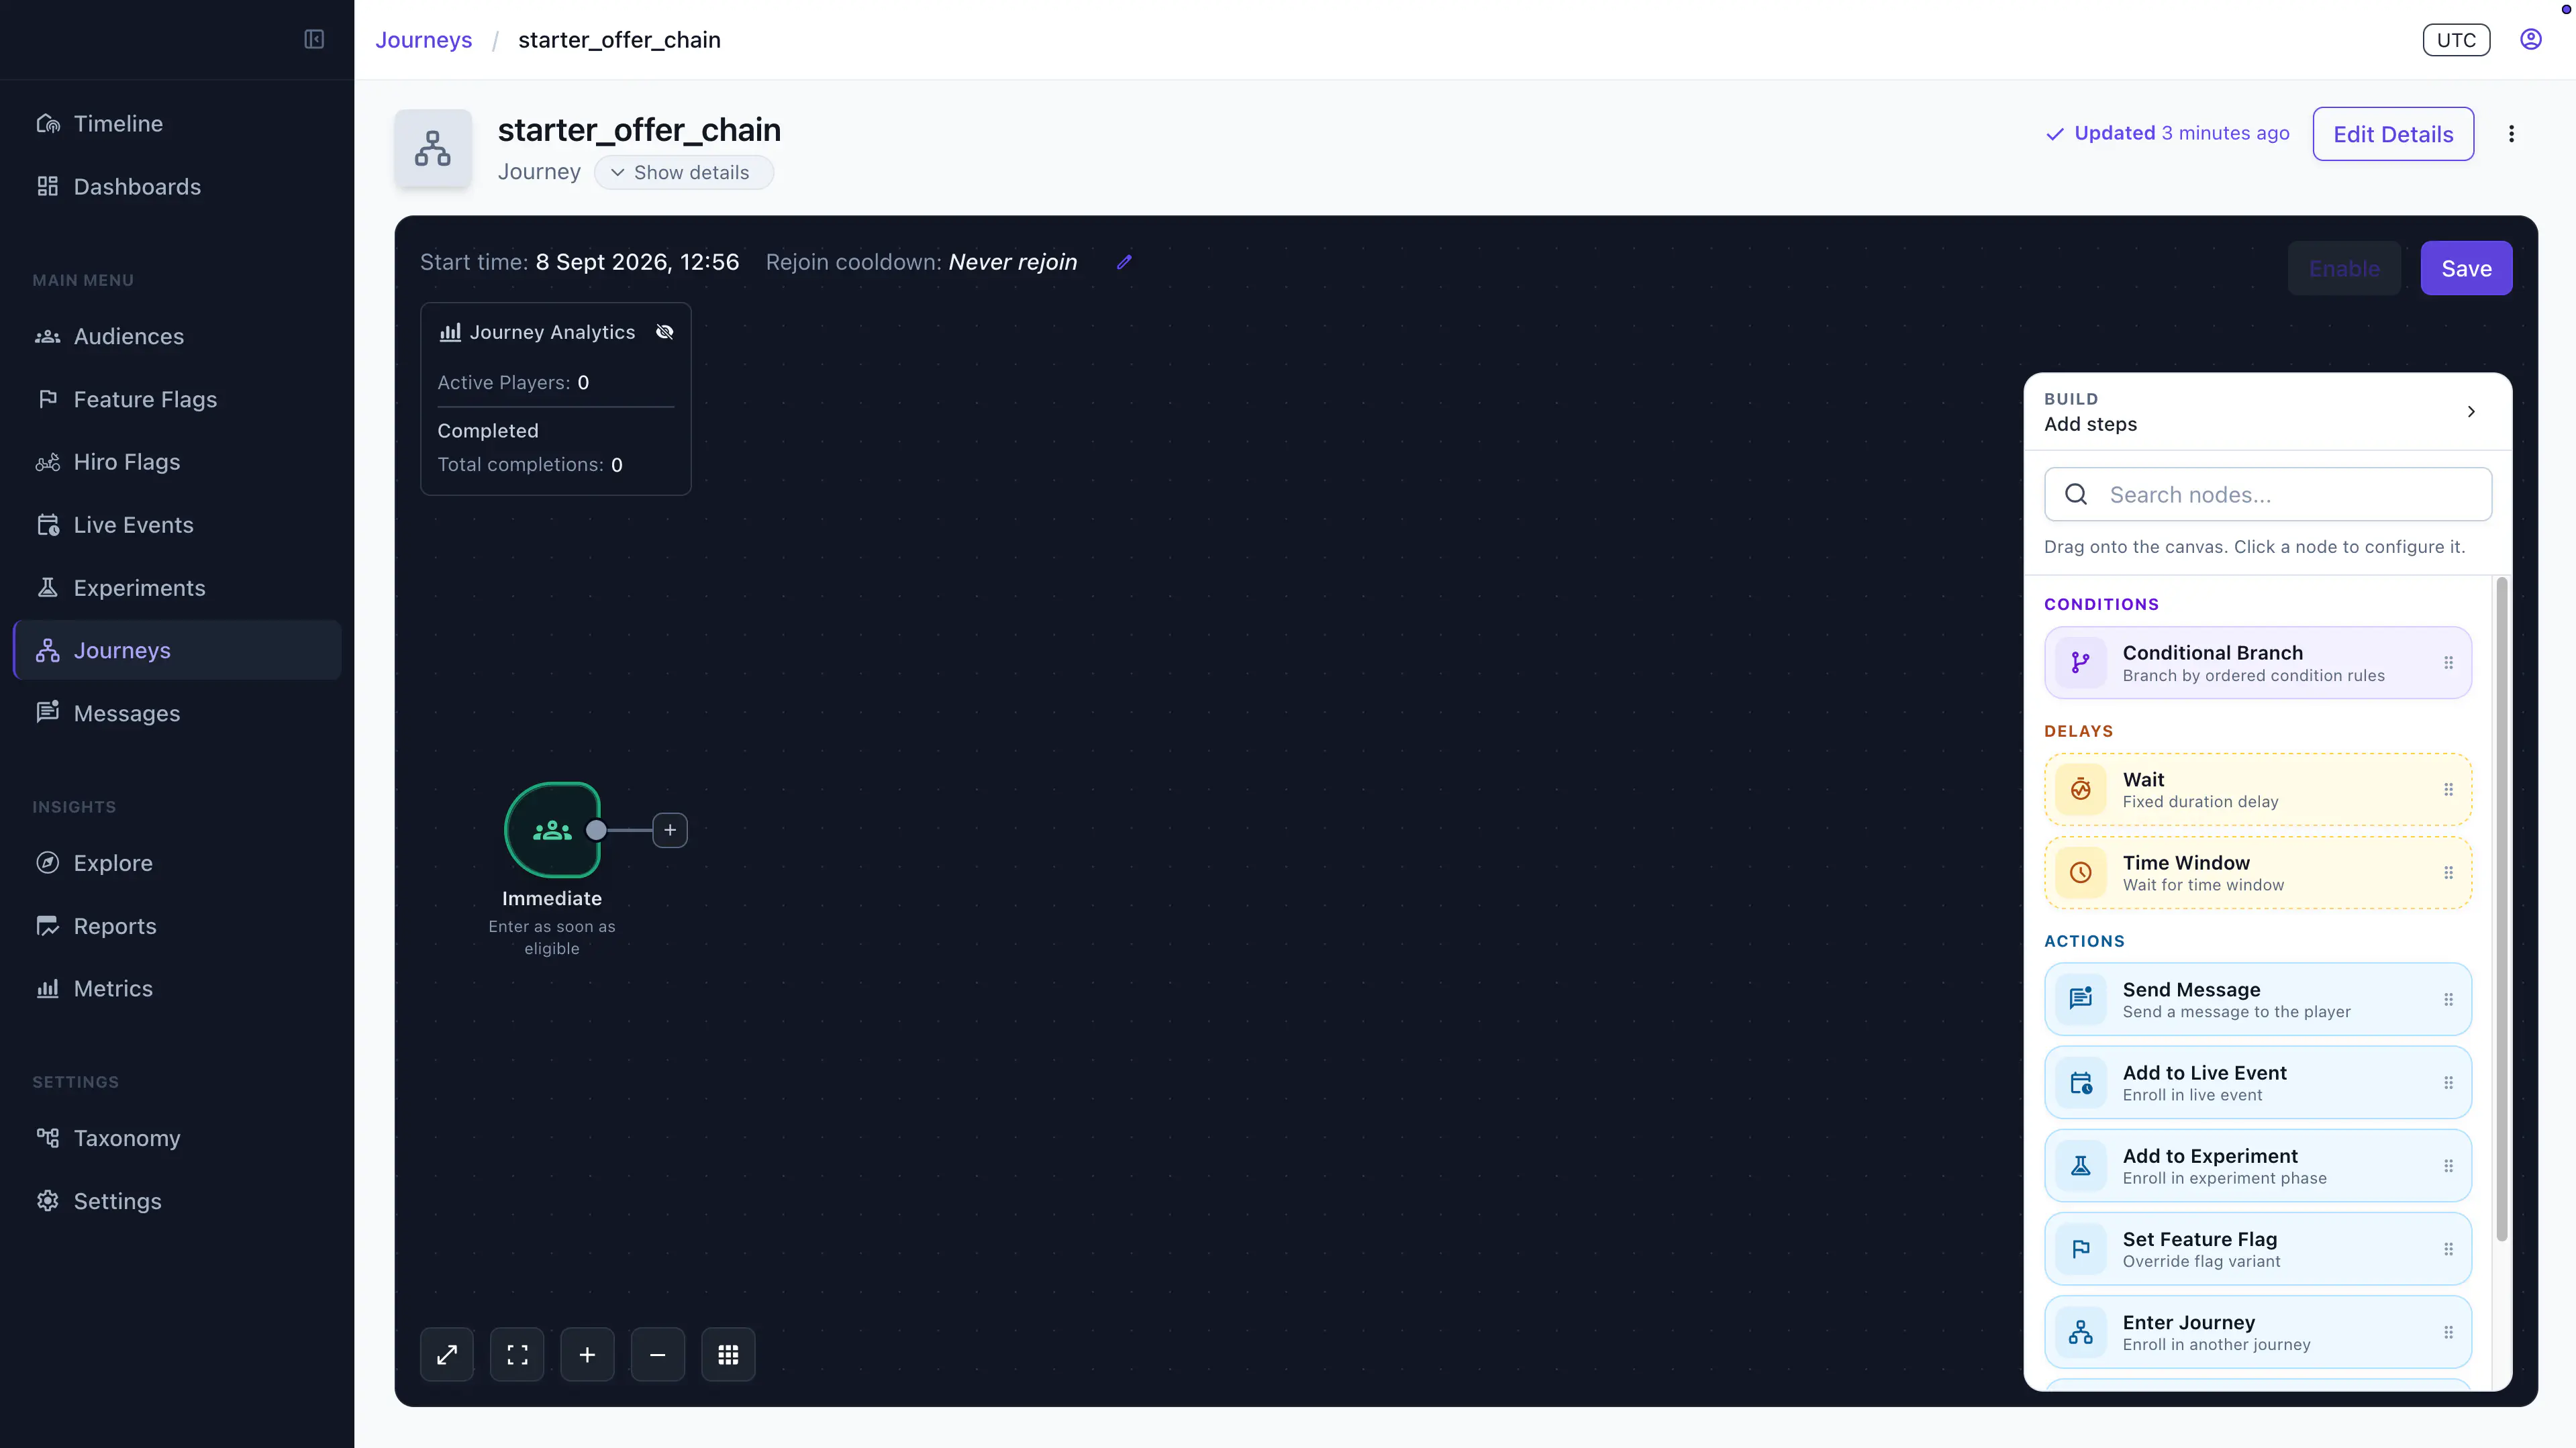
Define who enters #
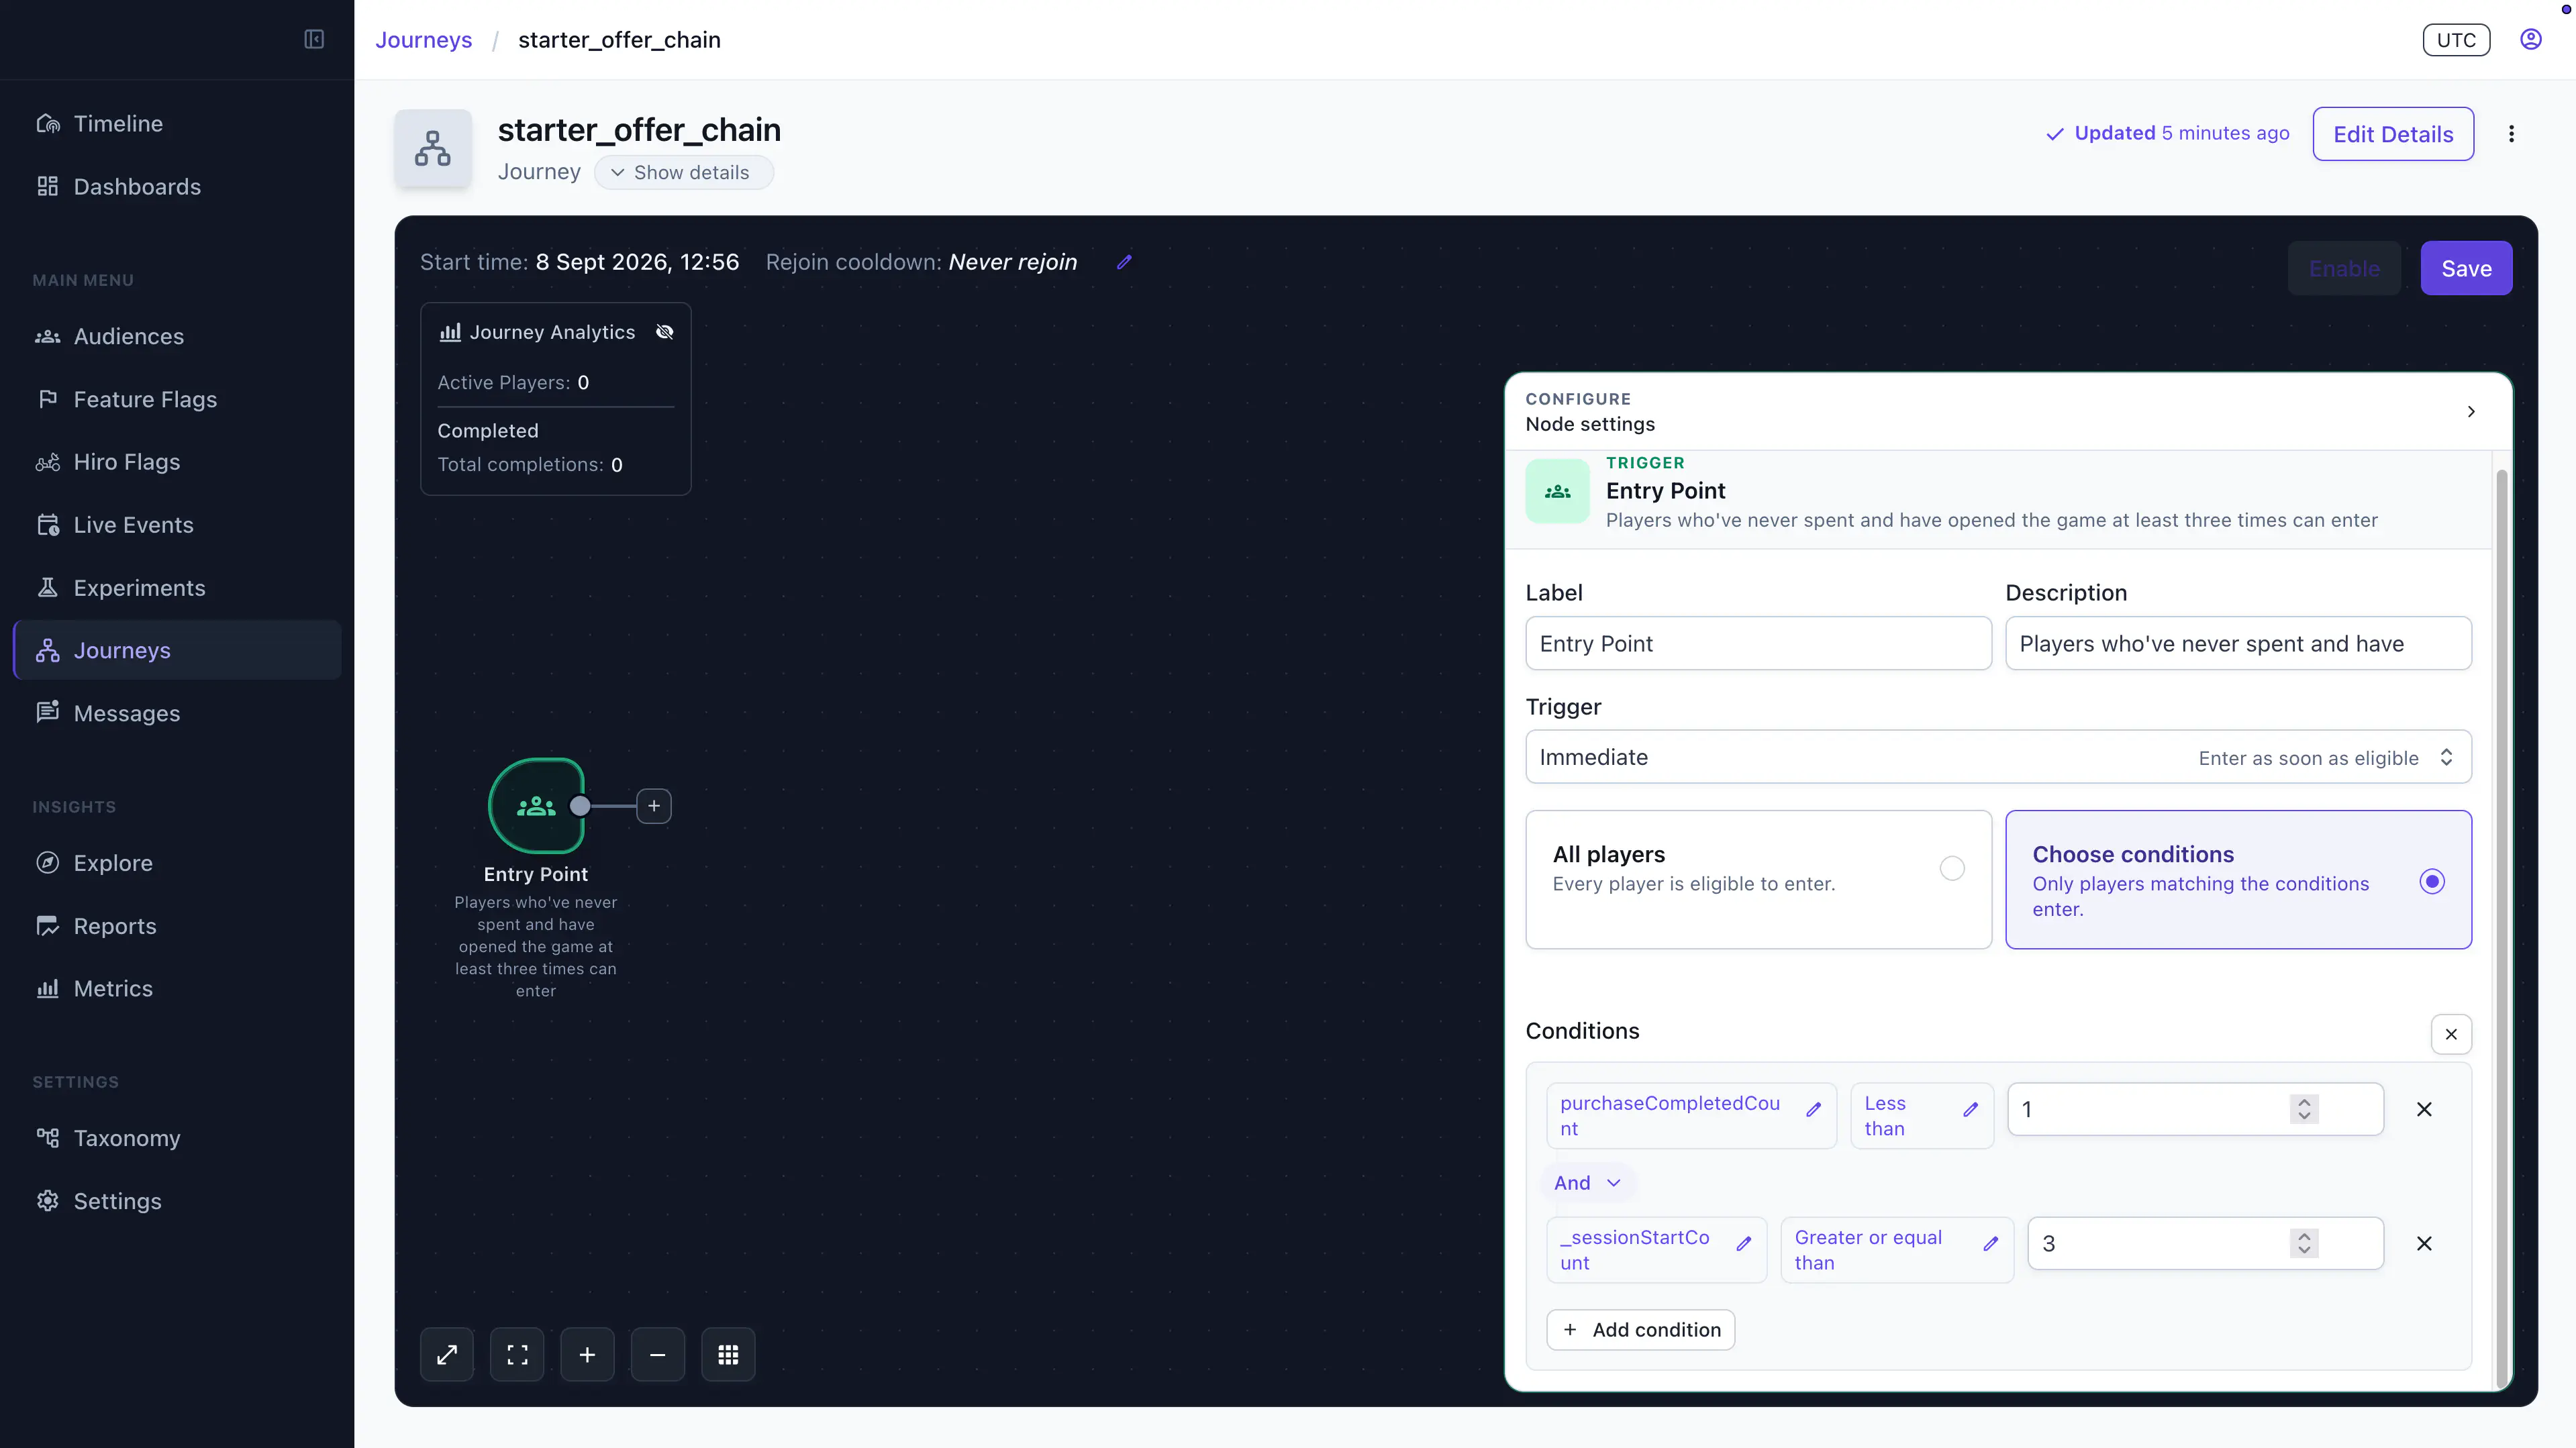
- Select the Entry Point step with the label Immediate to open its configuration.
- Select Choose Conditions.
- Add the conditions limiting entry to engaged non-spenders:
purchaseCompletedCountless than 1sessionStartCountmore or equal than 3
Players who’ve never spent and have opened the game at least three times now qualify. Leaving the condition empty would admit everyone.
Present the first offer #
Create the live event from inside the journey step rather than from the Live Events page. A journey supplies membership itself, so an event created this way doesn’t need an audience.
- Drag Add to Live Event from the palette onto the canvas.
- Connect Entry Point to it.
- Select the Create new Live Event icon (+ sign) beside the live event picker.
- Name the event
starter_offerand leave Audience(s) empty. - Leave Explicit Join off, so journey enrollment takes effect without the client opting in.
- Leave Sticky Membership off. It keeps a player in the event after eligibility ends, so it would leave the offer visible after the revert.
- Set Participation Duration (seconds, optional) to
172800, which is 48 hours. - Under Feature Flags to override, select
Hiro-Economyand give it this value:
| |
- Set the live event’s start and end times so that the run window fully contains the 48-hour participation window.
- Save the event. It’s selected on the step automatically.
SatoriPersonalizer reads one flag per Hiro system, named Hiro-[SystemName]. Economy config comes from Hiro-Economy, and a live event override outranks the flag’s own variants, so the live event is all you need.
{"store_items": {"starter_offer": {"disabled": false}}} enables the item but wipes its name, cost, and rewards. Always repeat the full definition of every item an override touches.Optionally, add a message to the tier. This step needs a message template to already exist. If you don’t have one, create it from the Messages section of the console first. See Create message templates.
- Drag Send Message onto the canvas and connect the live event step to it.
- Select your offer Template.
- Turn on Persist in Identity Inbox to keep the message after external delivery succeeds.
Players reaching these steps join starter_offer. Their participation clock starts, SatoriPersonalizer picks up the economy override, and the offer appears in the store.
Watch for the purchase or the expiry #
The player waits here until one of two things happens: they buy the offer, or the wait you set runs out. Satori re-evaluates the condition every time that player sends an event, so a purchase advances them the moment it lands.
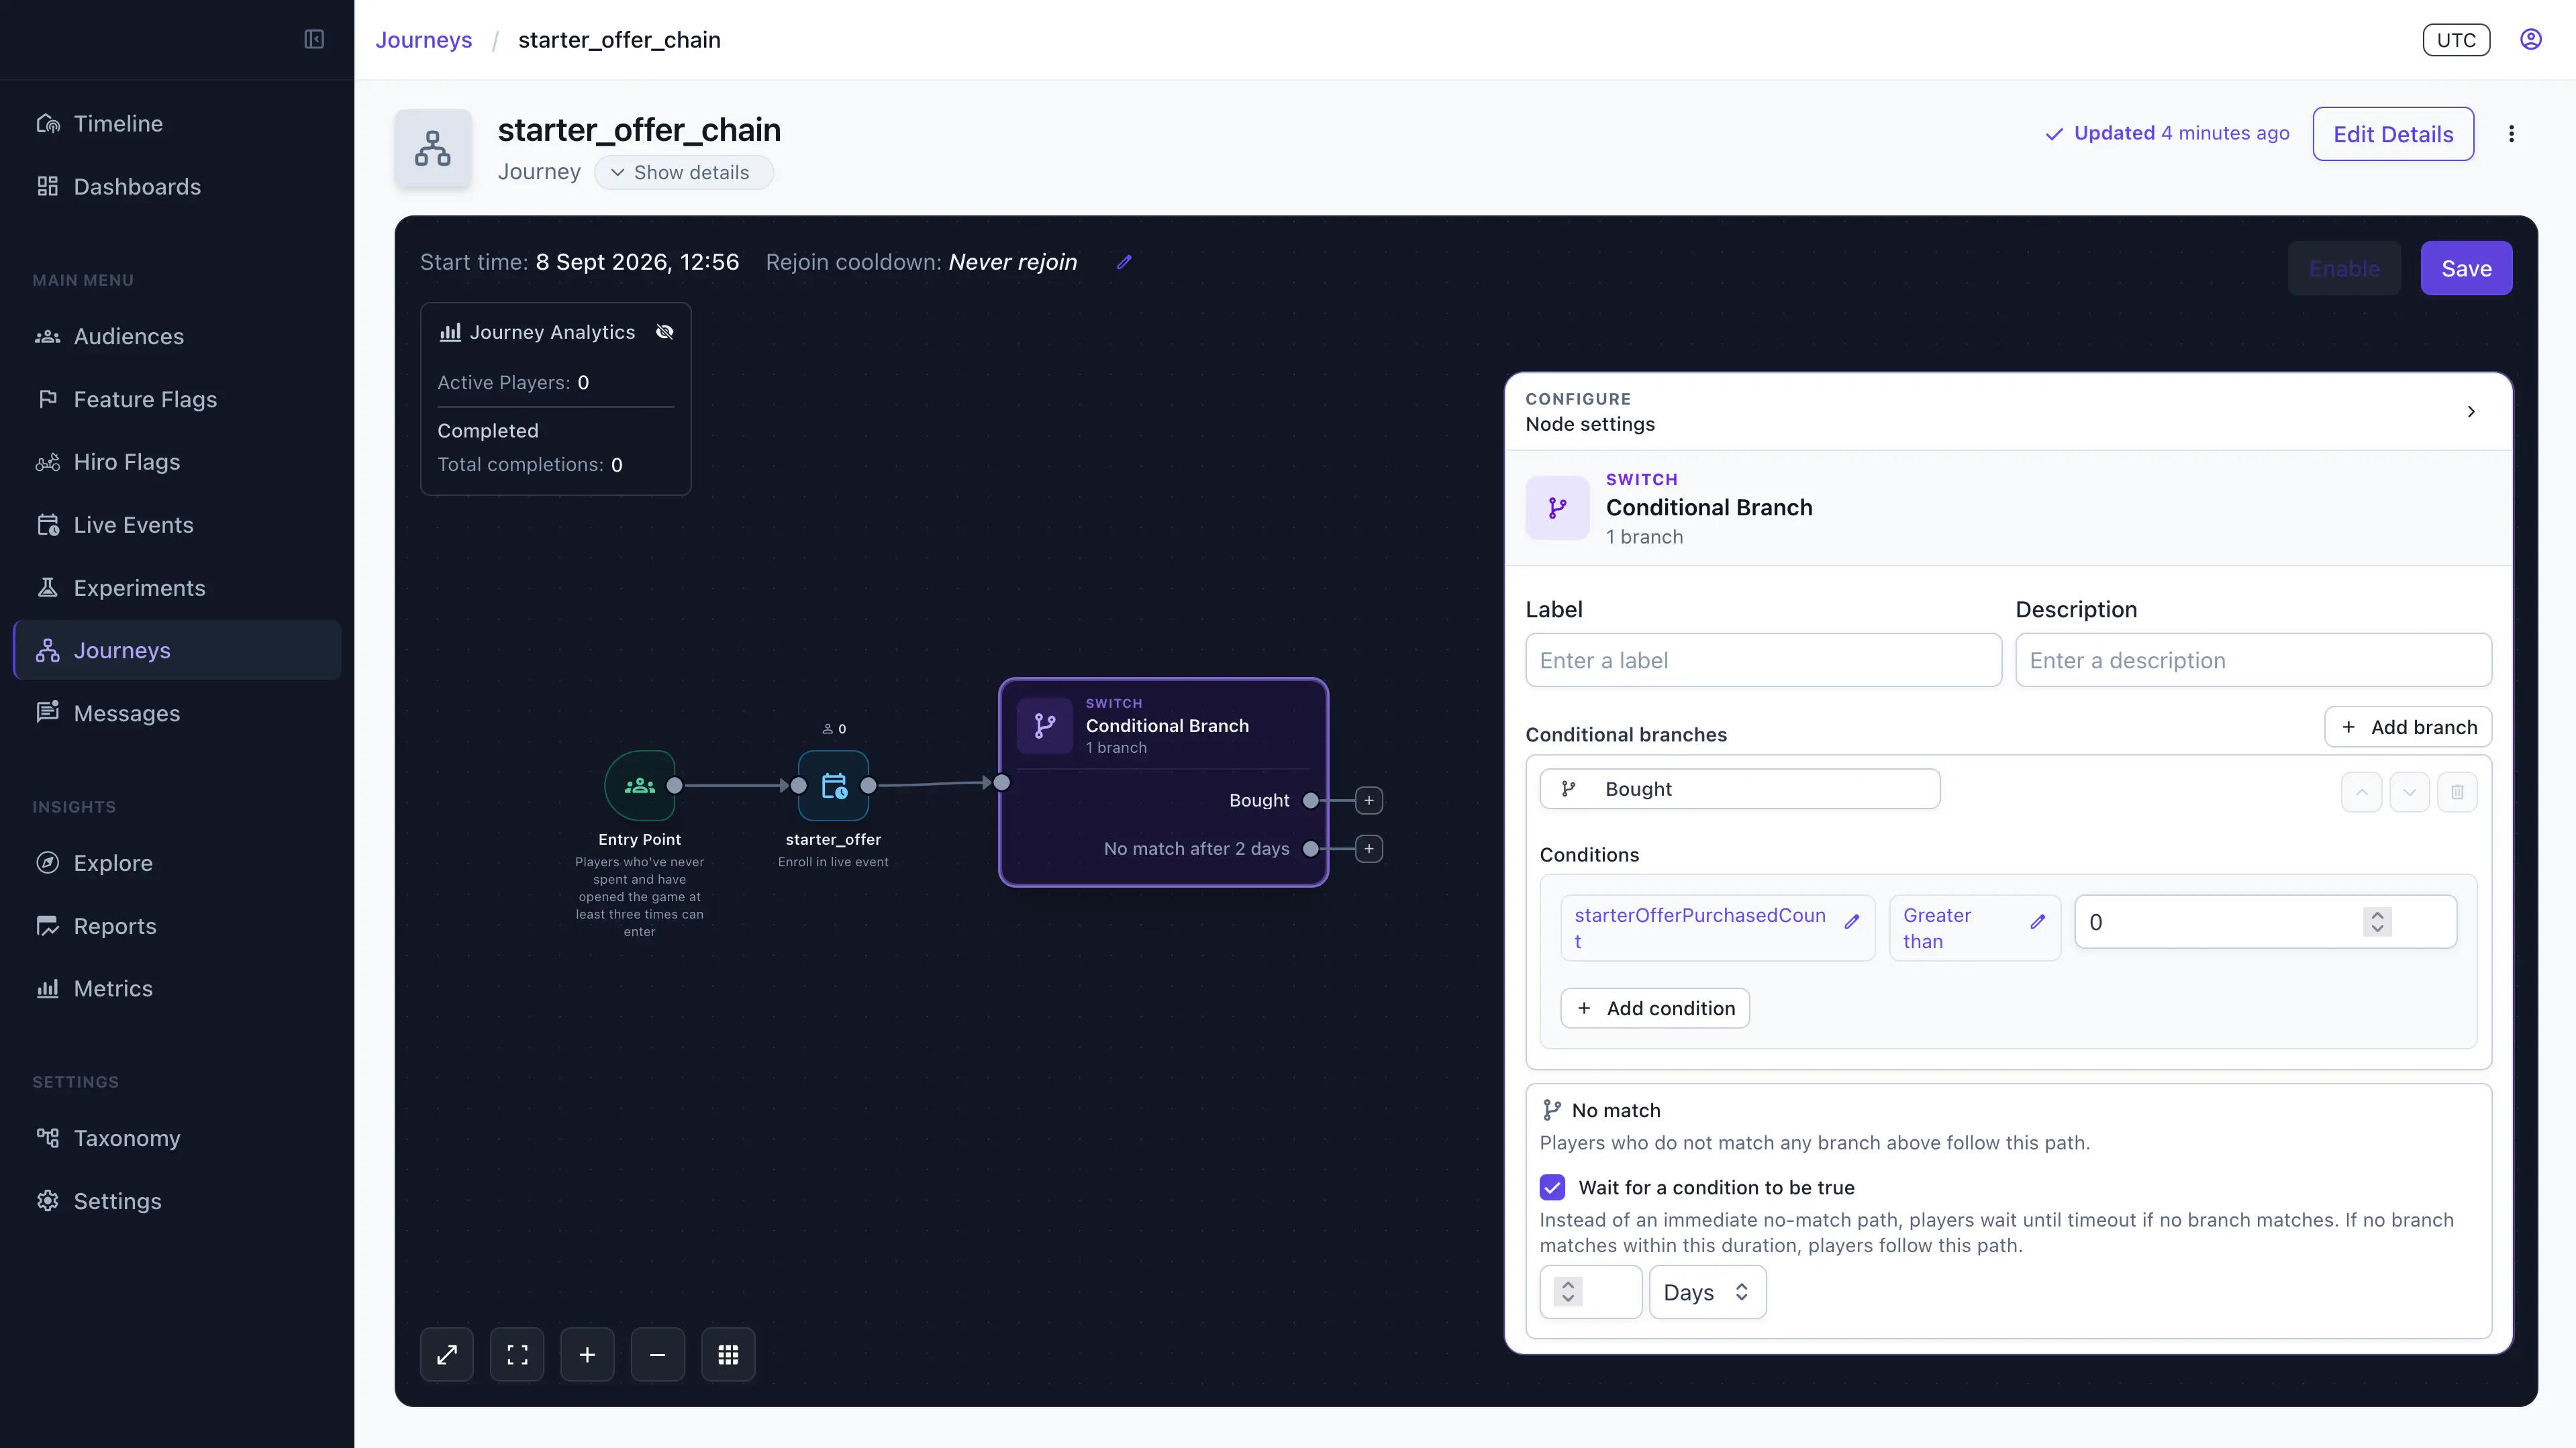
- Drag Conditional Branch onto the canvas and connect the Send Message step to it. If you skipped the optional message, connect the live event step instead.
- Add a rule and label its branch
Bought:starterOfferPurchasedCountgreater than 0
- Turn on Wait for a condition to be true and set it to 2 days (how long the offer will be available to the player).
A purchase sends the player down Bought as soon as the event is emitted, even if it arrives on the same pass that their window closes. Everyone else waits at this step until the timeout you set elapses, then leaves through No Match.
Escalate when the window closes #
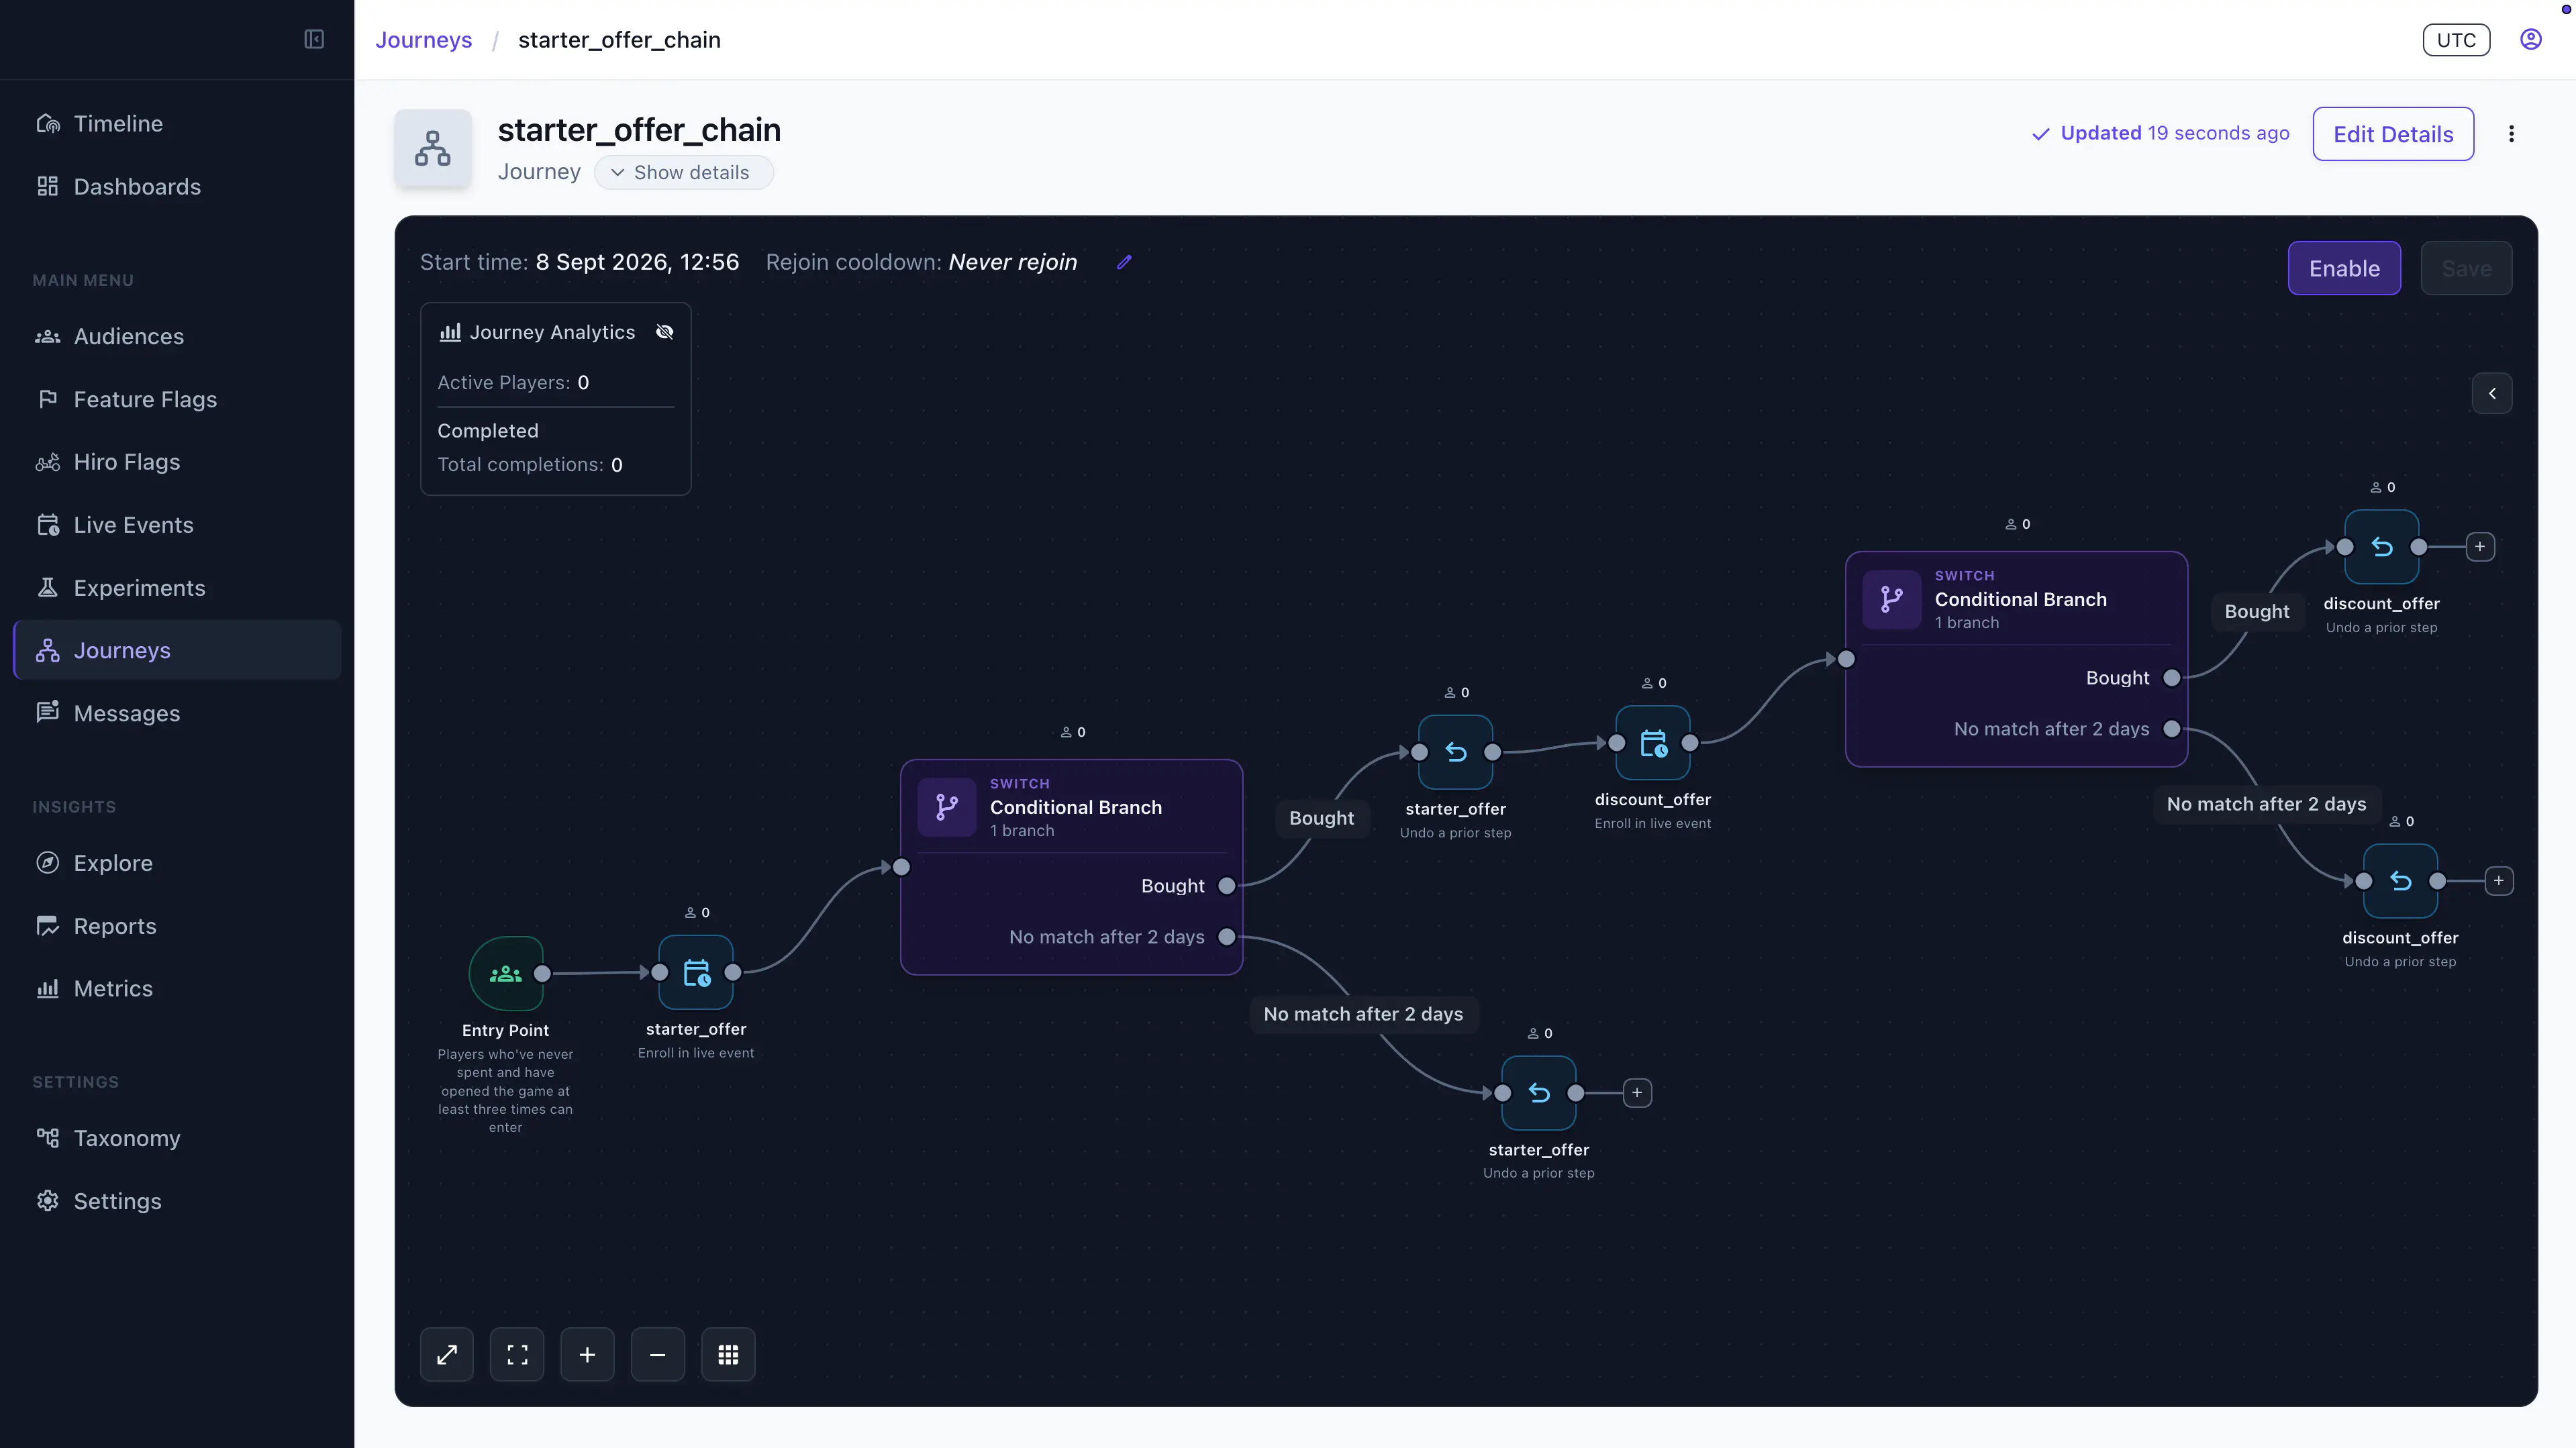
- Drag Revert Step onto the canvas and connect it to the Bought.
- Select the
starter_offerlive event step as the step to undo. - Add an Add to Live Event step connected to the revert, and create
discount_offerfrom it the same way. Enable thediscount_offerstore item. - (optional) Add a Send Message step announcing the discount.
- Add a second Conditional Branch with the same two-rule shape, matching
discountOfferPurchasedCountand the Wait for a condition to be true timeout.
Clear the offer on the way out #
Live event membership outlives the journey. Leaving the journey doesn’t remove it, so the player keeps seeing the offer. You have to take it away yourself. Add a Revert Step on every remaining path before the player reaches Exit:
- Drag Revert Step onto the canvas.
- Select the live event step it should undo.
- Connect it to Exit.
- Repeat for each remaining path out of the chain.
Render the offer and its countdown #
This step shows the offer in your store and counts down to the moment it expires. The examples use the Hiro and Satori C# client libraries. The offer itself comes from Hiro’s economy config. The countdown comes from the live event in Satori.
Start with the store. When the journey adds a player to the live event, SatoriPersonalizer folds that override into the economy config Hiro serves to that player. Call RefreshStoreAsync to fetch that updated config. The client’s cached store predates the override, so the offer stays invisible until you refetch:
| |
The countdown comes from the live event. Each returned event carries ActiveParticipationEndTimeSec, the moment this specific player’s participation ends:
| |
ActiveParticipationEndTimeSec once, then tick the remaining time down locally. Calling GetLiveEventsAsync every frame puts a request per frame per player on your Satori instance. Refetch from the server only when the player opens the store or returns to the foreground.Both offers are priced with a sku, so they’re real-money purchases. Buy them through UnityPurchasingSystem, which triggers the platform’s native purchase sheet, submits the receipt to Nakama for validation, and resolves only once the reward has been granted. See Purchase a store item:
| |
For a complete store UI, see One Time Store Offers.
Validate and enable #
The editor validates the graph as you build. Fix anything it flags before saving:
- Entry Point connects to at least one step
- Every step except Entry Point has exactly one incoming connection
- Only condition steps have more than one outgoing path
- Every path eventually reaches Exit
Save the journey, then set its status to Enabled. If the start time is still ahead, it reports as Scheduled until the window opens, then flips to Running on its own.
Confirm it’s working #
Open Journey Analytics for per-step counts. The two condition steps are the interesting ones: compare how many players leave through Bought against how many leave through No Match to see each tier’s conversion. Total completions and average duration tell you how long the chain takes end to end.
To debug a specific player, open their identity page and check their journey history. It lists every step they’ve entered and when, which is the quickest way to answer why someone did or didn’t get an offer.
If an offer isn’t appearing, check the resolution chain before suspecting the journey. GetFlagOverridesAsync returns every source affecting a player’s flags, so you can see whether the live event override is being applied and whether anything is taking precedence over it.
Adapt the chain #
Add a third tier: Repeat the revert-then-escalate pattern from the second Expired branch. Watch the total wait, because a chain that takes a week to resolve delays the player’s next journey too.
Run it on a cadence: Set a Rejoin cooldown period instead of Never rejoin. Players become eligible again once it elapses, which turns the chain into a recurring campaign. The minimum cooldown is 60 seconds.
Carry display data with the offer: Give the live event a Value, a one-off JSON object the client reads alongside the countdown. Useful for banner art or copy that doesn’t belong in your economy config.
Things to watch out for #
Override completeness: An override replaces every store item it names. Mentioning an item without repeating its full definition wipes the fields you left out. Keep override values complete.
Run window coverage: The run window has to contain the participation window. Participation expiry is only set when the player’s join time plus the duration falls before the run ends. Otherwise participation lasts the full run and the client gets 0, meaning no limit, so the countdown disappears.
Dormant players: Expiry doesn’t wake a dormant player. A participation window closing isn’t an event, so a player who stops playing escalates on their next session rather than the moment their window ends. The wait duration on the condition step is what eventually catches players who never return.
Lifetime event counts: starterOfferPurchasedCount never resets, so a player running the chain a second time after a rejoin cooldown looks like they already converted. For recurring chains, publish a season-specific event name from the reward hook.
Fixed action types: A step’s action type is fixed once saved. To turn a Send Message step into an Add to Live Event step, delete it and add a new one.
