Messages
Overview #
Messages let you broadcast information to one or more players at once. They’re ideal for announcements, promotions, notifications about live events like limited-time tournaments, rewards, and gifts.
Messages can be stored for the game client to fetch, or they can be sent as push notifications via integrations to inform players when they are not playing your game. Push notifications remind players to return to your game by sharing content and promotions outside the game.
In addition to push notifications, Satori’s OneSignal integration allows you to send messages by email, helping you reach your players through different channels.
Use cases #
Satori’s Messages feature enables game teams to communicate with their players for different use cases:
- Remind players about a tournament with broadcast messages
- Send direct messages for special promotions
- Provide a notification inbox experience in your game
Key terminology #
- Push Notifications: Messages sent over push servers that appear on a player’s device screen. Use them to reach players outside the game.
- Message Template: A predefined structure that determines how a message is composed, including the title, body, and optional metadata.
- Message Schedule: A configuration that specifies when and how messages from a template are delivered, either by time or by event.
- Direct Message: A message sent directly to one or more specific players, outside a schedule.
- Integration: An external service (such as OneSignal, APNS, or FCM) used to deliver messages to players outside the game client.
- Message Inbox: A collection of messages stored in the player’s in-game inbox, accessible when they log in.
Message Templates #
Templates define the contents of the message to be sent to players and can be used in scheduling or sending direct messages. To send a message using Satori, you need to create a template first.
Creating a template #
In the Messages screen, select Create template to make a new message template.
The information needed to create a message template is given in the table below.
| Field | Required | Description | Example |
|---|---|---|---|
| Name | Yes | A unique identifier for the template. Helps you reference or manage templates later. | Winter Tournament 2025 |
| Title | Yes | The headline or subject line of the message. Shown prominently in the player’s inbox or notification. | Limited-Time Winter Tournament! |
| Image URL | No | The URL of an image to include with the message, such as banners, promotions, or event highlights. | https://«your-url»/images/winter_tournament.png |
| Content Type | Yes | Select the format of the message body from a dropdown. Options: Plain Text, HTML, or JSON. | Plain Text |
| Content | Yes | The main body of the message, written in the selected content type. | Join the Winter Tournament today and win exclusive rewards! |
| JSON Metadata | No | Extra structured data in JSON format to support client-side logic, personalization, or deep linking. | { “rewardId”: “gold_pack_01”, “expiry”: “2025-12-31T23:59:59Z” } |
Message content types #
Satori messages support different content types:
- Plain Text
- HTML
- JSON
With Plain text content, you can write any message, but you can’t format the text. If you want to format the content, you can use HTML. The Satori Dashboard provides an editor where you can format your text and add links and images to your HTML content. With JSON content, the editor validates your JSON automatically.
Multi-language support #
When you create a template, the initial information you provide becomes the default content of the template. Within a template, you can add more translations using the “Add Translation” button on the top right.
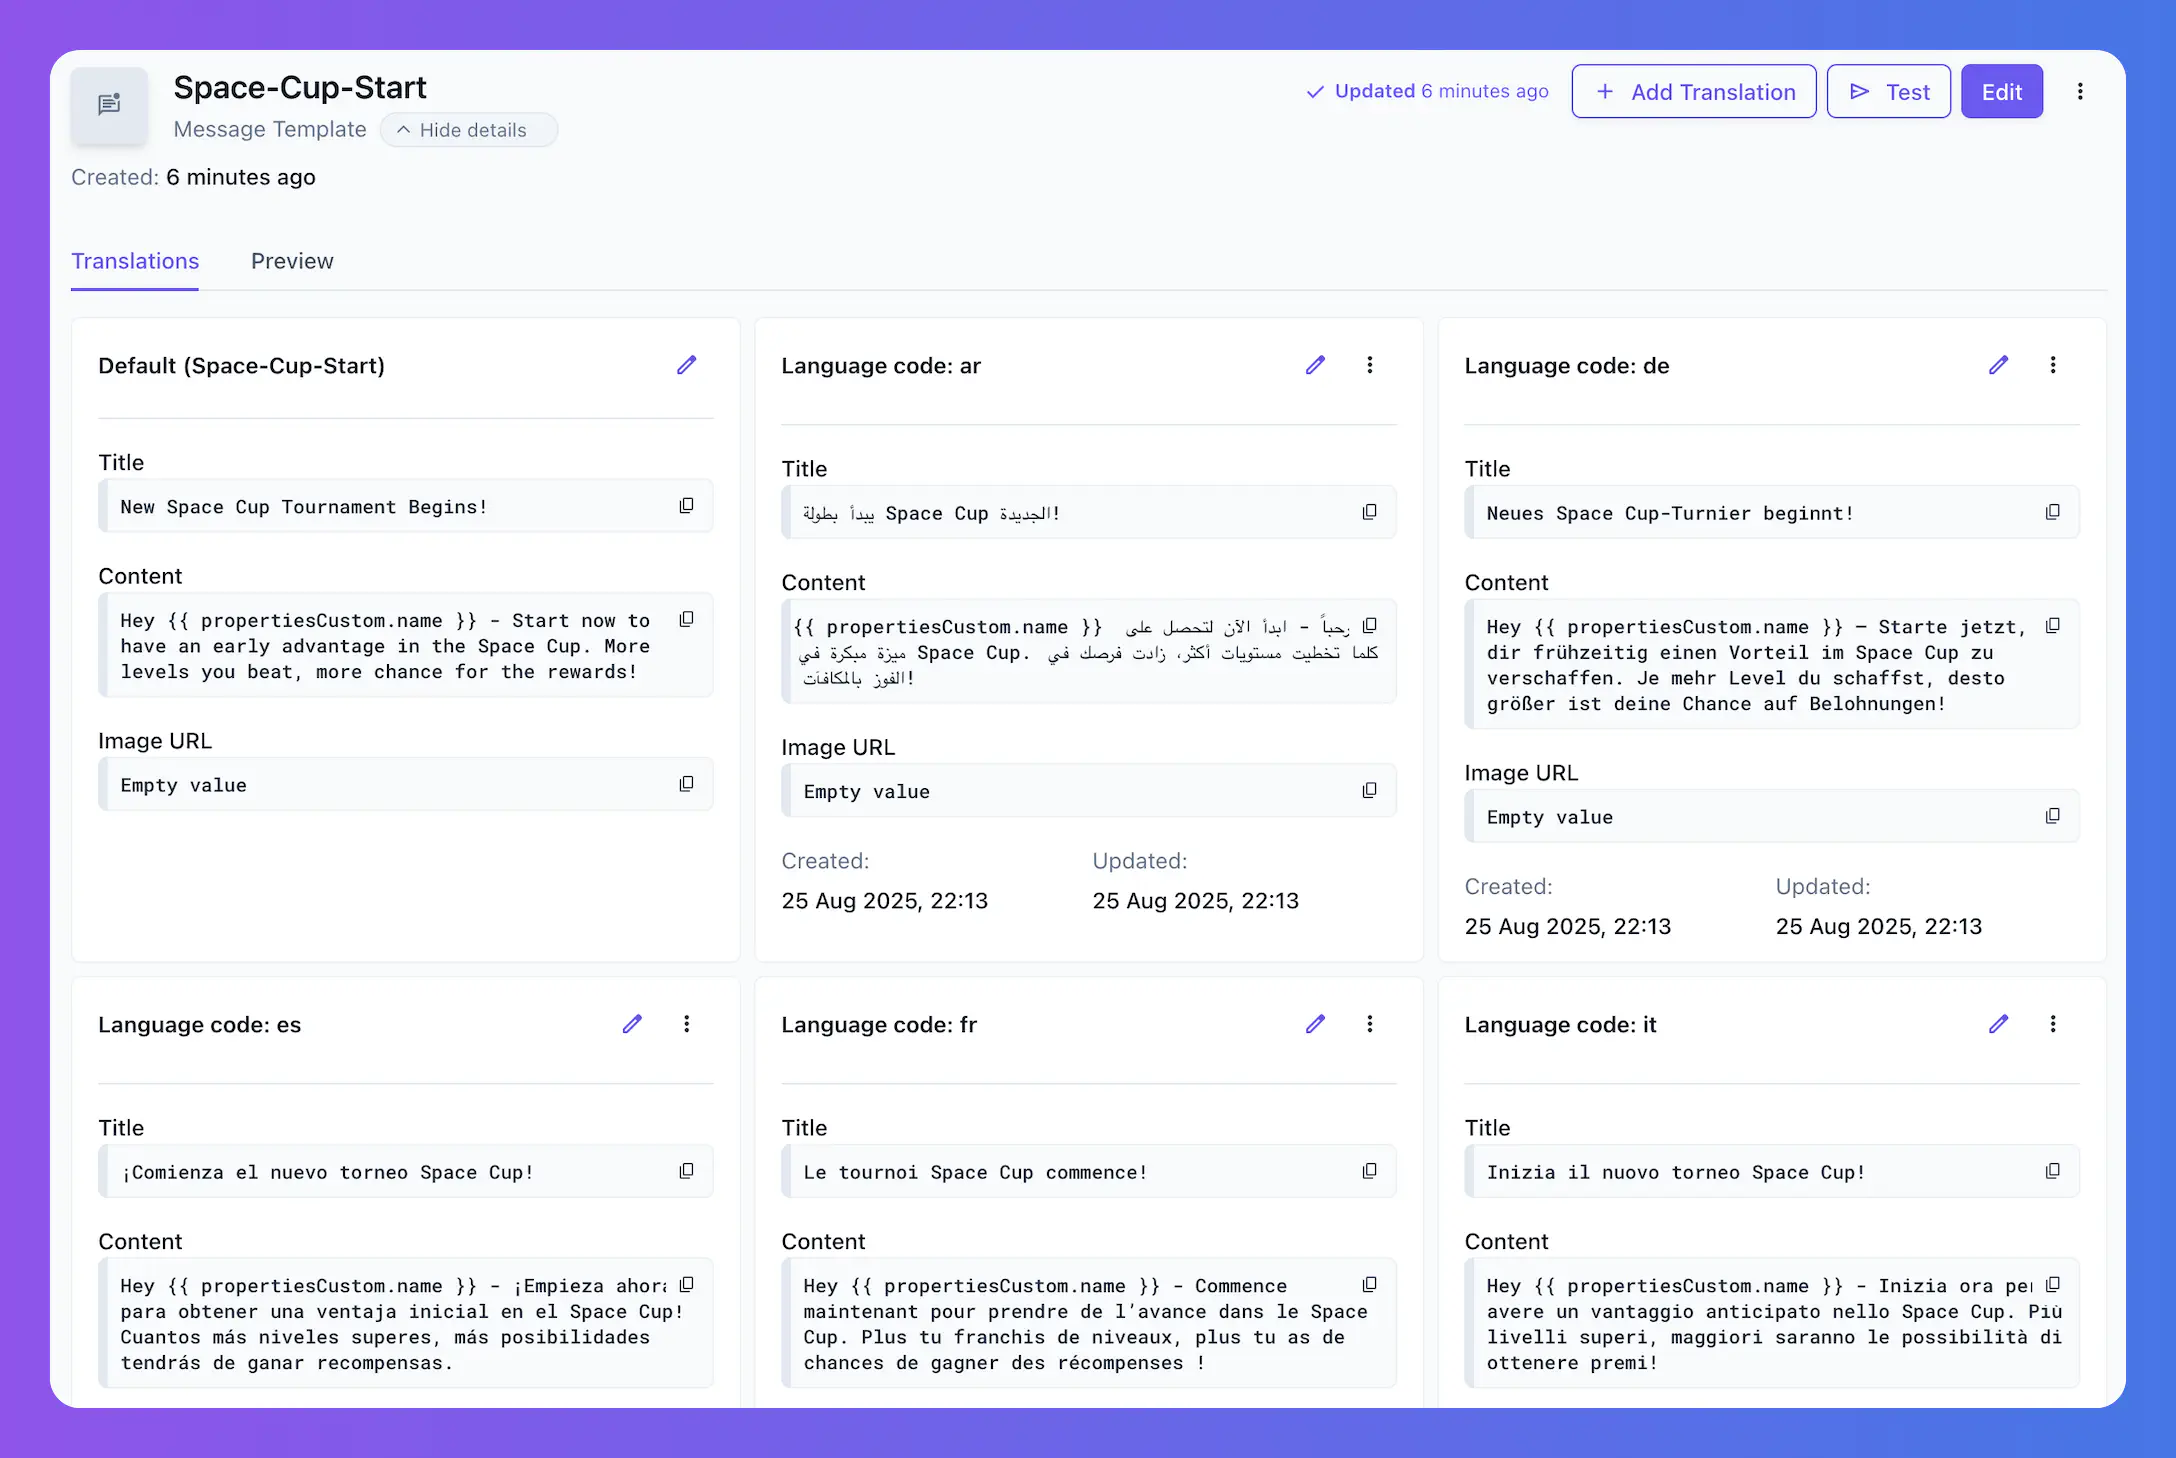
Translations will be automatically used by Satori based on the language property of the identity. Satori checks for a translation in the player’s language and uses it to:
- Send push messages through integrations (push notification or email)
- Send messages when fetched by the game client
If Satori cannot find a translation for the player’s language, the default content will be used.
Using properties in templates #
Templates support using identity properties in the content. For example, to call players by name or nickname, set a custom property and use it in your messages:
{{ propertiesCustom.name }}, congrats!
You have just completed level {{ propertiesCustom.levelCompletedCount }}! Claim your reward now!
We also sent a discount code to {{ properties.email }} - you can use it in your next purchase!
Satori will replace these placeholders with the actual values of the properties and send the message as:
John, congrats!
You have just completed level 50! Claim your reward now!
We also sent a discount code to john@example.com - you can use it in your next purchase!
All property types (default, computed, and custom) are supported for all content types (Plain Text, HTML, and JSON).
Testing templates #
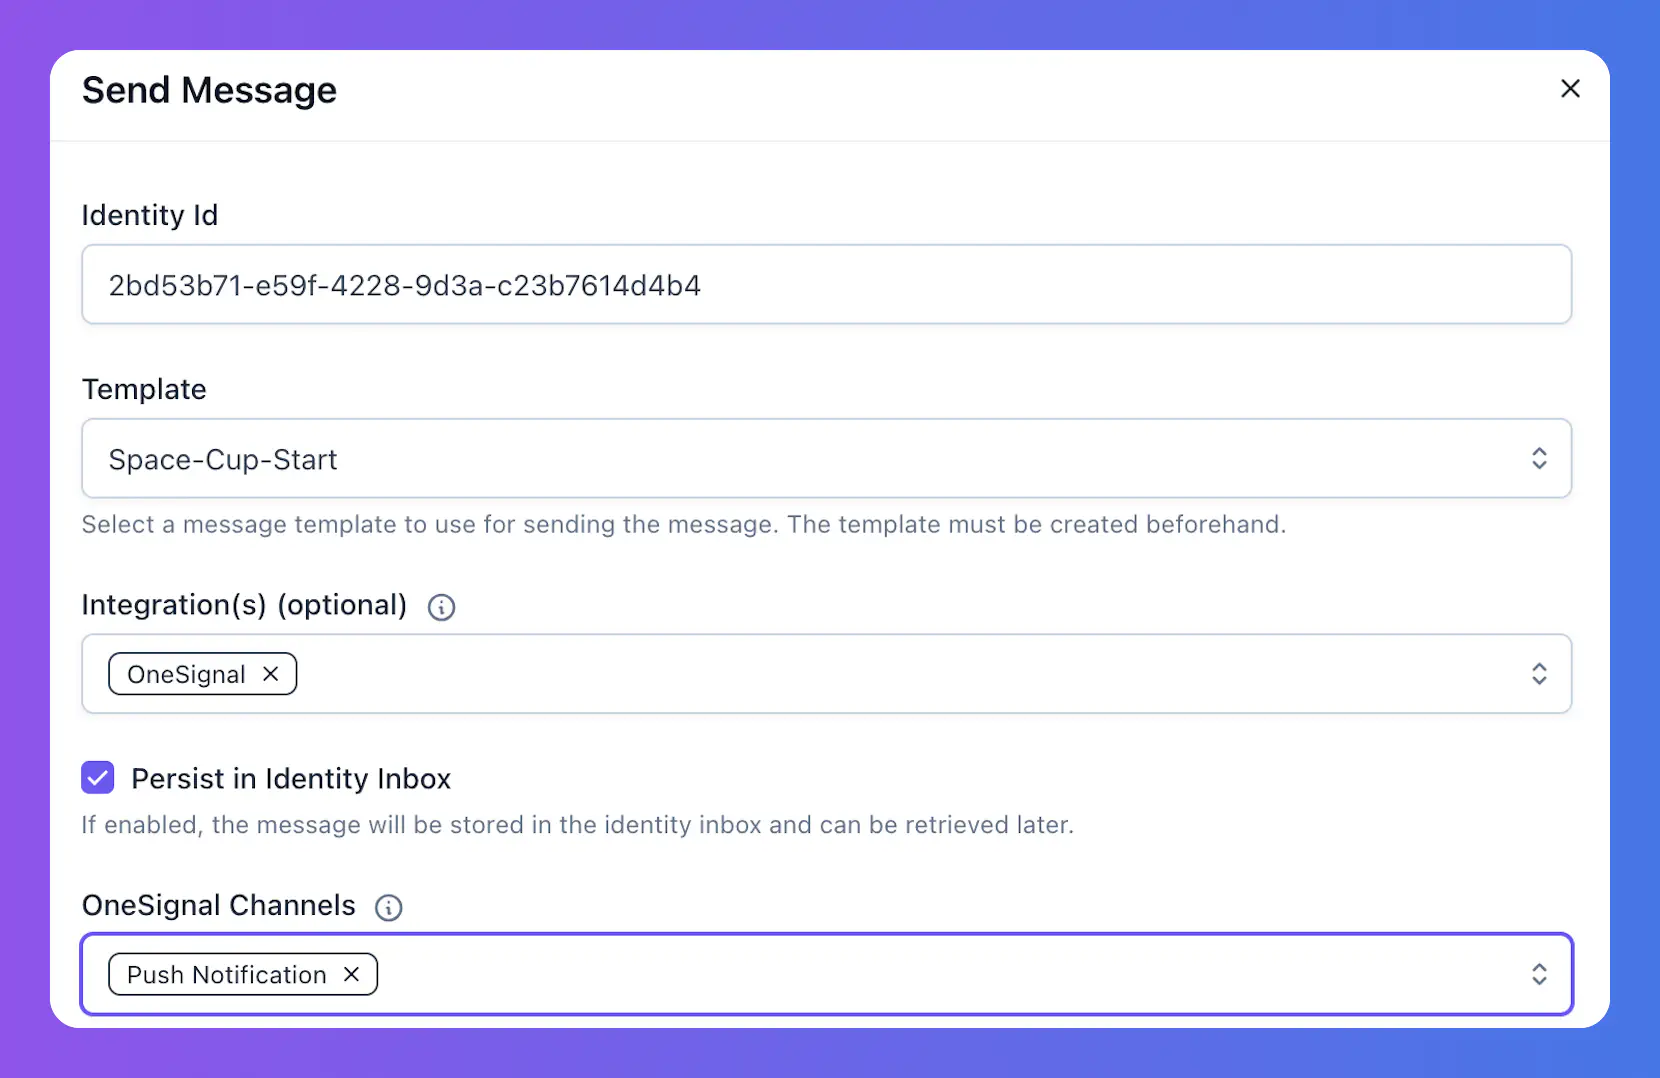
To test a template, you can send a test message to an identity. In the template details screen of the Satori Dashboard, select Test. Provide an identity and select integrations if you want to test with a specific one.
Message Schedules #
Message schedules define when template messages are sent. Satori supports two different schedule configurations:
- Time-Based
- Live Event-Based
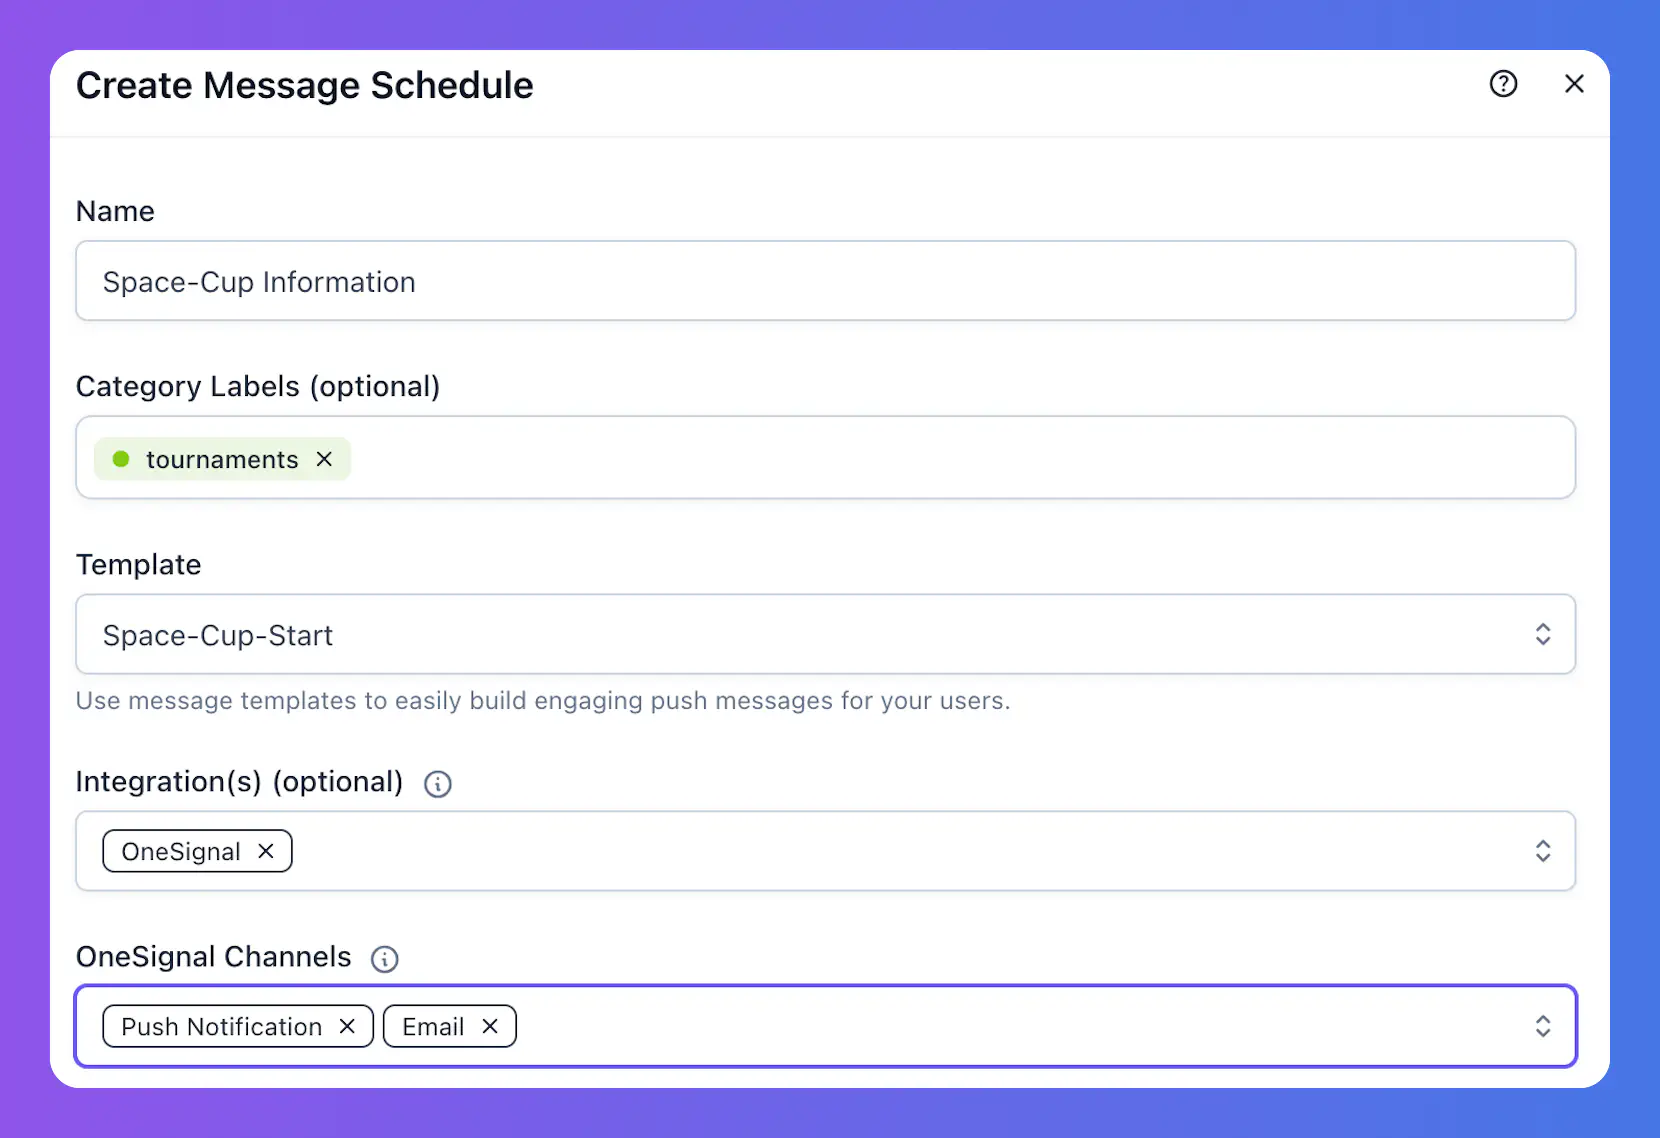
To schedule a new message, click on the “Schedule message” button on the top right of the Messages screen. In the modal that opens, you will need to complete the following information:
| Field | Required | Description |
|---|---|---|
| Name | Yes | The name of the message schedule. |
| Category Labels | No | Labels that identify the schedule. You can select multiple labels. |
| Template | Yes | The template used for sending messages. Select from previously created templates. |
| Integrations | No | Integrations to use when sending the message. You can select multiple integrations. |
| Connect to Live Event | No | A switch that determines whether messages are sent based on time or by an action of a live event. |
Time-Based Scheduling Fields
If the schedule is not connected to a live event, you will need to configure the following:
| Field | Required | Description |
|---|---|---|
| Audience(s) | Yes | The target audiences for the message. You can select multiple audiences, and their union will be used. |
| Exclude Audience(s) | No | Audiences to exclude from delivery. If a player is in both selected and excluded groups, they will be excluded. |
| Start Time | Yes | The date and time when the schedule becomes active. If repeat is not selected, messages are sent immediately at this time. |
| End Time | No | The date and time when the schedule ends. Only available if Repeat is selected but Repeat Forever is not. |
| Repeat Schedule | No | A cron expression that defines when the messages are repeated. Quick templates are available, and a Readable Format explains the cron in plain text. |
| Repeat Forever | No | If selected, the message schedule continues indefinitely. If not, it stops at the defined End Time. |
Live Event-Based Scheduling Fields
If the schedule is connected to a live event, you must provide live event details:
| Field | Required | Description |
|---|---|---|
| Live Event | Yes | The live event whose actions will trigger the message. |
| Reference Point | Yes | The specific action of the live event that acts as the reference for sending the message. |
| Offset | No | For some reference points, the time offset relative to the event action. |
| Unit | No | The unit for the offset. Options are Minutes, Hours, or Days. |
The following Reference Points can be configured in the system:
| Reference Point | Description |
|---|---|
| Before Event Start | Messages are sent at the given offset before the live event’s next run starts. |
| After Event Start | Messages are sent at the given offset after the live event’s next run starts. |
| On Event Start | Messages are sent exactly when the live event’s next run starts. Offset cannot be applied. |
| Before Event End | Messages are sent at the given offset before the live event’s next run ends. |
| After Event End | Messages are sent at the given offset after the live event’s next run ends. |
| On Event End | Messages are sent exactly when the live event’s next run ends. Offset cannot be applied. |
Scheduling from Live Events #
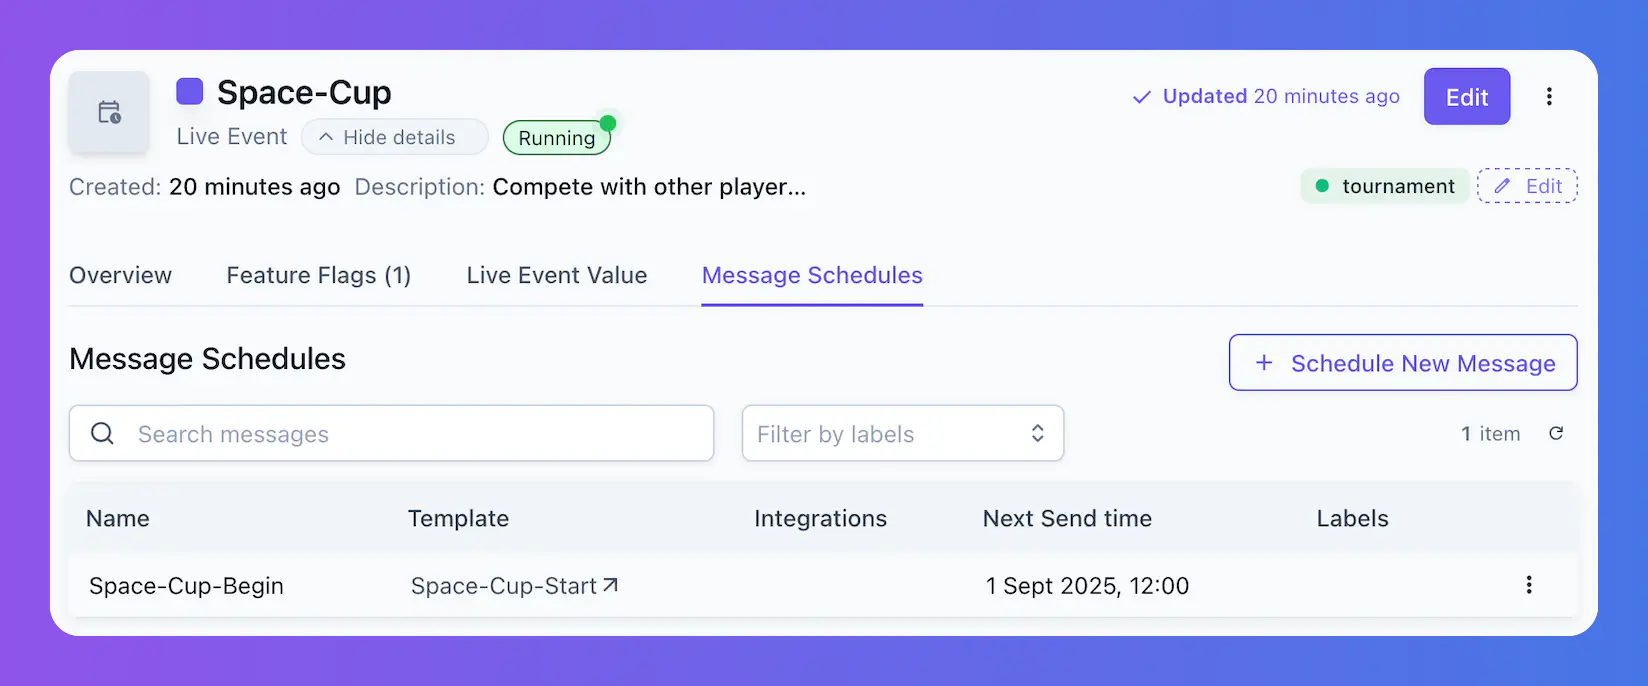
You can also schedule a message from the live event configuration.
- Open the Live Event you want to add a message schedule.
- Go to the Message schedules tab. This page lists all messages scheduled for the live event.
- To set up a new message schedule, click on the “Schedule new message” button.
- The modal opens and requires the same information as the regular schedule message flow.
- Enter the information and click “Create”. The new message schedule will be listed.
Direct Messages #
Using Console API #
You can send messages to one or more players directly using the Console API’s /v1/console/message-direct endpoint.
When using the endpoint, provide the following information:
- templateId: The identifier of the template used to render the message content. You can find this information at the top of the page when you open a message template.
- identityIds: List of recipient identity IDs.
- integrations: List of integrations to use for sending the message. Leaving this empty will ensure the message is only delivered to the identity inbox.
- persist: Boolean value that determines whether to store the message in the recipient’s inbox.
An example of the request body is given below:
| |
From dashboard #
You can also send direct messages from the Satori Dashboard. You can send a test message, as explained in the “Testing templates” section, or use the Identity details page.
On this page, go to the “Messages” section. Here, all messages in the player’s inbox will be listed. Selecting a message shows details such as Consume time and Read time.
To send a message to this player, click on the “Send message” button and fill in the details in the window that opens. You will need to select the template and the integrations you want the template to trigger.
Integrations #
Integrations allow you to distribute messages to your players while they are not interacting with your game. Players may be offline, inactive for a long time, or may have deleted the game, but with the right integration, you can still reach them.
Satori supports the following integrations:
- OneSignal
- Apple Push Notification Service (APNS)
- Firebase Cloud Messaging (FCM)
- Facebook App-to-User Notifications (Facebook A2U)
- Webhook
- OneSignal supports both push notification and email.
- APNS, FCM, and Facebook support push notifications only.
- Webhook is a special integration that triggers a request to a predefined endpoint.
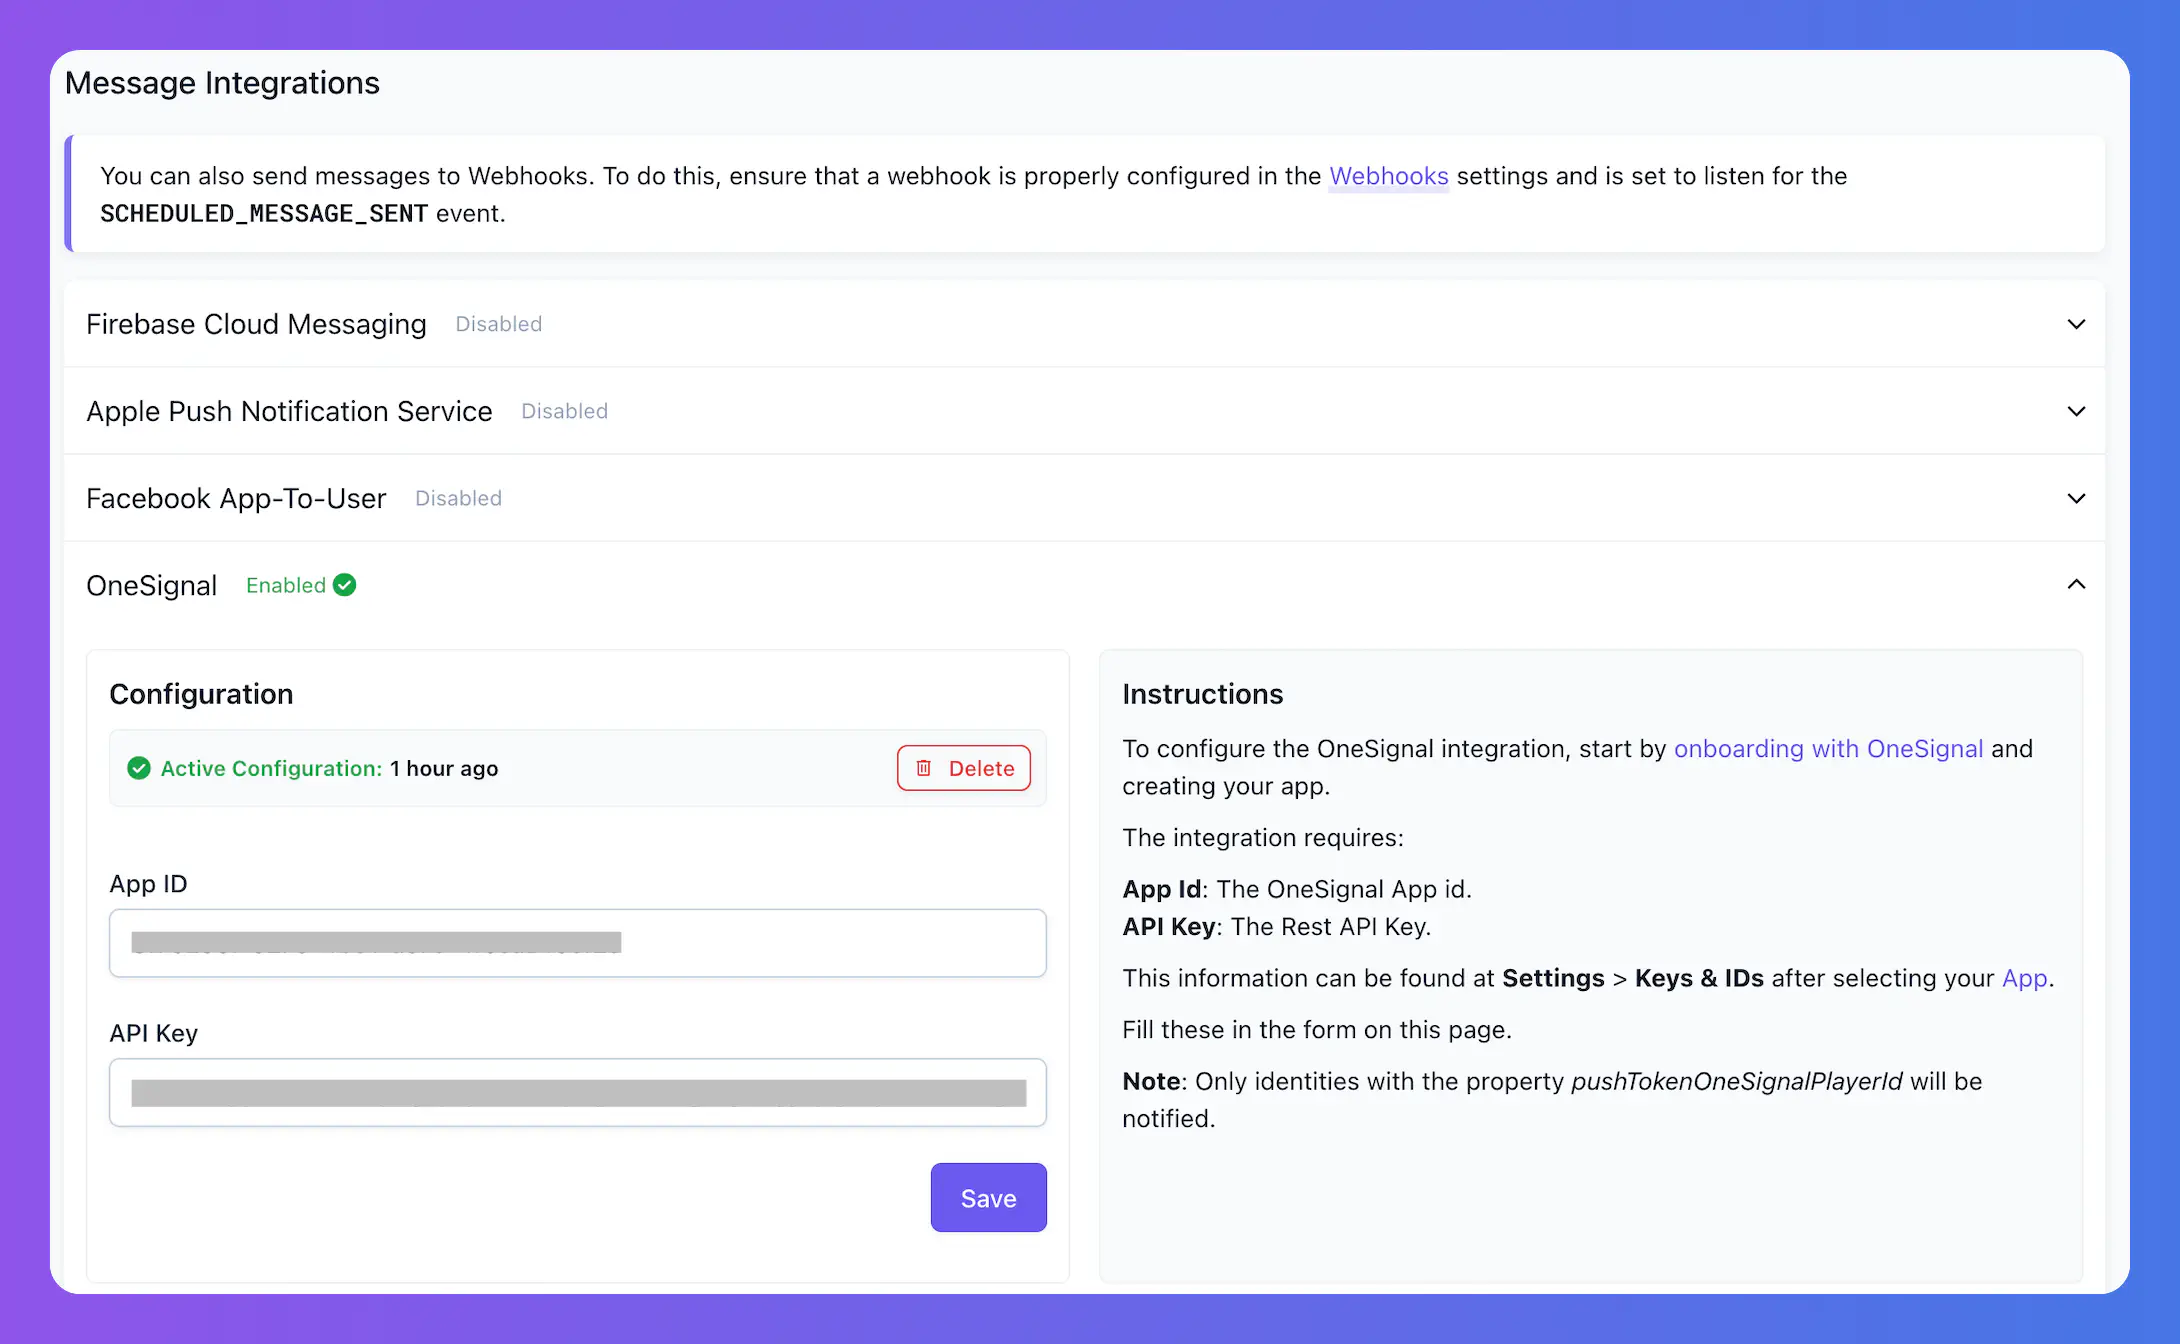
To set up an integration:
- Select Settings > Integrations.
- You will see “Message Integrations” on this page.
- Select the integration you want to set up.
- Enter the details and select Save.
You can add as many integrations as you need here.
Matching players #
When sending messages, Satori checks which integrations are enabled for that schedule. For those integrations, Satori sends the message through the integration for that player if they have a token for it.
To do this, the game client must store the relevant token in Satori’s default properties. For instance, on an iOS client, when a player gives consent for push notifications, the game client should capture the iOS Push Token and store it in the pushTokenIos default property of Satori.
The property to be used for each integration is given in the table below:
| Integration | Default Property |
|---|---|
| OneSignal | PushTokenOneSignalPlayerID |
| APNS | pushTokenIos |
| FCM | pushTokenAndroid |
| Facebook A2U | pushTokenFacebookA2U |

