Manage live events
This page covers how to use Satori to run live events across the full operational sequence: plan, configure, test, launch, tune, monitor, and analyze.
Plan #
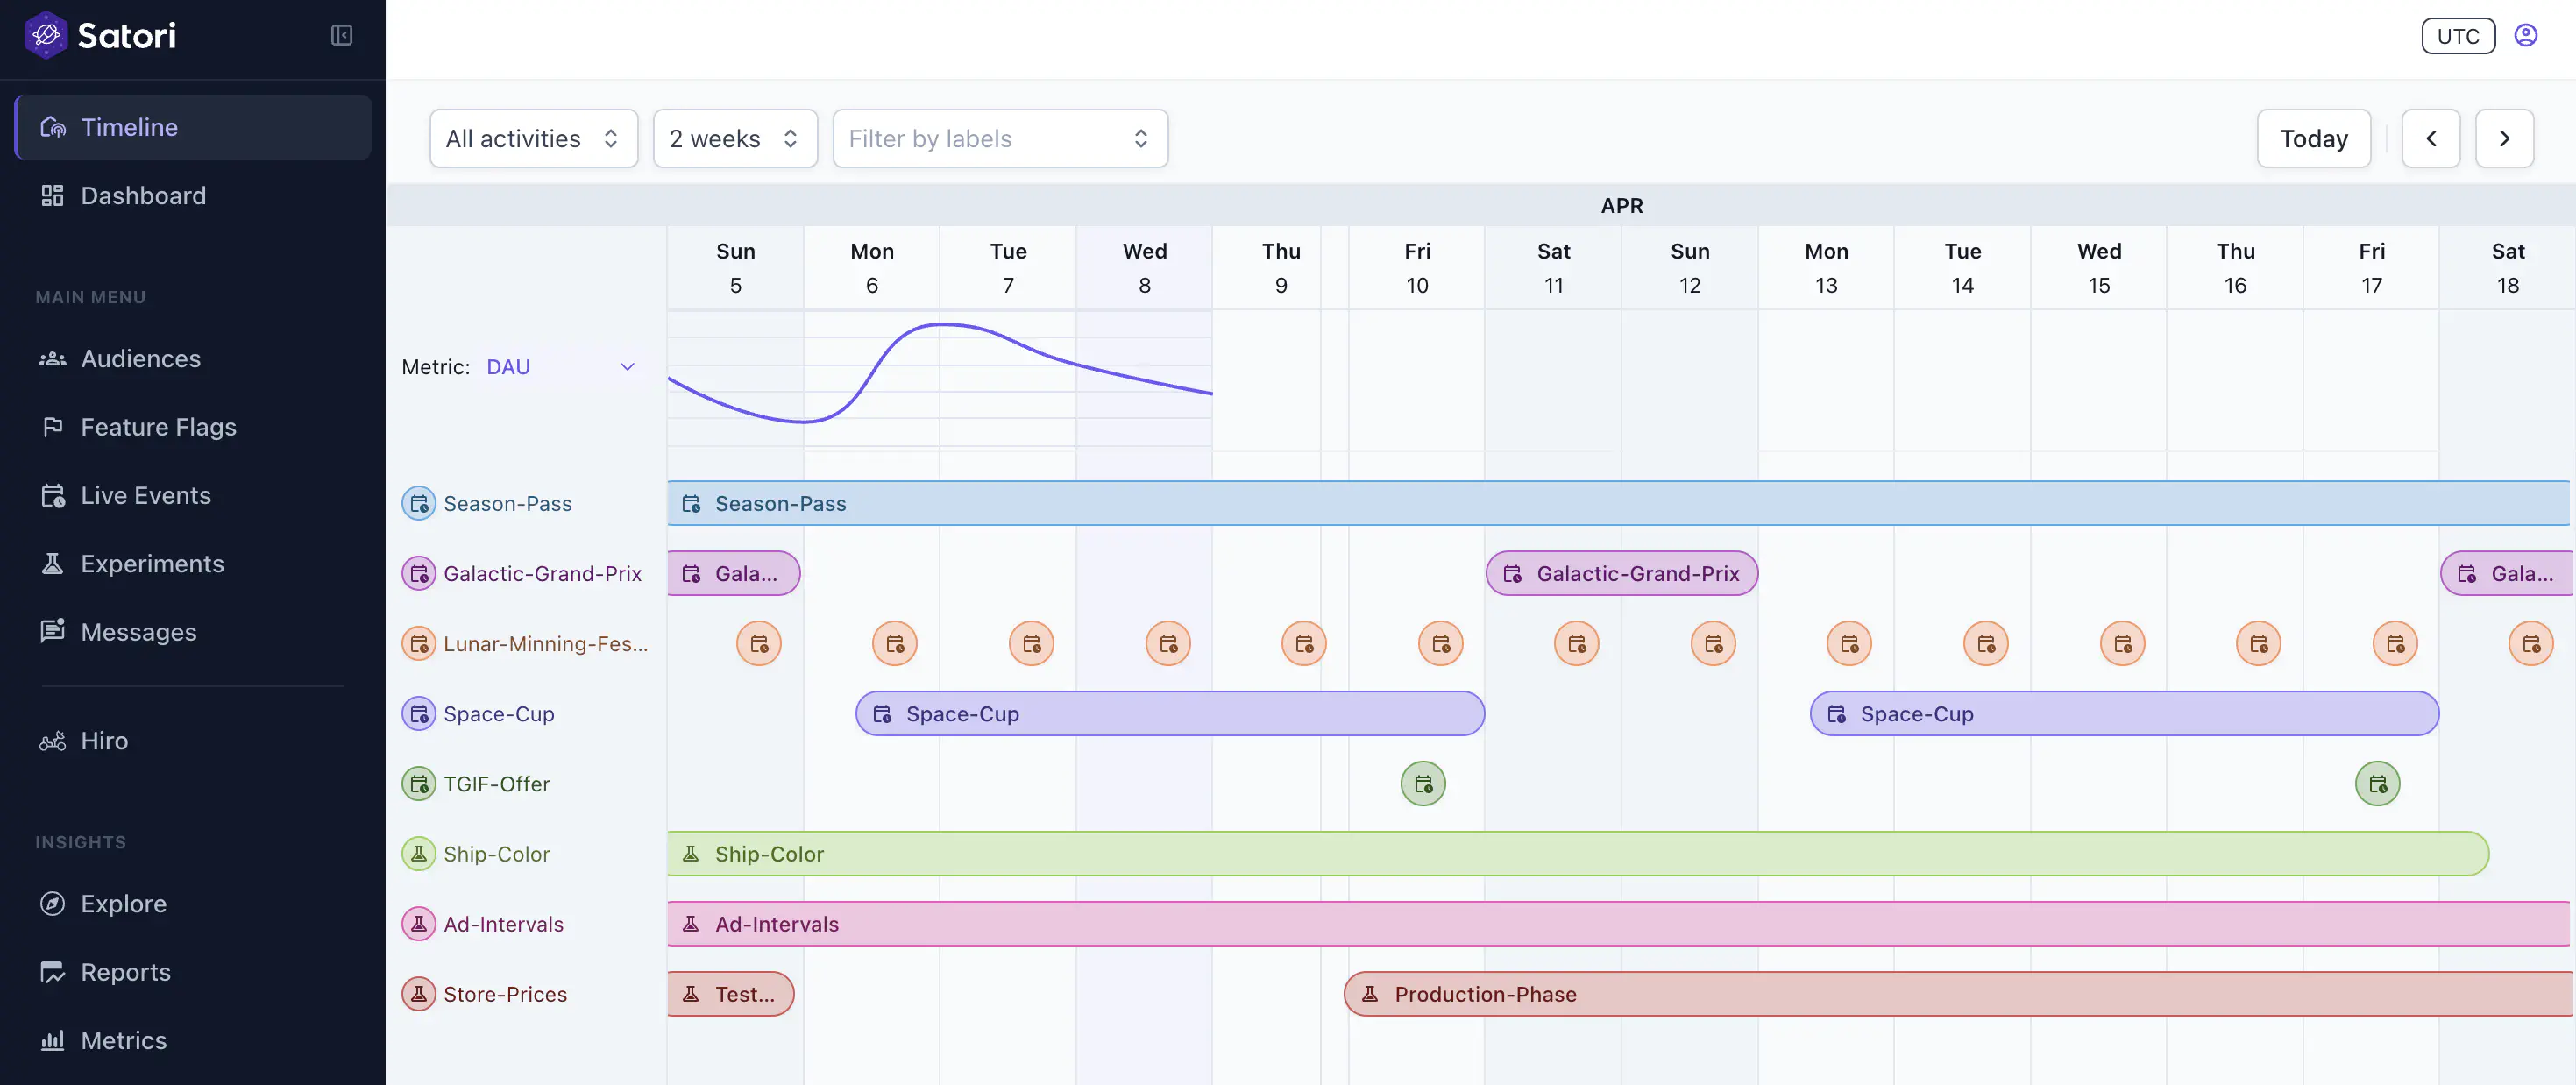
Use the Timeline view to find the right window for your event. It shows all active and scheduled events in a consolidated calendar, for up to a four-week span, so you can check for overlap before committing to dates.
Assign category labels during planning to group related events. Labels apply across live events, feature flags, and player messages, giving you a consistent way to filter the calendar by campaign or season.
Configure #
On the Live Events panel, select + Create Live Event to start the Create Live Event wizard.
Enter event details
- Name: Provide a unique event name.
- Description: Summarize the event’s purpose.
- Color: Pick a color to distinguish this live event visually in the calendar view.
- Category labels: Associate with predefined labels from the drop-down to organize your live events. See Category labels for more information.
Select metrics
- Attach performance tracking directly to the event. Choose predefined metrics from the drop-down to track for this live event.
- You can also create a new metric from this view using the
+symbol without navigating to the Metrics section of the console. The newly created metric is available across all live events and experiments. For more information, see Performance monitoring. - The metrics you select here are available in Run Reports in the live event detail view. See Monitor and analyze for more details.
Target audience
- Audiences: Choose the audiences that should participate from a drop-down list, or create a new one.
- Exclude audiences: Remove specific audiences when needed.
- Explicit join: Require players to opt in before joining.
- Sticky membership: Keep players in an event until it ends. Learn more at Customize enrollment.
To let players explicitly join events, use the Join Live Event API in your preferred client SDK. See the Unity example.

Set feature flags
Before you begin: see Remote Configuration to understand how feature flags work in Satori.
- Choose your live event feature flags. Select multiple existing feature flags from the drop-down. This overrides the default flags and variants.
- Create a new feature flag directly from this step without navigating to the Feature Flags section of the console. The new flag is usable across all live operations.
Players can be eligible for multiple flag variants. The priority order is: Experiment > Live Event > Flag Variants > Default Flag. Players receive the value with the highest priority. For more information, see Manage feature flags.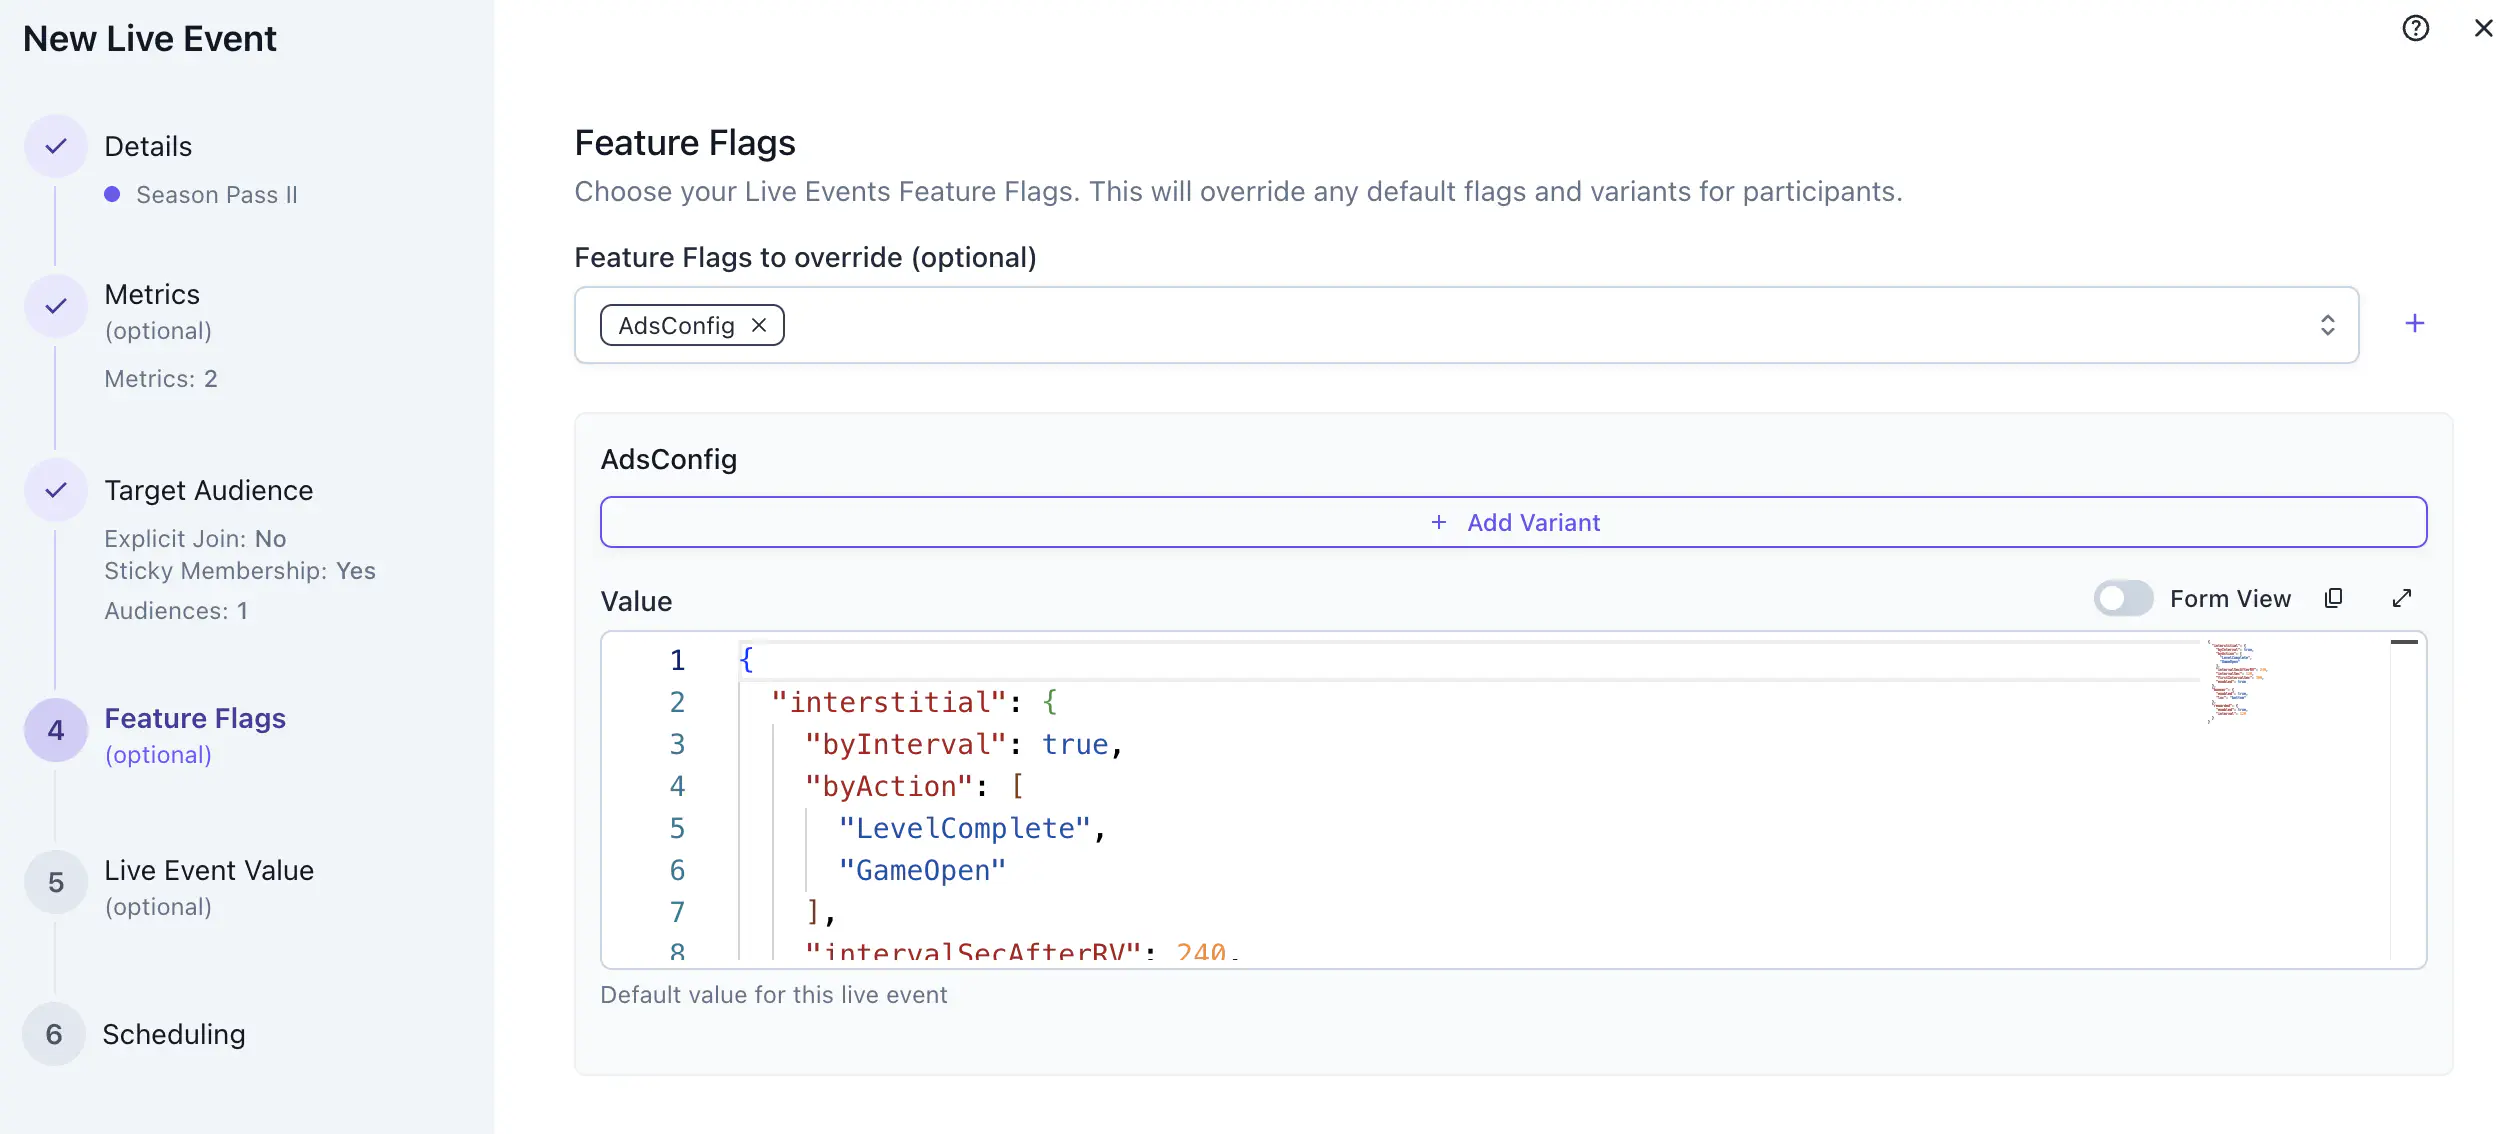
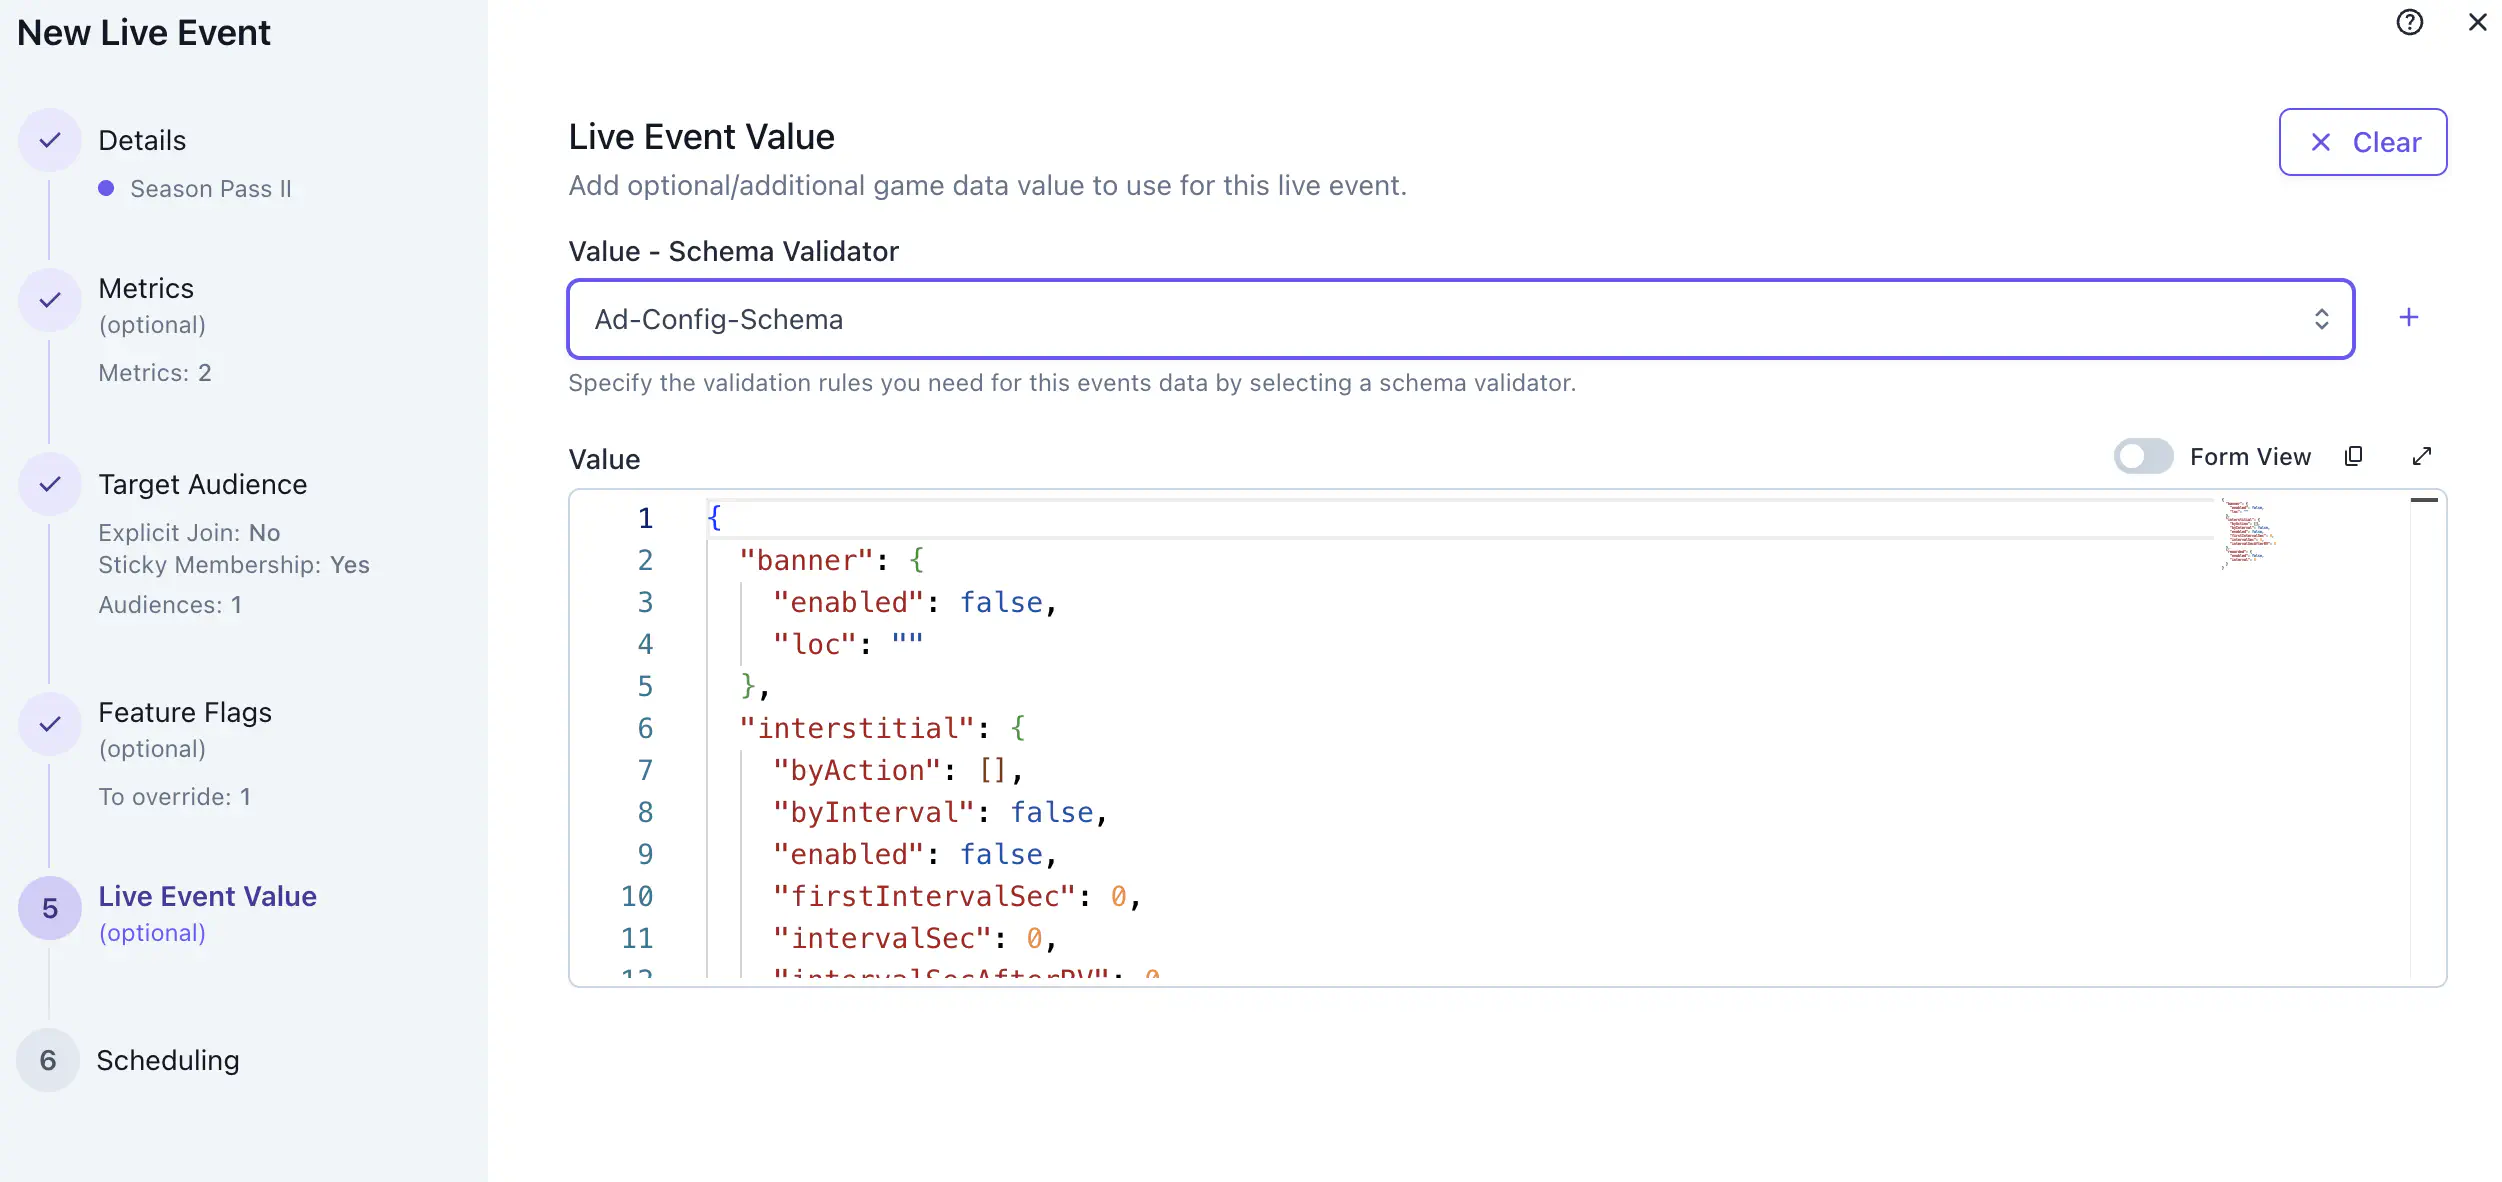
Set Live Event Value
Assign specific data for this particular live event. The data value creation follows the same pattern as a feature flag value. You can also create a new schema using the
+sign to validate the values.When to use Live Event Value
- Use Live Event Value for data that doesn’t need to persist after the event ends.
- Example: A repeatable season pass uses a feature flag to define the config for the entire series: reward tiers, unlock rules, and so on. Each individual run carries its own Live Event Value with the run-specific theme and UI parameters. The feature flag stays unchanged across all runs; the Live Event Value defines the unique characteristics of each run.
Schedule the event
- Start time: When the event begins.
- End time: When it ends.
- Repeat event: Automatically repeat the event using a preset frequency or a custom CRON expression.
By default, start and end times are in UTC. If Show dates in UTC timezone is toggled off in Settings > General, timestamps use local browser time.Schedule player messages
- Once the live event is saved, go to the event details page to create messages targeting players participating in this event. See Live event-based scheduling.
Test #
Test your event against a controlled set of identities before exposing it to your full player base.
- Create a QA audience. In the Audiences panel, create an audience that targets your internal test identities.
- Configure the live event to target your QA audience only. Set the start time to the current date and time so the event goes live immediately for your test identities.
- Test and verify. Using a test identity that belongs to your QA audience, verify that event values are delivered correctly, monitor metrics are firing, and feature flag overrides are applying as expected.
- Update the event for production. Once testing is complete, edit the live event: set the start time to your intended launch date and update the Target Audience configuration to your production audience.
Launch and tune #
Your live event starts automatically at its configured start time. You can edit a live event while it’s running without a code deploy. All value fields are editable.
If a reward level needs adjusting or an asset reference has changed, edit the event value in the console. The updated payload is delivered to qualifying players when the game client next requests a list of live events from the Satori API. See the Client Libraries page for integration details.
To stop a problematic live event immediately, edit its end time.
Monitor and analyze #
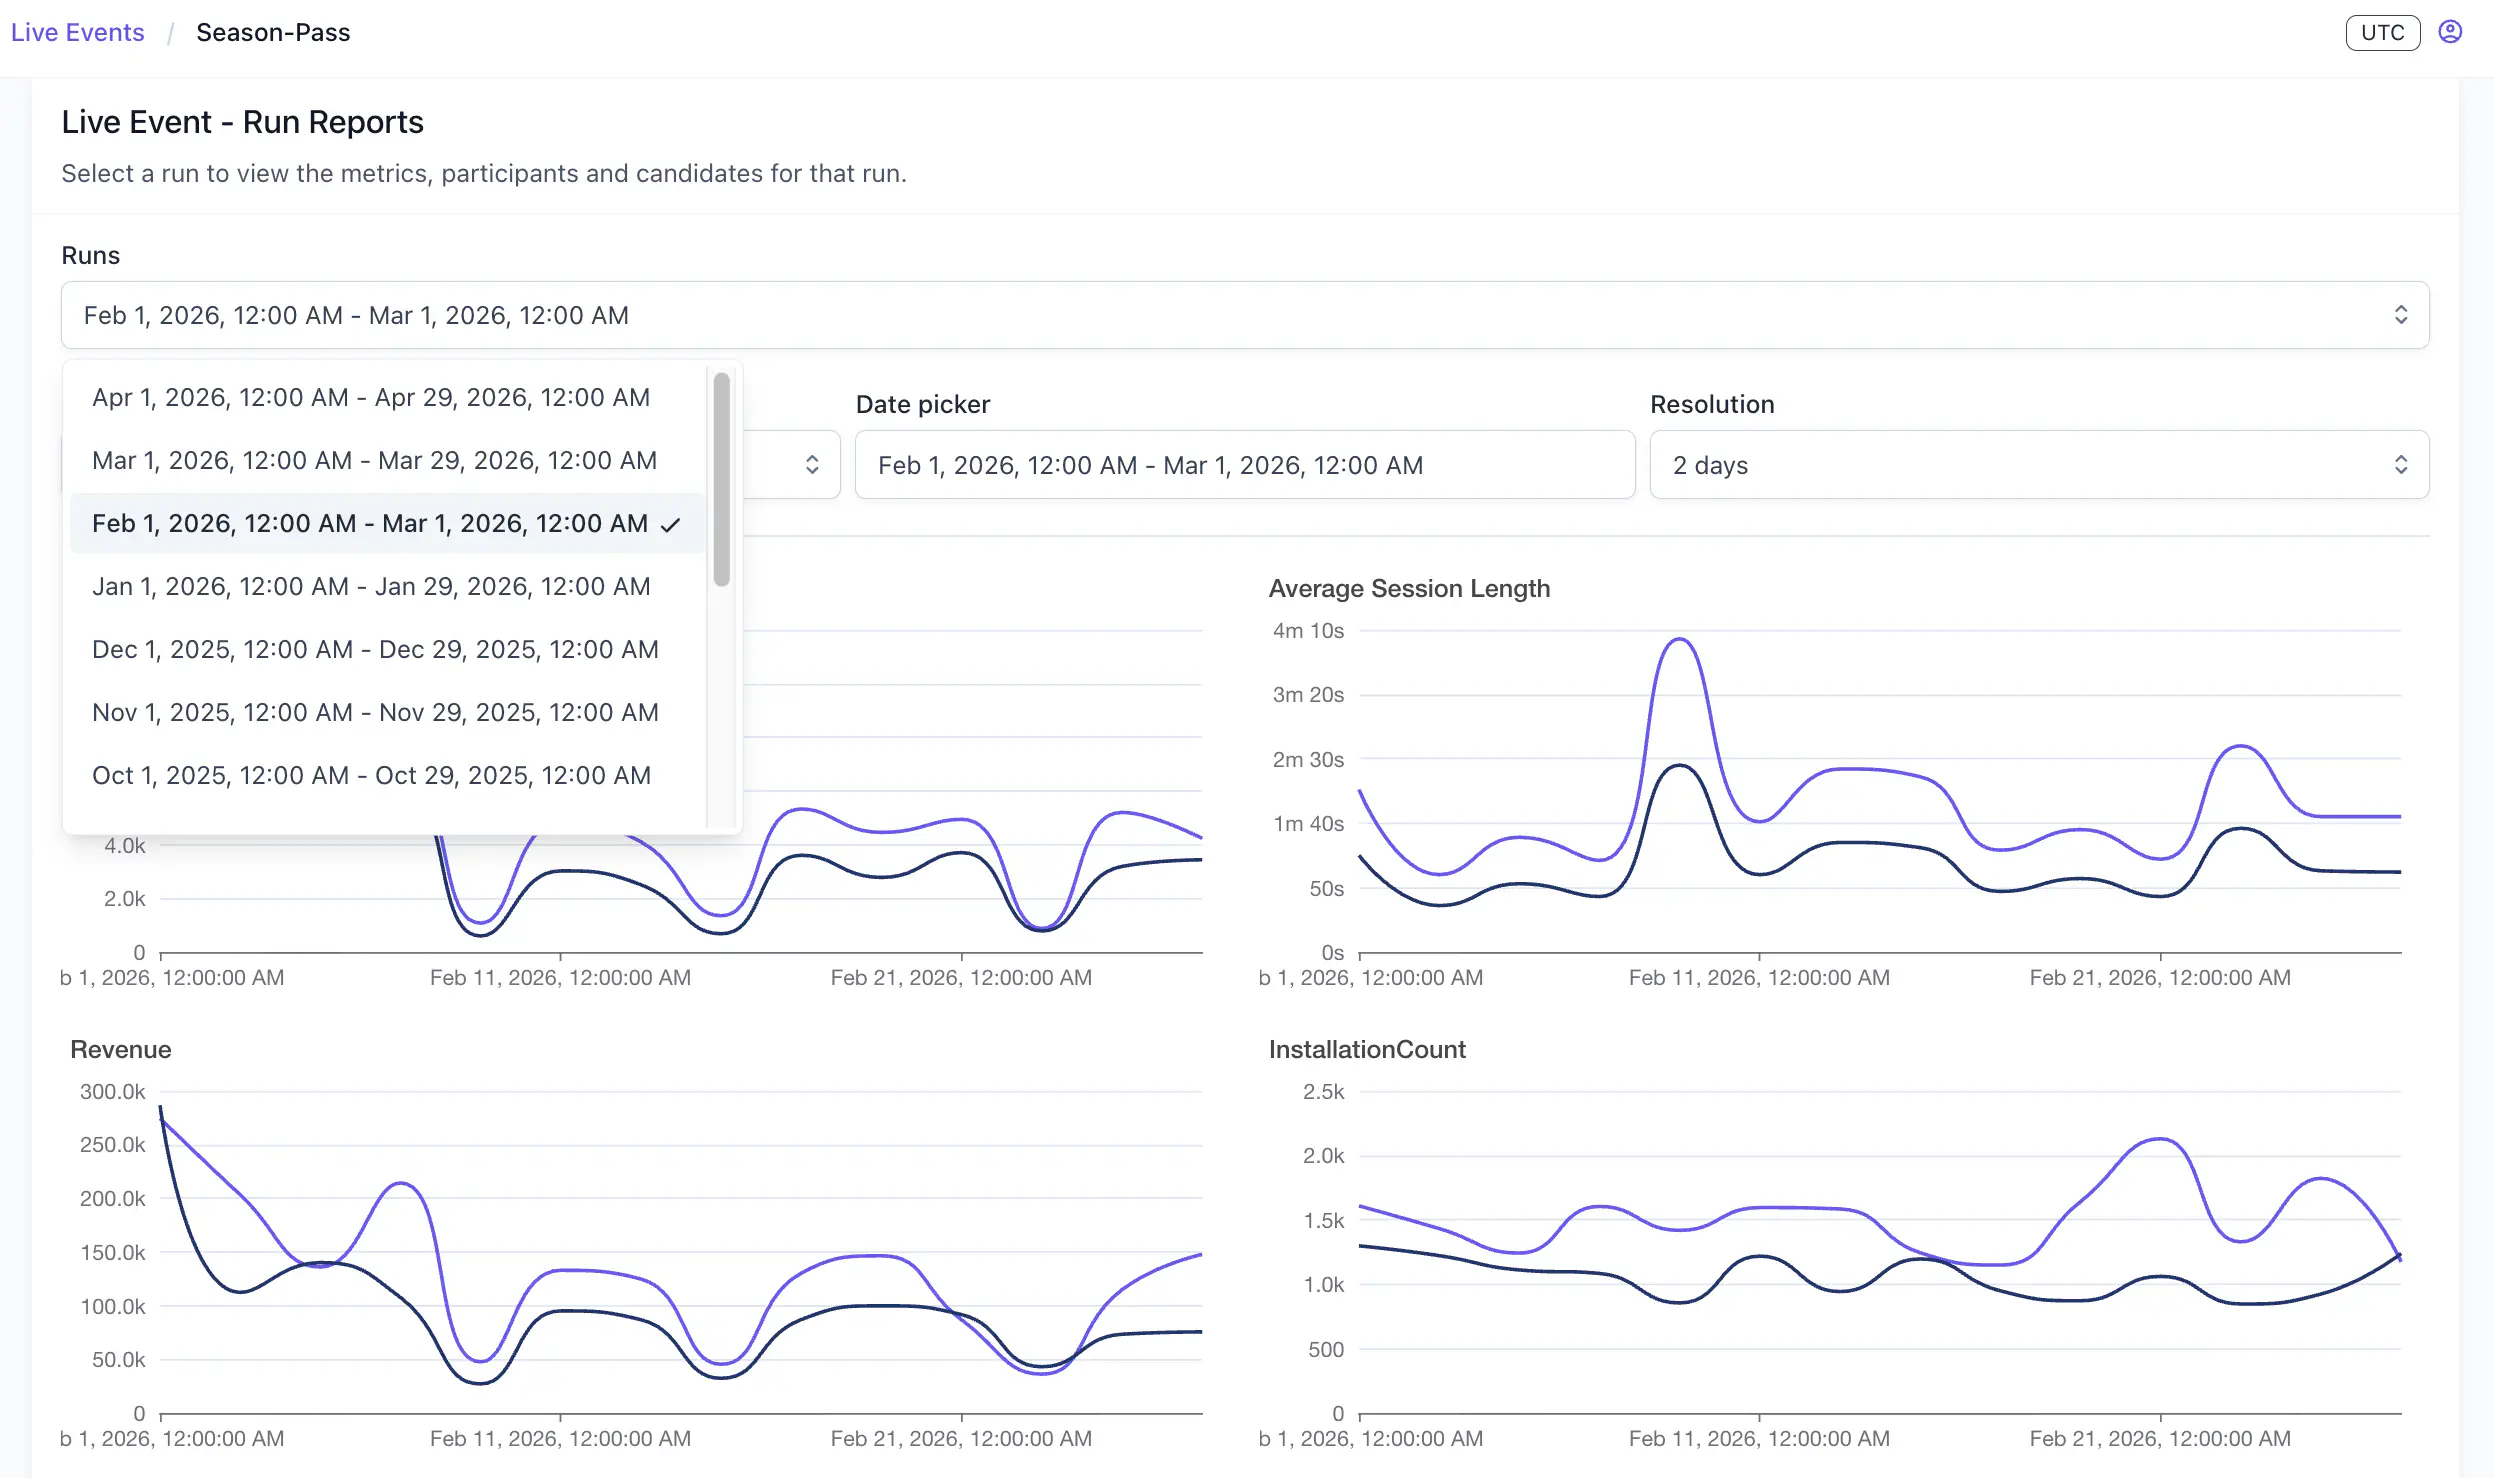
While the live event’s running, open the event’s details page to see time-series data for each monitor metric you attached. Use this view to track participation and conversion trends during the run.
When the event ends, review the monitor metrics for the completed run. Use Run Report to compare performance across previous runs of the same event. Use the filterable views to customize the date range and resolution of the data.
For more information on individual event metrics, see Performance monitoring.
