Unity Fish Game Tutorial
Fish Game is an open-source game project developed using the Unity game engine. It is a fast-paced 2D competitive shooter, inspired by Duck Game, for up to four players.
This game and tutorial highlight the powerful authentication, matchmaking, and real-time multiplayer features of Nakama.
Prerequisites #
To easily follow with this tutorial, perform the following before proceeding:
- Install Nakama
- Download and install Unity 2019.4
- Install the Nakama Unity SDK
- Download the Fish Game Unity project
- Familiarize yourself with the Project and Asset hierarchies
Project hierarchy #
Open the Fish Game project in Unity and see the project hierarchy:
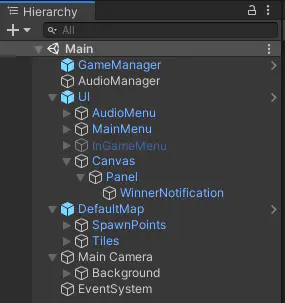
The following game objects are listed:
- GameManager: Controls all match specific game logic, including handling matchmaking.
- AudioManager: Handles the game audio.
- UI
- AudioMenu: A simple audio mute toggle.
- MainMenu: Menu enabling the player to find a match, cancel a matchmaking request, or view the credits.
- InGameMenu: Menu that the player can invoke mid-game by pressing ESC to quit the match.
- Canvas: A UI canvas that simply contains the winning player notification label.
- DefaultMap: The game level including spawn points and tilemap.
- Main Camera: The game 2D camera and a background sprite.
- EventSystem: The default Unity event system that handles UI interaction.
Asset hierarchy #
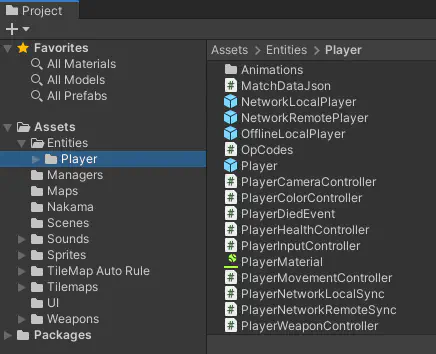
The relevant folders for Nakama features are:
- Entities > Player: Contains the player prefabs, three in total, and all
MonoBehaviourcomponents associated with them. - Managers: Contains the components responsible for handling global game elements (e.g.
GameManager) and various menu scripts. - Nakama: Contains the
NakamaConnectionclass, which is aScriptableObject, and theLocalNakamaConnectionasset. - Weapons: Contains the components responsible for handling weapons and projectiles.
Connecting to Nakama #
From the Asset hierarchy, above, you see that our Fish Game project already contains a NakamaConnection class and LocalNakamaConnection asset.
The NakamaConnection inherits from Unity’s ScriptableObject class, meaning we can create instances of the NakamaConnection class in our project and save them as assets that can be passed as dependencies to other scripts in our game.
To learn about how to connect to our Nakama server, let’s open up the NakamaConnection.cs file. After declaring our NakamaConnection class, we have defined some public variables that allow us to specify which Nakama server this connection object should connect to:
NakamaConnection.cs
| |
Next let’s look at the workings of the Connect function. First we create an instance of the Nakama.Client object and pass in our connection values:
NakamaConnection.cs
| |
This Client object is then used to interact with Nakama.
Next we attempt to restore an existing user session, for example, if a user previously launched the game and connected to the Nakama server we want to restore that same session if it hasn’t already expired:
NakamaConnection.cs
| |
Here we attempt to get an authentication token from PlayerPrefs. If found, we call the Nakama.Session.Restore function and pass in the authentication token to retrieve a Session object. We also perform a check to ensure that the session has not already expired. If the session has not expired, we assign this session object to our private Session variable. Otherwise, we need to reauthenticate to create a brand new session.
This happens inside an if statement that checks if the Session variable is null:
NakamaConnection.cs
| |
This means we have two potential paths, either the user has played the game before and we have stored their device’s unique identifier or this is their first time playing and we need to get a unique identifier for their device to authenticate with the Nakama server.
For a previous player, we check to see if there is already a value for the DeviceIdentifierPrefName key in PlayerPrefs and, if yes, grab the value and store it in the deviceId variable to be used later in the function:
NakamaConnection.cs
| |
For a new player we attempt to grab their device’s unique identifier from SystemInfo.deviceUniqueIdentifier. If this does not return an appropriate identifier value, it will return a value of SystemInfo.unsupportedIdentifier.
We can check for this and, if we receive this value, generate our own unique identifier using a Guid before storing it in PlayerPrefs for future use:
NakamaConnection.cs
| |
We can now authenticate with the Nakama server and store the authentication token to PlayerPrefs:
NakamaConnection.cs
| |
Now that we have a valid Nakama Session we go ahead and open a Socket:
NakamaConnection.cs
| |
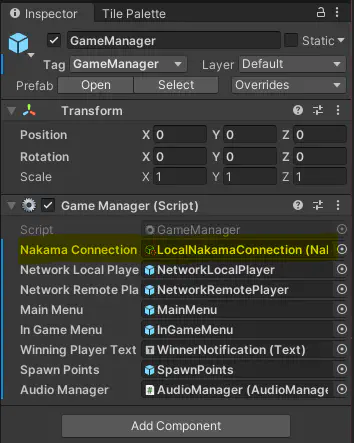
This allows us to begin communicating with the Nakama server and the other players connected to our game. Calling this connection in Fish Game is accomplished via the GameManager object:
Creating a connection #
By using the CreateAssetMenu attribute and defining public variables for our connection, this enables us to modify each NakamaConnection asset in the Unity Inspector.
This makes it simple to connect to multiple Nakama servers when needed, for example when you have a local, development, and production server.
To create a new Nakama connection asset:
From the Assets menu, select Create > Nakama Connection.
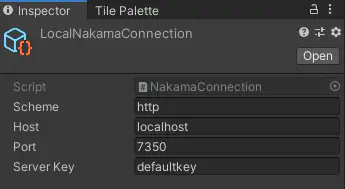
In the Inspector pane, edit the connection properties:
- Scheme: The connection scheme, whether
httporhttps. - Host: The host name or IP of the server.
- Port: The port used,
7350by default. - Server Key: The secret key for connecting to the server,
defaultkeyby default.
- Scheme: The connection scheme, whether
NakamaConnection assets to your .gitignore file so that you don’t commit them to source control and expose your production server secret key. For example:
# Heroic Cloud Nakama Connection asset HeroicCloudNakamaConnection.asset HeroicCloudNakamaConnection.asset.metaMatchmaking #
To review how matchmaking in Fish Game works, we will dive into the GameManager, NakamaConnection, and MainMenu classes and explore the relevant functions. See the matchmaker documentation for more detail on matchmaking in Nakama.
Here you are creating a new Dictionary to store the connected players and subscribing to the following events:
- ReceivedMatchmakerMatched: Enables you to react when Nakama has found a match.
- ReceivedMatchPresence: Enables you to react when player(s) join or leave the match.
- ReceivedMatchState: Enables you to react when receiving a message from the Nakama server.
GameManager.cs
| |
From the MainMenu class, you can see how the matchmaking request is triggered via the FindMatch function.
Here you are calling the FindMatch function on the NakamaConnection class via a reference on the GameManager, and passing in the amount of players (selected via drop-down) to match with:
MainMenu.cs
| |
In the FindMatch function in the NakamaConnection class, a Dictionary is declared with a single key,value pair that specifies we’re using the Unity engine, and a function to add this request to the matchmaking pool based on this filter and any other specified parameters:
NakamaConnection.cs
| |
Nakama will then respond by giving you a MatchmakingTicket. This ticket is what allows you to join a match that Nakama has found, or to cancel your existing matchmaking request:
NakamaConnection.cs
| |
Now that you have been added to the matchmaking pool, Nakama searches for a match and notifies you via the ReceivedMatchmakerMatched event listener when one is found:
GameManager.cs
| |
The stored reference to the Self.Presence value enables quick and easy access to the local player’s Nakama presence, useful for grabbing things such as their Session ID, User ID and Username.
The stored reference to the JoinMatchAsync() return value enables access to things such as the current match ID and connected users.
Next we loop through all of the connected users via the match.Presences property and spawn a player for each.
The final thing to consider for matchmaking is what to do when a user connects and disconnects. This is done via the OnReceivedMatchPresence event handler:
GameManager.cs
| |
Here the IMatchPresenceEvent gives us two things, a list of users who have joined the match and a list of users who have left the match.
For users who have joined, we spawn a player object for them just like we did in the OnReceivedMatchmakerMatched event handler.
For users who have left, we check to see if we currently have a reference for that user in the players Dictionary based on their Session ID. If we do, we first destroy the GameObject for that player, followed by removing them from our players Dictionary.
Spawning players #
Here we review the SpawnPlayer function called by the GameManager in response to matchmaking or user presence events.
First we perform a check to see if we already have a reference to this user in our players Dictionary based on their Session ID. If yes, we return early as we have already spawned this player:
GameManager.cs
| |
Next we determine where to spawn this player. If a spawnIndex hasn’t been passed (spawnIndex == -1) then we choose a random spawn point for this player. If a spawn index has been passed we will use that instead:
GameManager.cs
| |
Next we check to see whether or not this player is our own local player or a remote player. Based on this we decide which Player prefab to spawn, and then instantiate an instance of the prefab within the game at the relevant spawn point:
GameManager.cs
| |
Next we see if this is a remotely connected player and, if so, grab a reference to the PlayerNetworkRemoteSync component and set appropriate network data. We pass it the current Match ID and a reference to this user’s IUserPresence object:
GameManager.cs
| |
This is used when receiving data to check if that data is meant for that specific player.
We then add the player to our players Dictionary using their Session ID as the key and passing in the player GameObject as the value:
GameManager.cs
| |
Next we check to see if this is our local player and, if so, setup an event listener on their PlayerDied event:
GameManager.cs
| |
Player prefabs #
Found in then Entities > Player folder, Fish Game has two player prefabs: NetworkLocalPlayer and NetworkRemotePlayer.
NetworkLocalPlayer #
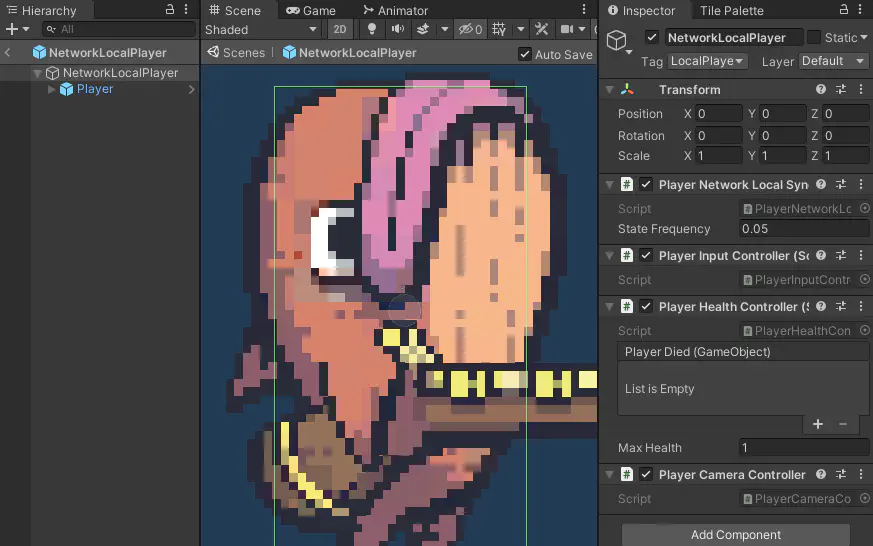
This is a simple wrapper around the network agnostic Player prefab, which has components to handle movement, physics, weapon and colour. The root GameObject of this prefab has a few noteworthy components:
- PlayerNetworkLocalSync: Handles sending out state updates across the network at a specific interval.
- PlayerInputController: Handles player input and passes it to the underlying movement controller.
- PlayerHealthController Handles player health and is responsible for triggering the
PlayerDiedevent. - PlayerCameraController A simple component that ensures the camera follows this player.
NetworkRemotePlayer #
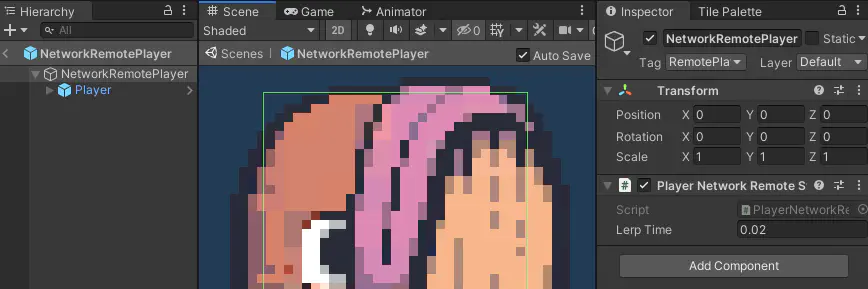
Also a wrapper around the Player prefab, here we have just one component on the root: PlayerNetworkRemoteSync.
This component receives state updates from the network and handles the smooth interpolation of it’s current state to the new correct state received. For example, if this object was at position { 100, 100 } and we received a network message to say that the correct position should be { 120, 100 }, this component would handle smoothly correcting this objects position over LerpTime seconds.
Sending player position #
To review how we send out position and input updates across the network from NetworkLocalPlayer, let’s look at Entities > Player > PlayerNetworkLocalSync.cs.
First we have a public variable that determines how often network state syncs updates are sent:
PlayerNetworkLocalSync.cs
| |
Changing the value here will increase or decrease the frequency with which state updates are sent across the network. Finding a good balance here is a crucial part of creating a smooth feeling multiplayer game.
You can see the default value here of 0.1f, or 10 ticks per second. For our Fish Game example, let’s set this to 0.05f, doubling our rate to 20 ticks per second:
| |
A faster rate will send updates more frequently, which should result in a smoother feel for other players, while sending updates less frequently will result in player positions becoming out of sync on other connected clients and the interpolations/corrections being much more jarring.
Next let’s focus on the LateUpdate function, used as we only want to send updates after the player’s position has been updated. First is a check to see if the state sync timer has elapsed and, if so, then we need to send a new update:
PlayerNetworkLocalSync.cs
| |
Next we check to see if the local player’s input has changed since the last time this function ran and, if not, return early:
PlayerNetworkLocalSync.cs
| |
Finally, we send the player’s current input across the network:
PlayerNetworkLocalSync.cs
| |
Operation codes #
Used in the functions above, operation codes (OpCodes) are a numeric representation of specific network actions that can occur in the game.
You can see all the OpCodes we have in Fish Game by looking at Entities > Player> OpCodes.cs. These include:
VelocityAndPosition: See above. Send a network message containing the player’s velocity and position.Input: See above. Indicates that a player’s input has changed since the last update, and sends a message with the current input.Died: Indicates death of a player, after which their GameObject is destroyed and they are removed from theplayersDictionary.Respawned: Send a message across the network informing other players where you have spawned.NewRound: Send a message across the network informing other players that you won, and initiate a new round.
Receiving player position #
To review how we receive position and input updates across the network from a NetworkRemotePlayer, let’s look at Entities > Player > PlayerNetworkRemoteSync.cs.
First we have two public variables: one storing a reference to the current Match ID as well as the player’s IUserPresence object, and the other determining the speed at which we interpolate the player’s position:
PlayerNetworkRemoteSync.cs
| |
Within the Start function, we set up a a listener for whenever we receive data from the network:
PlayerNetworkRemoteSync.cs
| |
Here, we first determine whether or not the message we are receiving is meant for this object or not by comparing this object’s NetworkData.User.SessionId with the matchState.UserPresence.SessionId value:
- If they do not match, we don’t need to handle this message and return early from this function.
- If they do match, we perform a switch on the
matchState.OpCode. Depending on theOpCodewe pass the state to one of three functions to be handled, either for:
Receiving position and velocity #
For this, let’s look at the UpdateVelocityAndPositionFromState function:
PlayerNetworkRemoteSync.cs
| |
Here we grab the state as a Dictionary<string, string> using the helper function GetStateAsDictionary, then update the player’s rigid body velocity property with the incoming velocity.x and velocity.y values.
Next we create a new Vector3 with the incoming position.x and position.y values. We then begin the interpolation process by setting the player’s current position as the lerpFromPosition and the new position as the lerpToPosition. We reset the lerp timer and set the lerpPosition value to true which will ensure the the interpolation code that lives in LateUpdate will run.
Receiving input #
For this, let’s look at the SetInputFromState function:
PlayerNetworkRemoteSync.cs
| |
Again we grab the state as a Dictionary<string, string>, then set the appropriate values on the PlayerMovementController from the incoming state data.If the stateDictionary["attack"] value is true we also update the PlayerWeaponController by calling the Attack function.
A final consideration here is the OnDestroy function. It is always good practice to remove event listeners when no longer needed, such as the OnReceivedMatchState handler here when this object is destroyed:
PlayerNetworkRemoteSync.cs
| |
When a player dies #
To review how we handle player death let’s look at the Entities > Player > PlayerHealthController. A PlayerDied event is declared, and called in the TakeDamage function when a player’s health is less than 1:
PlayerHealthController.cs
| |
The local player death is handled via the OnLocalPlayerDied function in the GameManager class:
GameManager.cs
| |
Here we send a message across the network to let other players know that we died, and our location. Then we are removed from the players Dictionary and destroyed.
All remaining players then receive the OpCodes.Died network action, the response is then handled via the OnReceivedMatchState function:
GameManager.cs
| |
Here we are getting a reference to the Session ID of the connected user who sent the message and storing it in userSessionId, then see if there is any state data inside the network message by checking the matchState.State.Length property.
Lastly we do a switch over the matchState.OpCode and handle each one as necessary.
Announcing the winner #
On each player death, we destroy their GameObject and remove them from the players Dictionary based on their Session ID.
Next we check to see if they are the only player remaining. If so, the AnnounceWinnerAndStartNewRound function is called:
GameManager.cs
| |
Here we are grabbing the winning player’s name and sending out a network message with the OpCodes.NewRound action telling everyone that the match has been won and the winning player. We then call the AnnounceWinnerAndRespawn function:
GameManager.cs
| |
This displays the winning player message and, after a short delay (2 seconds here), removes the message. Then we destroy the local player GameObject and remove them from the players Dictionary before respawning them at a random location.
