Fish Game
Fish Game for Godot is an open-source, 2-4 player online game built in the Godot game engine as a demonstration of Nakama features.
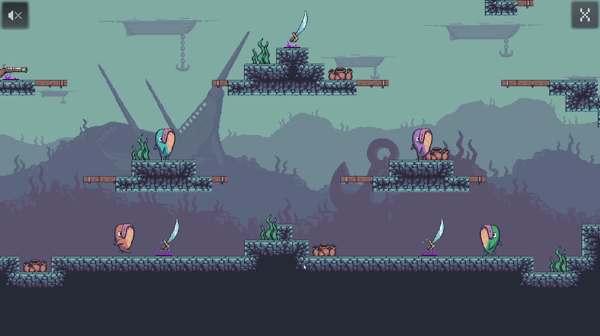
As you can see, Fish Game is a frenetic battle royale starring murderous fish - the last fish standing wins! The game design is heavily inspired by Duck Game (except with fish).
If you want to try it out for yourself, you can download playable builds for Windows, Linux or MacOS from the Releases page.
In this tutorial, we’re going to walk through each part of the code that interacts with Nakama to cover all the principles and APIs that you need to know to create your own online multiplayer game with Godot and Nakama.
We’ll touch on the following Nakama features:
This tutorial assumes you’re already proficient with game development in the Godot game engine, but haven’t ever used Nakama before.
Ready to start a fish fight? Let’s go!
Playing the game from source #
You can download the full source code from GitHub.
To run the game from source you’ll need:
- Godot 3.5.0 or later, and
- Nakama server (version 3.13.1 or later)
Installing and running Nakama #
The easiest way to setup a Nakama server locally for testing/learning purposes is via Docker.
There is a docker-compose.yml included in the source code of Fish Game.
Importing into Godot and running the game #
To run the game:
Open Godot and Import the project.
(Optional) Edit the autoload/Online.gd file and replace the variables at the top with the right values for your Nakama server. If you’re running a Nakama server locally with the default settings, then you shouldn’t need to change anything.
Press F5 or click the play button in the upper-right corner to start the game.
Setting up the leaderboard #
If you didn’t use the docker-compose.yml included with Fish Game the leaderboard won’t work until you first create it on your server. (The game will play fine without the leaderboard.)
To create the leaderboard:
- Copy the
nakama/data/modules/fish_game.luafile to themodules/directory of your Nakama server - Restart your Nakama server
About this tutorial #
While Fish Game is a very simple example game, it’s meant as real-world example. It’s structured like a real game, so the code isn’t quite as simple as it would be in a more artificial example.
This means:
- There is more indirection (i.e. having multiple classes that call other classes rather than just doing it directly) than you’d usually see in a tutorial.
- The code is full of error checking, handling corner cases, addressing race conditions, and other things that make the code look a little uglier and more complex. These are the things that are frequently omitted from most tutorials but are absolutely necessary in a real-world game.
Also, in this tutorial, we’re going to be looking at individual snippets of code from the game, rather than the full source code in each file. This is to make it easier to demonstrate the specific things we are teaching in this tutorial.
Structure of the game #
Before we start digging into network code, let’s first talk a bit about the high-level structure of the game.
Main scene #
When you first open the project in the Godot editor, you’ll see Main.tscn - the game’s “Main Scene”. This scene is responsible for tying all the parts of the game together.
It manages global elements, like the game music and all of the menus.
Take a look at its scene tree:
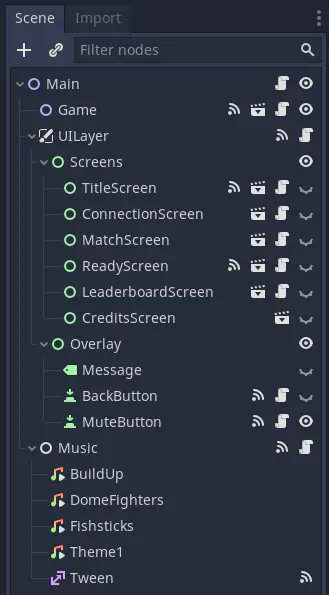
Notice all of the nodes under the UILayer/Screens node, like ConnectionScreen, MatchScreen, etc. These are all the menus - or “screens” as they’re referred to in the code - which are important for interacting with Nakama.
Throughout the code you’ll see lines like:
| |
This refers to the MatchScreen node you see here (which is an instance of the main/screens/MatchScreen.tscn scene).
The UILayer has some other useful methods you’ll see frequently, such as:
ui_layer.hide_screen(): Hides the current screen.ui_layer.show_message("..."): Shows a message over the top of the screen. Only one message can be shown at a time.ui_layer.hide_message(): Hides the message.
The Main scene also handles the game life-cycle: initializing the game (either in local or online mode), starting/stopping matches, and keeping score.
Game scene #
The Game.tscn scene is responsible for all the “game parts” of the game.
It handles loading the map, instantiating the player scenes and the game camera.
Player scene #
The really interesting functionality, from both a gameplay and networking perspective, is in the Player.tscn scene.
It’s made up of a couple sprites, collision shapes, areas, animation players and all the sounds that the player can make.
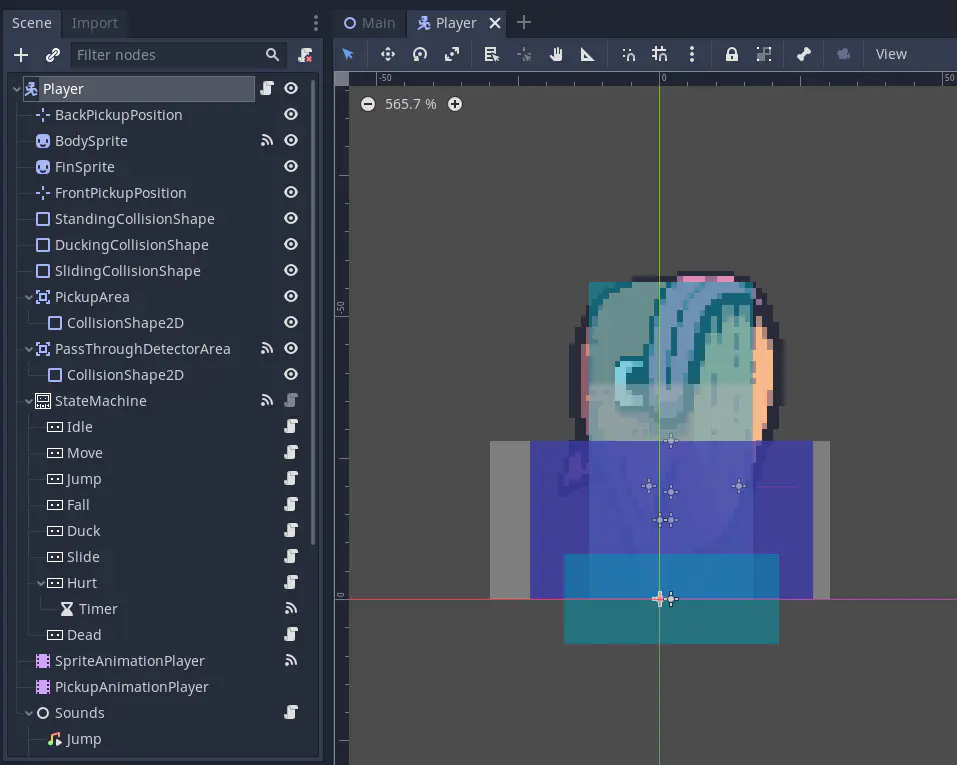
However, the most important part is its state machine. Every state that the player is capable of being in (e.g. Idle, Move, Jump) is represented by a node underneath the StateMachine node. Player controls, motion and animation all change with its current state.
This tutorial is focused on Nakama so we’re not going to discuss the state machine pattern in depth here. But it’s important to know about the state machine because we need to synchronize the player’s state over the network in order to enable online play.
Connecting to Nakama #
Alright, let’s get started!
The first thing we need to do is connect to the Nakama server.
Connection details #
The information needed to connect originates from the autoload/Online.gd singleton (exposed as Online):
| |
These default values will allow you to connect to the Nakama server setup by the included docker-compose.yml. If using a different Nakama server, replace these with the correct values for your situation.
About the build system #
While looking in the autoload/ directory you may have noticed another singleton in autoload/Build.gd.
In the Git repository, this file only contains a comment:
extends Node

#####
# NOTE: This file is replaced by the build system. DO NOT EDIT!
#####
It’s replaced with the values for connecting to the production Nakama server when building a release of the game. This is done automatically by GitHub Actions using scripts/generate-build-variables.sh. The actual values are stored in GitHub encrypted secrets, so they don’t ever need to be committed in Git.
If you want to setup a similar build system for your game, take a look at the GitHub Actions workflow configuration in .github/workflows/godot-export.yml, or, if you use GitLab, there’s a GitLab CI configuration at .gitlab-ci.yml as well.
Nakama client #
In order to interact with our Nakama server, we need to get a NakamaClient object. The NakamaClient class comes from the Godot client for Nakama, which is included in the source code for this project under addons/com.heroiclabs.nakama.
Looking further in autoload/Online.gd, you’ll see the following code:
| |
This allows us to refer to Online.nakama_client and get a NakamaClient object configured for our Nakama server.
Nakama session #
The nakama_session variable is also defined in autoload/Online.gd:
| |
Unlike Online.nakama_client it doesn’t construct an object for us, we’re expected to create a NakamaSession somewhere else in the project and assign it to Online.nakama_session.
We do it this way because there are multiple ways to authenticate with Nakama (email/password, Steam, Facebook, etc) which all require different workflows and UIs. So, we let the UI do the user authentication in whatever way it needs to, and store the session in Online.nakama_session. Then other parts of the project can use Online.nakama_session, and connect to (or yield() on) the session_changed signal to know when the session was created or changed.
We’ll be creating the NakamaSession and assigning it to Online.nakama_session in the section about User authentication.
Nakama socket #
Using a NakamaClient, we can make simple requests to Nakama and get a response. Underneath it’s making normal HTTP requests.
However, we also want to use Nakama’s Realtime Multiplayer API, so we need to open a NakamaSocket which gives a persistent bi-directional connection (via WebSockets) to Nakama, allowing Nakama to send us messages at any time.
There is a nakama_socket variable defined in autoload/Online.gd:
| |
This allows any code in the project that needs a NakamaSocket to do:
| |
And then use Online.nakama_socket to do whatever it needs to do!
Reusability #
Nothing in the Online singleton is specific to Fish Game and it has no dependencies beyond the Nakama addon. You could easily copy autoloads/Online.gd into your own project!
In fact, all the singletons were designed to be reusable in other projects and to provide clear external APIs.
User authentication #
Before a user can join a match they need to first authenticate with the Nakama server, which is how a NakamaSession is created.
Nakama provides a number of different authentication mechanisms. For simplicity, we’re going to use email and password authentication.
Let’s take a look at main/screens/ConnectionScreen.tsn:
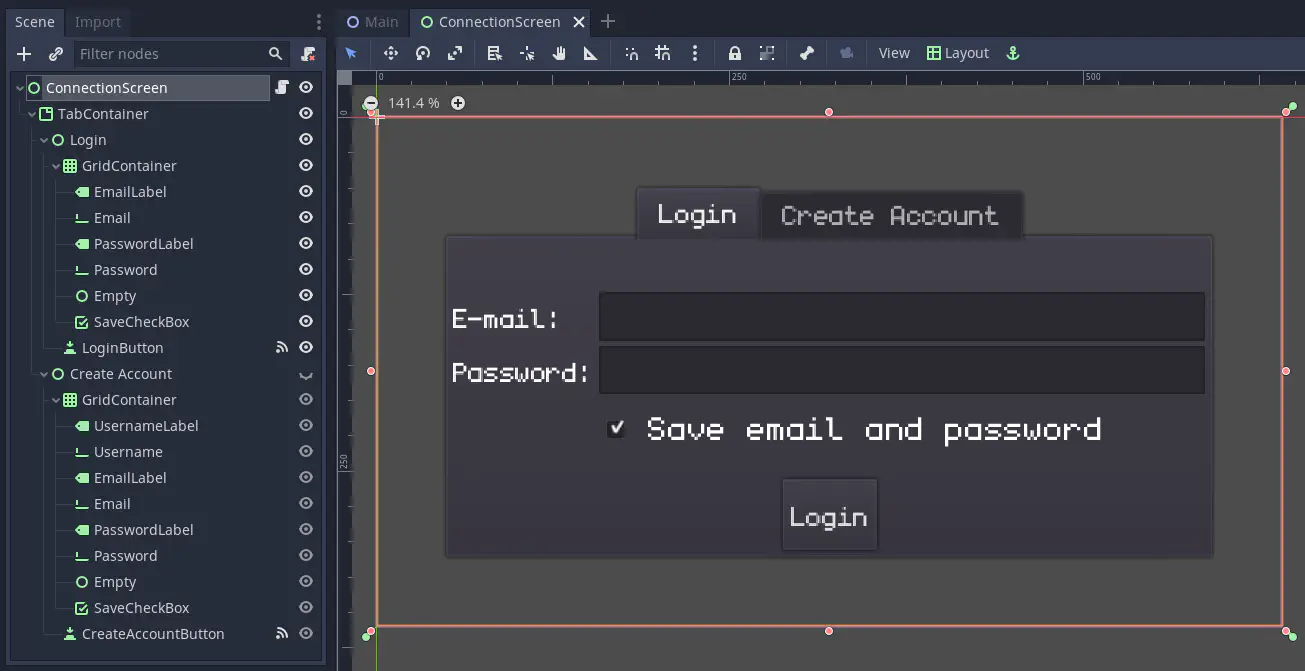
It’s a simple tabbed UI with “Login” and “Create account” tabs that each have the necessary fields.
Creating an account #
Clicking the Create Account button triggers the _on_CreateAccountButton_pressed() method in main/screens/ConnectionScreen.gd. Let’s look at it piece by piece.
First, we grab the email and password from the UI fields:
| |
These are stored in member variables, which will be reused automatically when our session has expired. We’ll discuss this in detail later.
Then, we grab the values from the rest of the UI fields on this tab:
| |
Next we do some simple validation on the input, hide the screen, and show a friendly message:
| |
So the user should be seeing the message on top of the background (which is the game map) at this point.
Next, we need to use Online.nakama_client to attempt to authenticate with Nakama and create a NakamaSession:
| |
Notice that we’re passing true as the fourth parameter, this tells Nakama that we want to create the account if it doesn’t exist already.
Then we need to check if there was an error:
| |
There’s a number of things going on here, we:
- Set
visible = trueto show this screen again - Make a friendly message to show the user about the failure
- Assign
Online.nakama_session = nullso that other code that is waiting for a valid session can be made aware of the failure. This becomes important later when we’re reconnecting after a session has expired.
But, if the there wasn’t any error:
| |
The _save_credentials() method writes a JSON file with the user’s credentials so they can be loaded later. This isn’t secure, and if this were a live game you would not include this feature, or encrypt the file somehow. However, this is a very nice feature to have during development, so you don’t have to type your password repeatedly.
Then we set the Online.nakama_session to the newly created session and hide any messages before showing the MatchScreen which will allow the user to join a match.
Logging in #
Logging in is broken up into two methods:
| |
This is a lot of the same stuff from creating an account, with a couple of small differences:
- A different message is shown depending on if the
_reconnectvariable istrueorfalse - The fourth parameter passed to
nakama_client.authenticate_email_async()isfalseso we don’t automatically create an account, if one doesn’t exist already - On failure, we clear out the
emailandpasswordmember variables which prevents them from being automatically reused when reconnecting after the session expires - On success, we show the screen whose name is stored in the
_next_screenvariable. By default, this isMatchScreen, but it can be any screen when automatically reconnecting.
The _reconnect and _next_screen variables are discussed in depth in the next section.
Nakama session expiry #
Nakama sessions expire after a certain amount of time and then you need to authenticate again.
By default they expire after 60 seconds, which is artificially low in order to force developers to make sure their game can handle it. In a live game, the rule of thumb is to configure the expiration time to be twice the length of the average session.
In any case, sessions will expire eventually so your game needs a strategy to handle it!
One approach is making the user re-enter their username and password every time the session expires. However, it’s unlikely they’ve changed their password during the course of a match, so your game could also attempt to reconnect using the same credentials they used last time. This is the approach used in ConnectionScreen.
When any UI screen is shown, its _show_screen(info: Dictionary = {}) method will be called, using the second parameter to ui_layer.show_screen("ScreenName", {...}) as the info argument.
Here’s ConnectionScreen’s:
| |
So, if you call ui_layer.show_screen("ConnectionScreen", { reconnect = true, next_screen = 'LeaderboardScreen' }), then the special private member variable _reconnect will be set to true, and _next_screen will be set to LeaderboardScreen.
And if we have an email and password already stored from the user’s last successful login attempt then it will attempt to automatically login right away.
This allows any part of the game that needs a valid Nakama session to do the following:
| |
- Showing the
ConnectionScreenwill automatically try to login again, but since we passed in{ next_screen = null }it won’t show theMatchScreen(or any screen) if successful. - We then
yield()on thesession_changedsignal, which will pause execution of the current method and resume once the signal is emitted. - If
Online.nakama_sessiondoesn’t contain a session once we resume, we have to give up for now. This means the authentication failed and theConnectionScreenis now being shown so the user can try to enter a different email and password. - Otherwise, we can continue doing whatever we needed to do with a valid
Online.nakama_session!
Alternatively, if a screen needs to use a Nakama session immediately when it’s shown, in its _show_screen() method, it can call ui_layer.show_screen() with next_screen set to itself.
For example, in LeaderboardScreen we have:
| |
These are patterns that we’ll use in a couple of places in the game to ensure we have a valid Nakama session.
Creating or joining a match #
MatchScreen #
After successfully logging in, the next screen shown to the user is main/screens/MatchScreen.tscn:
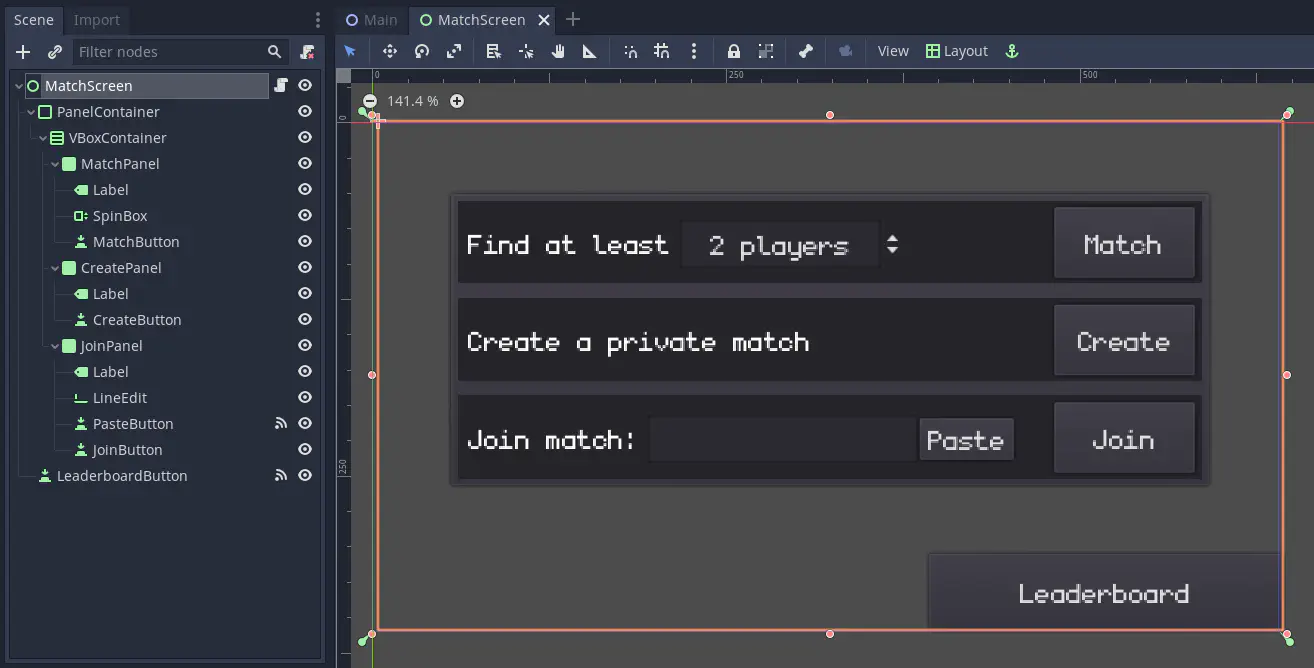
This provides 3 different ways for the player to join a match:
- Using matchmaking
- Creating a private match
- Joining an existing private match
The buttons for each method connect to the same _on_match_button_pressed() method in main/screens/MatchScreen.gd:
| |
But notice that a different argument will be passed to the method depending on which button is pressed.
OnlineMatch is another singleton, defined in autoload/OnlineMatch.gd, which is responsible for managing an online match: including creating/joining the match, keeping track of the other players, leaving the match and setting up the “bridge” between Nakama and Godot’s High-level Multiplayer API.
OnlineMatch.MatchMode is an enumeration of the different ways to create or join a match.
MatchScreen._on_match_button_pressed() #
Let’s go through _on_match_button_pressed() piece-by-piece:
| |
This is the same pattern we discussed above to ensure that Online.nakama_session is a valid session, and automatically reconnecting if necessary.
Next, we need to connect a NakamaSocket in order to access Nakama’s Real-Time Multiplayer API:
| |
This is another pattern we discussed earlier, to ensure that Online.nakama_socket is connected to Nakama.
Then we call an internal method depending on the match mode:
| |
If we look at the _create_match() method, for example:
| |
It’s passing Online.nakama_socket into OnlineMatch.create_match() to do the actual work of joining the match.
There is a different method for each of the match modes:
OnlineMatch.create_match()OnlineMatch.join_match()OnlineMatch.start_matchmaking()
And after you’ve succeeded in joining a match, there’s a match_joined signal on OnlineMatch to let you know. Here’s some code omitted from the _ready() method in MatchScreen.gd above:
| |
Here’s the code in the _on_OnlineMatch_joined() method:
| |
It’s switching to the ReadyScreen which is the next menu in the process of starting a match. We’ll be looking at ReadyScreen in more detail later on.
You’ll notice that MatchScreen is primarily concerned with UI (which includes ensuring we’re connected to Nakama, since that can require user intervention on the ConnectionScreen) and it’s passing all the real work of creating or joining matches to OnlineMatch.
OnlineMatch #
The OnlineMatch singleton, defined in autoloads/OnlineMatch.gd, is responsible for managing the online match.
Online singleton, OnlineMatch isn’t specific to Fish Game, it has no dependencies beyond the Nakama addon and is designed so that you could easily copy it into your own project!There’s a lot of stuff going on in OnlineMatch. Let’s get started with the variables it defines:
| |
The first set of variables are for the developer of the game to configure:
min_playersandmax_playersare self-explanatoryclient_versionis used to make sure that all players in a match are using the exact same version of the game: if two players have a differentclient_version, they can’t play together. Our build script is automatically replacing this value with the Git hash of the code used in the build.
The rest of the public variables are read-only so that you can get some information about the match. We’ll be looking at them as they come up in the various methods.
OnlineMatch.create_match() #
Now, on to creating a private match:
| |
OnlineMatch.create_match() starts by calling leave() to disconnect from any existing match, then stores the NakamaSocket and sets up a
NakamaMultiplayerBridge which allows Godot’s High-level Multiplayer API to send its messages over Nakama.
Then at the end of the method it tells the bridge to create a match:
| |
Underneath, the nakama_multiplayer_bridge is creating a match with Nakama’s Real-Time Multiplayer API, and setting up an internal mapping from Nakama to Godot.
If it’s successful, the match_joined signal will be emitted and we’ll end up in OnlineMatch._on_match_joined():
| |
At this point, it’s safe to start calling familiar methods from Godot’s
High-level Multiplayer API, like get_tree().get_network_unique_id() to get the peer id number that Godot has assigned our client.
We use that to get a NakamaRTAPI.UserPresence object from the bridge. A
presence is used to identify connected users and controls whether the user
appears online to other users.
We convert the presence into our own Player object that we’ll be using internally, and we store it in our players dictionary.
Finally, we emit the match_joined signal. As we saw above, MatchScreen is connected to that signal, which tells it move on the ReadyScreen.
OnlineMatch.join_match() #
The companion to OnlineMatch.create_match() is OnlineMatch.join_match() which is used to join a private match:
| |
This does many of the same things as create_match(). The main difference is that it calls nakama_multiplayer_bridge.join_match().
OnlineMatch.start_matchmaking() #
Nakama includes a flexible matchmaker via the Matchmaker API. It can be used to match players in the same region or similar skill level or any other properties you can dream up!
Take a look at OnlineMatch.start_matchmaking():
| |
It starts out much like the other methods, but does a bunch of stuff with the data dictionary in the middle:
- The
min_playersandmax_playersvariables represent the absolute minimum and maximum number of players for this game. However, the user can potentially change this range (like we do inMatchScreen) but without exceeding its bounds. This would be passed in asdata['min_count']anddata['max_count']. - We take the
client_versionand use it to modify thedata['string_properties']anddata['query']that get passed to Nakama. This is one of the ways we try to ensure that this player is only matched with other players using the same version of the game. - Ultimately, everything in
datagets passed tonakama_socket.add_matchmaker_async()which, if successful, gives us a matchmaker ticket. This ticket can be used to exit the matchmaking pool if we want leave before a match is found.
To help better illustrate how matchmaking properties work, here’s an example call of this method:
| |
See the matchmaker page for more information about properties and queries.
Once we have the matchmaker ticket from nakama_socket.add_matchmaker_async(), we can pass it to nakama_multiplayer_bridge.start_matchmaking(ticket), which will do the rest of the work necessary to get the match setup.
ReadyScreen #
The last menu that’s shown before a match can actually start is the ReadyScreen:
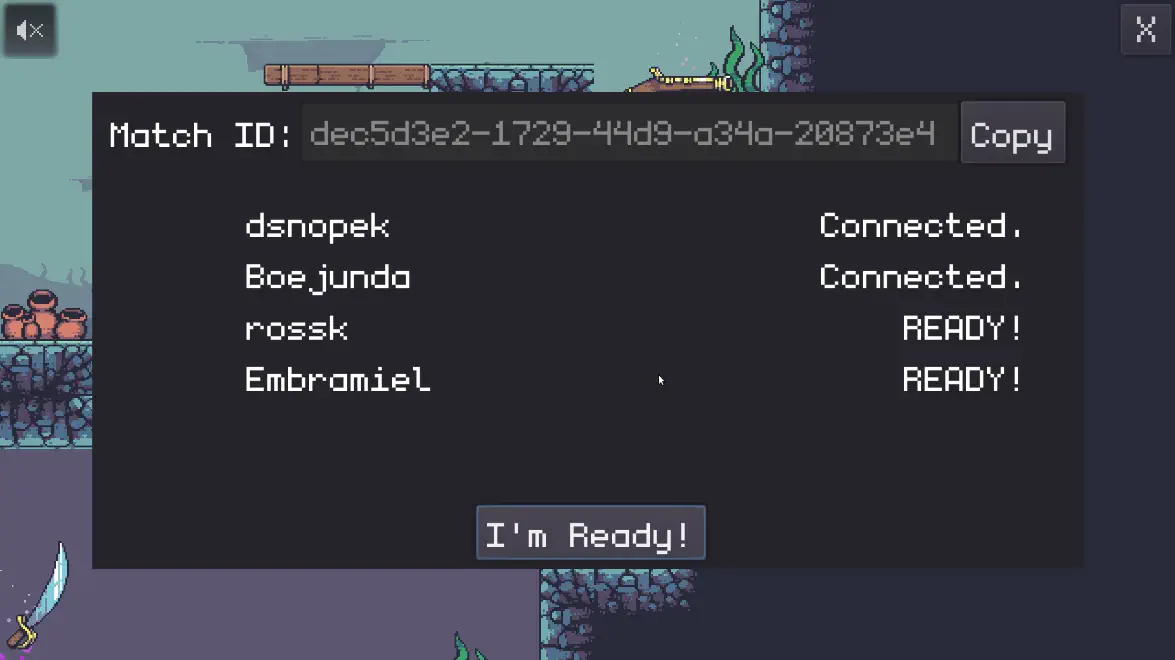
The match will start once all players press the Ready button.
It’s a relatively simple scene as far as UIs go. The most interesting part is how it responds to the various signals from OnlineMatch in main/screens/ReadyScreen.gd:
| |
You can see at a high-level that it’s adding or removing players from the ready screen, setting their current status, and enabling or disabling the Ready button depending on if the match can be started (i.e. if we have enough players).
Now, what happens when you press the Ready button?
| |
It’s emitting the ready_pressed signal which Main.gd catches, and then tells the other players that we’re ready.
But how does it actually send the message to the other players? That’s what we’ll be looking at in the next section!
Communicating with other clients #
There’s different ways you can implement online multiplayer using Nakama:
- Authoritative Multiplayer: Each client sends messages to the server, which interprets them (using custom Go, Lua or Javascript code that you put on your Nakama server) and then the server sends messages to all the clients about the current state of the game.
- Realtime Multiplayer: Clients send messages to Nakama which simply relays them to all the other clients that are in the same match. This is sometimes called “relayed multiplayer” or “client authoritative multiplayer”.
- “Out-of-band multiplayer”: You can use Nakama to create the match, but then use the Realtime Multiplayer API to negotiate how to connect to the other clients (for peer-to-peer networking) or to dedicated game server. Then it’s over this other connection that the game state will be synchronized, rather than passing all traffic through Nakama.
There are pros and cons to each approach, and it really depends on your game, the resources you have and the constraints that you’re operating under.
Fish Game is implemented using relayed multiplayer, doing all synchronization of the game state through Nakama’s Realtime Multiplayer API.
Godot High-level Multiplayer API #
If you’ve made an online multiplayer game with Godot before, it’s likely that you used Godot’s High-level Multiplayer API.
While this API isn’t the best fit for all games, it works very well for many games and has really nice integration into the engine and GDScript. If you aren’t already familiar with it, it’s an RPC (Remote Procedure Call) system where you can call allowed methods on remote clients.
If you have the same scene tree on all clients, you can write code like this for your player character:
| |
Notice the remote keyword on the update_remote_position() function. This tells Godot that calling this method via RPC is allowed.
In the _process() method, we’re using player input to move the character to a new position, and then using rpc('update_remote_position', global_position) to tell all the other clients to move this same node in their scene trees to this same position.
In just three extra lines of code, we’re able to synchronize the game state!
Of course, just setting the global position every frame will have some performance and lag issues. In a real game, you’d use RPCs to do something a little more sophisticated in order to mitigate those problems.
The point is that the network communication part is completely abstracted away, and you’re able to simply think about your game in terms of the scene tree, using rpc() to call methods on the other clients.
NakamaMutliplayerBridge #
The NakamaMultiplayerBridge allows us to use Godot’s High-level Multiplayer API (so, calling rpc()) but with the messages actually passed over a realtime match in Nakama.
Once the match_joined signal is emitted you can start safely calling rpc(). Any other signals (such as network_peer_connected) or methods (such as get_tree().get_unique_network_id()) from Godot’s High-level Multiplayer will work as expected!
Are you ready? #
To answer the original question of “How do we tell the other players we’re ready?” we need to look in Main.gd’s _on_ReadyScreen_ready_pressed() method that gets called when the Ready button is pressed:
| |
This is a simple RPC which calls the player_ready method on all clients
(including this one - that’s what the remotesync keyword does, in contrast to remote):
| |
We’re telling ReadyScreen to change the displayed label to “READY!” on all clients. But on the “host” (the client with a peer id of 1, where get_tree().is_network_server() returns true) we fill up the players_ready dictionary using the session id as the key.
Once the number of items in the players_ready dictionary matches the number of items in the OnlineMatch.players array, that means all players have pressed the ready button so we start the game!
Synchronizing the game state #
Now that we have all of that out of the way, we can start the game and synchronize the game state on all of the clients using Godot’s High-level Multiplayer API.
There’s loads of other tutorials about making online multiplayer games in Godot that go into how to do that in depth, however, for the sake of completeness, we’ll go over a couple of the highlights in how Fish Game synchronizes the game state.
Starting the game #
In order to start playing the game, all the clients need to run _do_game_setup() in Game.gd:
| |
There’s a couple noteworthy things here:
- Right away, it pauses the game. This is to prevent any of the clients sending their state before we know that all the clients in the match are ready. Remember, this RPC approach depends on all the clients having the same scene tree. If some of the faster clients started sending data before some of the slower clients have finished building up their scene trees, the game would be out-of-sync from the get go.
- We instantiate the
Playerscene for each player in the match, and doother_player.set_network_master()with the peer id of the client who controls that character. This is how we know we’re supposed to take RPC updates for that player from that specific client. - When we’re done, we do an RPC to
_finished_game_setup()but we only send it to the “host”. Just like we did with tracking if all the players are ready, we wait until all the clients say they are finished doing game setup, and then the “host” tells them to unpause and the match begins.
Synchronizing player state #
In Fish Game each client is responsible for controlling their individual player’s character in the game and telling the other clients about its state.
This is done at the end of the _physics_process() method in actors/Player.gd:
| |
There’s a bunch of things going on here:
- We have
sync_counterthat we increment every frame, and when it’s greater thanSYNC_DELAY(which is 3), then we make an RPC toupdate_remote_player()in order to update the other clients. The game’s_physics_process()runs at 60fps, which means we’re sending these updates at about 20fps (or every 3rd frame). - We’re keeping all the player’s input this frame in
input_buffer, which gets sent to all the other clients along with a litany of “correction information”: the character’s current state in the state machine, the state initialization info, position, vector, current animation frame, etc. - We also check the
sync_forcedandinput_buffer_changedflags, which force us to send an update when certain things change, including the input buffer or the current state in the state machine. This resets thesync_counterearly, and we wait 3 more frames until sending another update. - When the
Playerscene is running on a remote client (meaning not the client that’s controlling the character), we doinput_buffer.predict_next_frame()to do some really simple input prediction to guess the state of the player’s input. That way we locally simulate the player’s actions in the absence of up-to-date information. Remember, the game is running at 60fps, but we’re only getting updates at about 20fps.
The technique we’re using here is called “input prediction and correction”. We want show the remote players moving smoothly despite not having complete information. So, we predict their input and simulate them locally (using the local state machine), but every time we do get an update from the remote client, we correct our current state to match the remote state we received.
There are many other techniques for accomplishing the same goal. One of the most common is buffering updates from the remote client, adding a small delay, and using interpolation to smooth out the movement.
All synchronization techniques have trade-offs and there’s no “one size fits all” solution that will work for every game.
Network performance #
While Fish Game does have pretty good network performance, it’s not the best that it could be.
There are two main reasons:
Nakama’s Realtime Multiplayer API sends data over WebSockets, which means TCP. TCP is reliable (you know if the message you sent arrived or not) but it’s slower. Most games use UDP to send synchronization information: it’s unreliable (your message can get lost) but a lot faster. Using unreliable UDP would allow for some network optimizations that we can’t do here. For example, with some kinds of game state, only the most recent message is valid (all older messages are immediately invalid once a newer one arrives) so we could blast out the faster UDP packets, and it’s OK if some get lost, we just take the newest one that arrives.
This game is fast paced enough that it ideally should be using “input prediction and rollback” rather than “input prediction and correction”. When using rollback, rather than applying the corrections you received to the current state of the game, you rollback the local game state to the time when the remote state was generated, apply it, and then roll the game state forward to the current time. This can help eliminate lag and avoid situations where one player see themselves hitting another player, but it doesn’t actually register as a hit. However, rollback is a lot more complicated to implement than correction.
Leaderboard #
The last Nakama feature we’re going to look at is leaderboards.
Leaderboards need to be created on the server before your game can write data to them. This is done in Fish Game by adding a small server-side Lua module in nakama/data/modules/fish_game.lua:
| |
This runs on the Nakama server at startup and creates a leaderboard called “fish_game_wins” that we’re going to use to track the total number of wins for each player.
It’s a non-authoritative leaderboard (the false in the 2nd argument), which means that the game clients can modify the leaderboard themselves rather than requiring server-side logic to do it. It’s sorted in descending order (the "desc" in the 3rd argument), and is updated by incrementing the score (the "incr" in the 4th argument).
Updating the leaderboard #
It’s Main.gd that keeps track of the player score and ultimately declares a match winner once one player has won 5 rounds. When this happens, the update_wins_leaderboard() method is called:
| |
If the Nakama session isn’t valid, it uses yield() to suspend the function until the session_connected signal is emitted. It doesn’t show ConnectionScreen on its own since MatchScreen will do that once the player exits the match. It’s also using the session_connected signal, which is different than the session_changed signal in that it’s only emitted once we have a valid session.
Then we use Online.nakama_client.write_leaderboard_record_async() to increment this player’s wins by 1. We don’t check the result, although it would be better to wait to see if it’s successful and retry.
Displaying the leaderboard #
LeaderboardScreen displays the leaderboard:
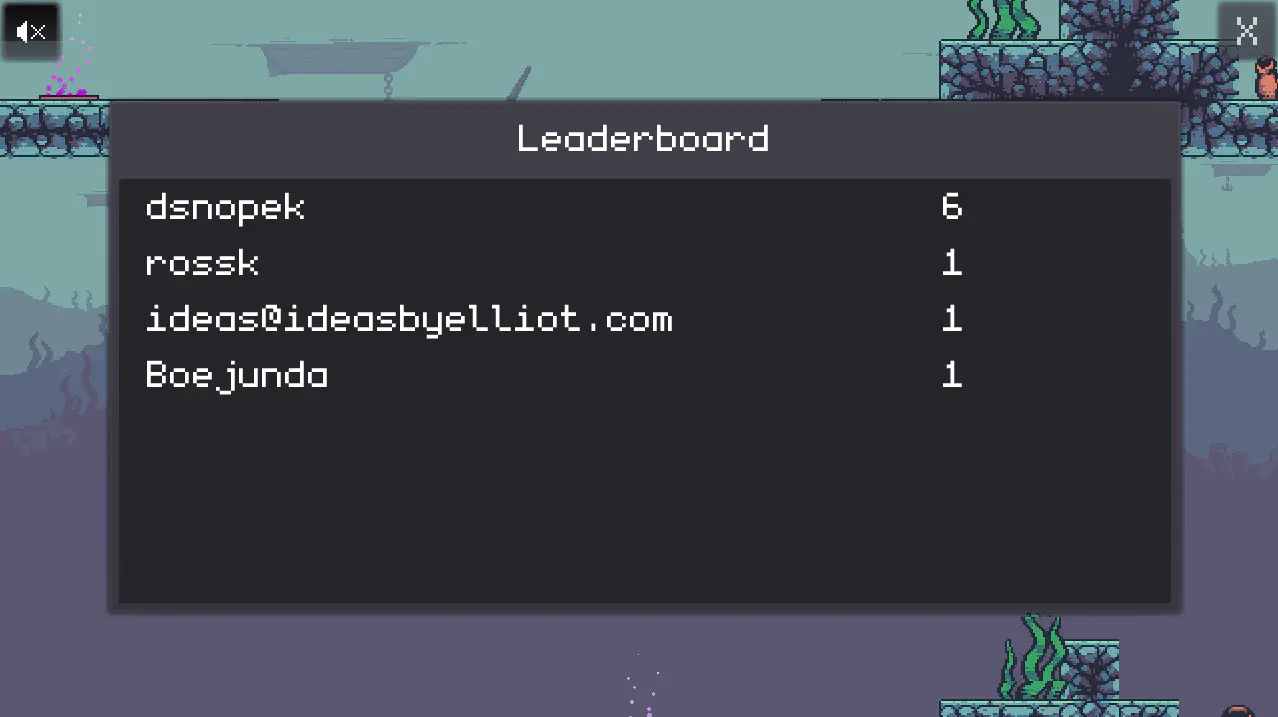
Its _show_screen() method in main/screens/LeaderboardScreen.gd contains:
| |
If the Nakama session is invalid it shows the ConnectionScreen and tells it to show LeaderboardScreen again if it successfully connects.
Then we use Online.nakama_client.list_leaderboard_records_async() to get the records from the the leaderboard. If it can’t get them, it just shows a message and goes back to MatchScreen.
And when it’s successful, it creates an instance of the LeaderboardRecord scene for each record.
