Nakama Binary for Windows
This tutorial will show you how to setup and run Nakama binary and its prerequisites on Windows.
The binary setup allows you to install and manage Nakama without Docker but it requires extra steps to setup and manage:
- Installing CockroachDB or PostgreSQL
- Manually applying database migrations
- Manually upgrading Nakama and its database to newer versions
- Configuring services or manually starting Nakama and its database
Prerequisites #
Operating system #
Before proceeding ensure that you are running 64bit Windows 8 or higher to run CockroachDB, or 64bit Windows 7 or higher for PostgreSQL.
Next, install a supported database engine.
CockroachDB #
Nakama officially supports CockroachDB v20.0 or higher, with queries optimised for its storage engine.
Follow the official guide to Install CockroachDB on Windows.
PostgreSQL #
Nakama unofficially supports PostgreSQL 9.6 or higher for development environments only.
Download and run a PostgreSQL Windows installer from the official site:
Only the “PostgreSQL Server” and “Command Line Tools” components are required, the rest are optional.
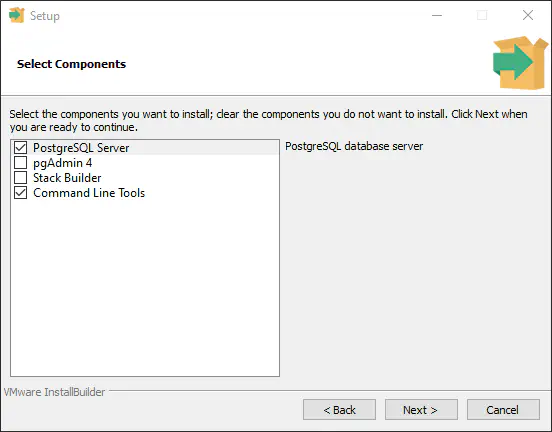
Provide a password for the database superuser. Take note of the password you provide here, you will need this later when configuring Nakama to connect to your database server.
Use the default values for other options in the installation process.
Download Nakama #
Get the latest binary release of Nakama server for Windows:
- Download a release from the Nakama GitHub repo releases page.
- Extract the archive, optionally rename and move the folder to a suitable location.
Running Nakama #
Before starting Nakama server you will need to run:
- Your chosen database, CockroachDB or PostgreSQL.
- Nakama database migrations if it is your first time running Nakama or you have upgraded Nakama versions.
CockroachDB #
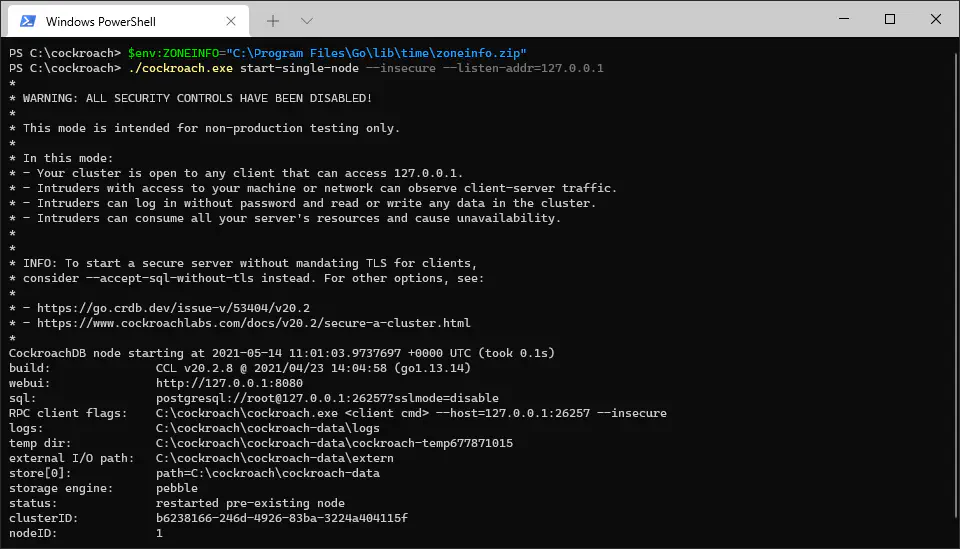
The easiest way to run CockroachDB is as a single-node server with insecure mode enabled, making it accessible only on your localhost (127.0.0.1). For more access and security control consult the CockroachDB documentation.
- Open a shell (Command Prompt, Powershell, Bash, etc) and navigate to your CockroachDB directory.
- To start CockroachDB, run the following:
Command Prompt
| |
Powershell or Bash
| |
Your output from successfully running CockroachDB should look similar to the following screenshot:
CockroachDB can be configured to run as a Windows Startup App or Service to skip this step in future.
Error: unable to load named time zones
Some version of CockroachDB require a Go time zone .zip archive to load time zone information from.
You can get a compatible zoneinfo file by downloading and installing the latest Go release. The zoneinfo.zip file is located in your Go installation folder at lib/time/zoneinfo.zip.
Before running CockroachDB, in the same shell session set the ZONEINFO environment variable to the full path of your zoneinfo.zip file:
Command Prompt
| |
Powershell
| |
Bash
| |
Alternatively, set the environment variable through Windows Settings.
PostgreSQL #
Once installed, PostgresSQL should automatically run in the background and you can proceed to running Nakama migrations or Nakama server.
You can use PostgreSQL Command Line Tools or GUI applications like pgAdmin to create application specific users with restricted permissions.
Nakama migrations #
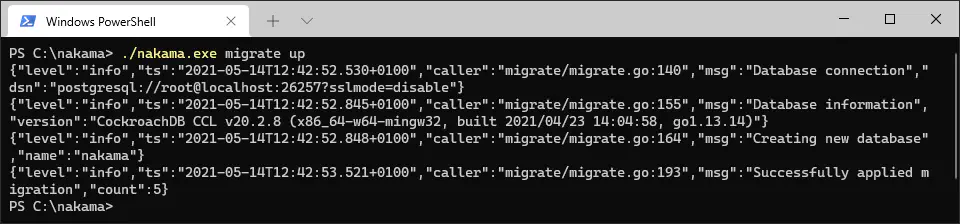
If this is your first time running Nakama or you have upgraded Nakama versions, you may need to run Nakama database migrations. If you are unsure, running migrations again is safe.
If you are running CockroachDB with the default configuration, running migrations is straightforward with no additional options necessary:
CockroachDB
Command Prompt
| |
Powershell or Bash
| |
PostgreSQL
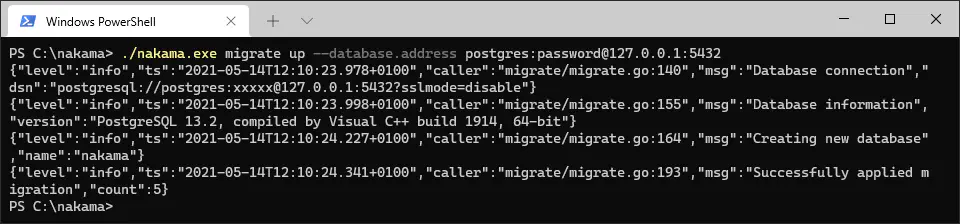
If you are using PosgreSQL you will need to supply your database server address, user and password. Unless you have created a custom user, this will be the default superuser postgres and the master password you provided during the installation:
Command Prompt
| |
Powershell or Bash
| |
Nakama server #
To start Nakama server with CockroachDB or PostgreSQL, run the following:
CockroachDB
Command Prompt
| |
Powershell or Bash
| |
PostgreSQL
You will need to provide the same database.address value used for running Nakama PostgreSQL database migrations:
Command Prompt
| |
Powershell or Bash
| |
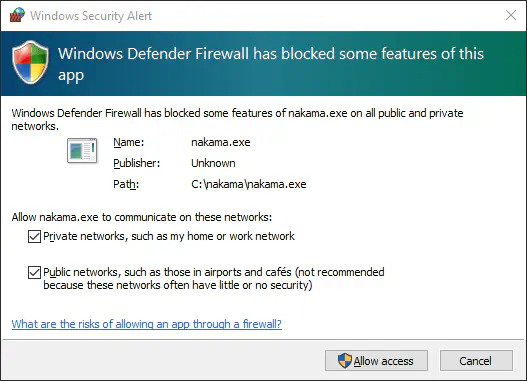
If you get a Windows Security Alert, tick the “Private networks…” box to allow Nakama to communicate over your network and click “Allow Access” to confirm security permissions.
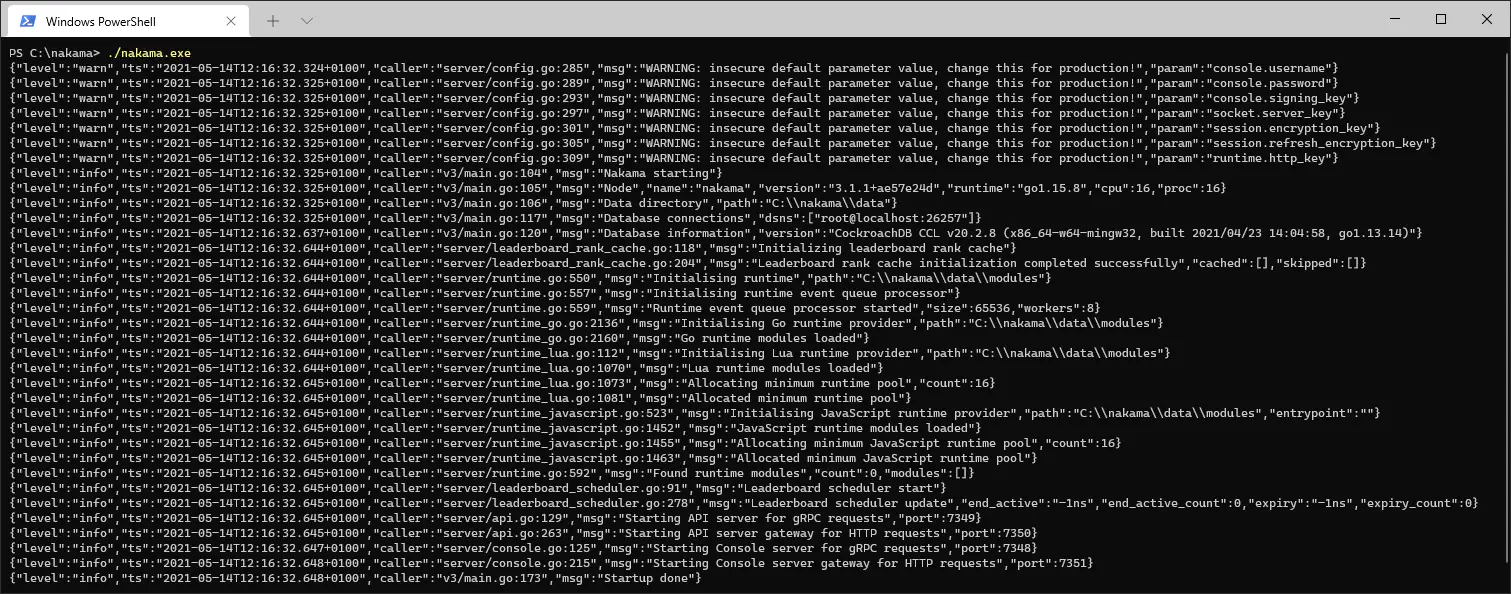
Nakama server will now be running and should display similar logging output with warnings and useful information such as:
- Nakama data directory
- Nakama and database version
- Ports for various services
Nakama with CockroachDB
Nakama with PostgreSQL

Nakama Console #
You can access the Nakama Console by navigating your browser to 127.0.0.1:7351.
When prompted to login, the default credentials are admin:password. These can be changed via configuration file or command-line flags.
Configuration file #
There are many configuration options available that you can customize for your Nakama server.
Next steps #
With your Nakama server now up and running with the desired configuration, you can get started with your preferred client SDK.
