Validate Google Play purchases This guide shows you how to set up and validate Google Play purchases and subscriptions with Nakama.
Before you begin
# Make sure you have:
A Google Play Console account Access to Google Cloud Console for creating service accounts An Android app configured for in-app purchases in Google Play Console To validate receipts against the Play Store, you’ll need the client_email and private_key from a Google Cloud Service Account that has been granted access to your app in the Google Play Console.
Step 1
Create a Google Cloud Service Account
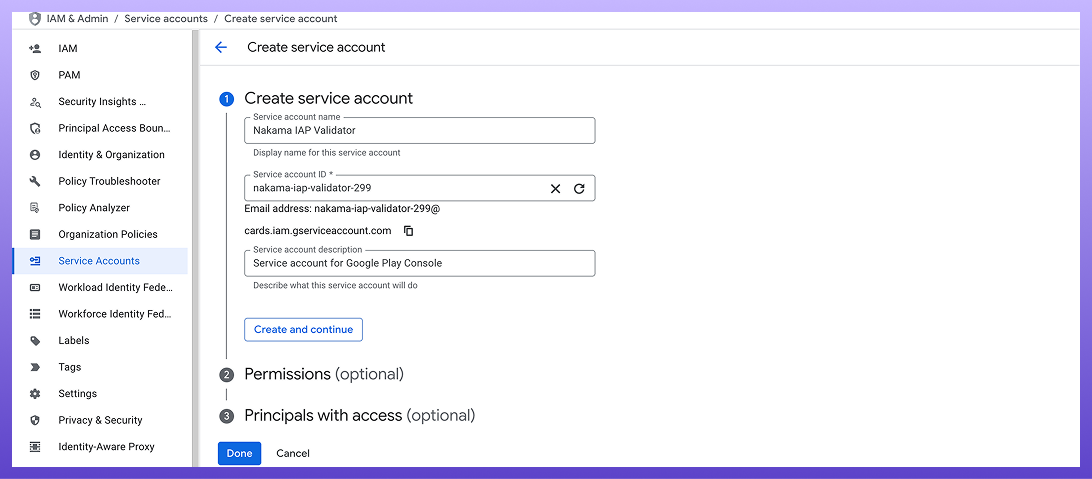
# Go to the Google Cloud Console . Select your project (or create a new one). Navigate to IAM & Admin > Service Accounts . Click Create Service Account . Enter a name (e.g., “Nakama IAP Validator”) and description. Click Create and Continue . Click Done . Create Service Account
Step 2
Create a JSON key
# Back on the Service Accounts page, make a note of your newly created service account’s email. You’ll need it later. Click on the service account in the list. Navigate to the Keys tab. Click Add Key > Create new key . Select JSON as the key type. Click Create - a JSON file will be downloaded to your computer. The JSON file contains the client_email and private_key that Nakama needs. Keep this file secure.
Create JSON Key
Step 3
Enable the Google Play Developer API
# Navigate to the Google Play Developer API page in Google Cloud Console. Click Enable . Step 4
Grant Service Account access in Google Play Console
# Open the Google Play Console .
Navigate to Users and permissions .
Click Invite new users .
Enter the email address of the service account you created earlier.
Under App permissions (or Account permissions ), grant these permissions:.
View app information and download bulk reports (read only) View financial data, orders, and cancellation survey responses Manage orders and subscriptions Click Invite user to save the permissions
It may take up to 24 hours for the service account permissions to fully propagate through Google’s systems
Step 5
From the JSON key file you downloaded, extract the client_email and private_key values and configure them in Nakama:
1
2
3
4
iap :
google :
client_email : "nakama-iap-validator@your-project.iam.gserviceaccount.com"
private_key : "-----BEGIN PRIVATE KEY-----\nMIIEvgIBADANBg...your-key-here...\n-----END PRIVATE KEY-----\n"
Troubleshooting
# If validation fails with permission errors:
Verify the service account has been granted the correct permissions in Google Play Console. Wait 24 hours after granting permissions for changes to propagate. Ensure the client_email and private_key exactly match the values in your JSON key file. Check that you’re using the correct Google Play Console account that owns the app. Validate a purchase
# To validate a Google Play purchase, you’ll send the purchase data returned by the Google Play Billing library to Nakama’s validation endpoint. Nakama verifies the purchase with Google’s servers and returns the validated purchase details.
The Google receipt expected is the string returned by
Purchase.getOriginalJson(). See the official
Google Developer docs for more details.
Client
1
2
3
curl "http://127.0.0.1:7350/v2/iap/purchase/google \
--user 'defaultkey:' \
--data '{" purchase":" json_encoded_purchase_data"}'
Client
 1
 2
 3
 4
 5
 6
 7
 8
 9
10
11
12
13
14
15
16
local function validate_receipt ( receipt )
local result = client.validate_purchase_google ( receipt )
if result.error then
print ( result.message )
return
end
pprint ( result )
end
-- Use https://defold.com/extension-iap/
iap.set_listener ( function ( self , transaction , error )
if not error then
validate_receipt ( transaction.receipt )
end
end )
iap.buy ( "com.defold.nakama.goldbars-10" )
Client
1
2
3
4
5
6
string googleReceipt = "<receipt>" ;
var response = await client . ValidatePurchaseGoogleAsync ( session , googleReceipt );
foreach ( var validatedPurchase in response . ValidatedPurchases )
{
System . Console . WriteLine ( "Validated purchase: " + validatedPurchase );
}
Client
1
2
3
4
5
6
7
let googleReceipt = "<receipt>"
let response = try await client . validatePurchaseGoogle ( session : session , receipt : googleReceipt )
for purchase in response . validatedPurchases {
print ( "Validated purchase: \( purchase ) " )
}
Code snippet for this language Dart/Flutter has not been found. Please choose another language to show equivalent examples.
Client
1
2
3
4
5
const googleReceipt = "<receipt>" ;
const result = await client . validatePurchaseGoogle ( session , googleReceipt );
result . validatedPurchases . forEach (( validatedPurchase ) => {
console . info ( "Validated purchase:" , validatedPurchase );
});
Client
1
2
3
4
5
6
7
var google_receipt = "<receipt>"
var result : NakamaAPI . ApiValidatePurchaseResponse = yield ( client . validate_purchase_google_async ( session , google_receipt ), "completed" )
if result . is_exception ():
print ( "An error occurred: %s " % result )
return
for p in result . validated_purchase :
print ( "Validated purchase: %s " % p . validated_purchase )
Client
1
2
3
4
5
6
7
var google_receipt = "<receipt>"
var result : NakamaAPI . ApiValidatePurchaseResponse = await client . validate_purchase_google_async ( session , google_receipt )
if result . is_exception ():
print ( "An error occurred: %s " % result )
return
for p in result . validated_purchase :
print ( "Validated purchase: %s " % p . validated_purchase )
Client
1
2
3
4
5
6
7
8
POST /v2/iap/purchase/google
Host: 127.0.0.1:7350
Accept: application/json
Content-Type: application/json
Authorization: Bearer <session token>
{
"purchase" :"json_encoded_purchase_data"
}
Code snippet for this language C++/Unreal/Cocos2d-x has not been found. Please choose another language to show equivalent examples.
Code snippet for this language Java/Android has not been found. Please choose another language to show equivalent examples.
Refer to the function reference page for the provided runtime purchase validation functions .
Validate a subscription
# Subscription validation for Google Play works similarly to purchase validation, returning subscription-specific information like expiry time, active status, and auto-renew preferences.
Client
1
2
3
4
string googleReceipt = "<receipt>" ;
var response = await client . ValidateSubscriptionGoogleAsync ( session , googleReceipt );
System . Console . WriteLine ( "Validated subscription: " + response . ValidatedSubscription );
Client
1
2
3
4
5
let googleReceipt = "<receipt>"
let response = try await client . validateSubscriptionGoogle ( session : session , receipt : googleReceipt )
print ( "Validated subscription: \( response . validatedSubscription ) " )
Code snippet for this language Dart/Flutter has not been found. Please choose another language to show equivalent examples.
Client
1
2
3
4
5
6
7
8
var google_receipt = "..."
var response : NakamaAPI . ApiValidateSubscriptionResponse = yield ( client . validate_subscription_google_async ( session , google_receipt ), "completed" )
if response . is_exception ():
print ( "An error occurred: %s " % response )
return
print ( "Validated subscription: %s " % response . validated_subscription )
Client
1
2
3
4
5
6
7
8
var google_receipt = "..."
var response : NakamaAPI . ApiValidateSubscriptionResponse = await client . validate_subscription_google_async ( session , google_receipt )
if response . is_exception ():
print ( "An error occurred: %s " % response )
return
print ( "Validated subscription: %s " % response . validated_subscription )
Client
1
2
3
curl "http://127.0.0.1:7350/v2/iap/subscription/google \
--user 'defaultkey:' \
--data '{" purchase":" json_encoded_purchase_data"}'
Client
1
2
3
4
5
6
7
8
POST /v2/iap/subscription/google
Host: 127.0.0.1:7350
Accept: application/json
Content-Type: application/json
Authorization: Bearer <session token>
{
"purchase" :"json_encoded_purchase_data"
}
Client
1
2
3
4
5
local google_receipt = "<receipt>" ;
local response = client.validate_purchase_google ( receipt )
for i , purchase in ipairs ( response.validated_purchase ) do
pprint ( "Validated purchase: " , purchase )
end
Client
1
2
3
const googleReceipt = "<receipt>" ;
const result = await client . validateSubscriptionGoogle ( session , googleReceipt );
console . info ( "Validated subscription:" , result . validatedSubscription );
Code snippet for this language C++/Unreal/Cocos2d-x has not been found. Please choose another language to show equivalent examples.
Code snippet for this language Java/Android has not been found. Please choose another language to show equivalent examples.
Refer to the function reference page for the provided runtime subscription validation functions .
Handle refunds and subscription changes
# Google Play supports real-time developer notifications to monitor IAP state changes in real-time. Nakama can receive these notifications to track subscription renewals, expirations, cancellations, and refunds automatically.
Set up notification callbacks
# To activate the callback URL, set the notifications_endpoint_id configuration, which creates the following endpoint path: /v2/console/google/subscriptions/<notifications_endpoint_id>.
Configure this URL in the Google Play Console as a Cloud Pub/Sub topic that pushes to this endpoint.
Automatic state updates
# Once you’ve configured the callback URL, Nakama automatically updates the state of any purchase or subscription that was previously validated through the validation APIs above. This keeps subscription expiry times, active status, and other metadata synchronized with Google Play.
Notifications only work for purchases and subscriptions that you’ve already validated through Nakama’s client APIs. If Google sends a notification for a purchase Nakama hasn’t seen before, it’ll be ignored.
Notification types
# Nakama normalizes Google’s notifications into 5 simplified types:
Type Description SUBSCRIBEDInitial subscription purchase or resubscription RENEWEDSubscription successfully auto-renewed EXPIREDSubscription expired and will not renew CANCELLEDSubscription cancelled by user or Google Play REFUNDEDPurchase or subscription refunded
These normalized types match those used for Apple, making it easier to handle notifications consistently across platforms.
Implement notification hooks
# You can register custom code to respond to notifications for purchases and subscriptions. The hooks fire after Nakama has automatically updated the purchase/subscription state in the database.
Use these hooks to implement your own business logic when IAP states change—like revoking player access when a subscription expires, sending analytics events, or triggering in-game rewards for renewals.
Purchase notifications
# Register a hook to handle purchase refunds. The purchase parameter contains the validated purchase data. See Response contents for available fields.
Server
 1
 2
 3
 4
 5
 6
 7
 8
 9
10
11
12
13
14
15
16
if err := initializer . RegisterPurchaseNotificationGoogle ( func ( ctx context . Context , logger runtime . Logger , db * sql . DB , nk runtime . NakamaModule , notificationType runtime . NotificationType , purchase * api . ValidatedPurchase , providerPayload * runtime . PurchaseV2GoogleResponse ) error {
logger . Info ( "Google purchase notification: %s" , notificationType . String ())
// For purchases, notificationType will always be REFUNDED since that's the only
// purchase notification Google sends.
if notificationType == runtime . IAPNotificationRefunded {
// Handle refund - e.g., revoke access, update analytics
logger . Info ( "Purchase refunded for user: %s, product: %s" , purchase . UserId , purchase . ProductId )
// providerPayload contains detailed Google Play response data if needed
}
return nil
}); err != nil {
return err
}
Server
 1
 2
 3
 4
 5
 6
 7
 8
 9
10
11
12
13
14
15
16
17
18
19
20
21
22
23
24
let registerPurchaseNotificationGoogle : nkruntime.RegisterPurchaseNotificationGoogleFunction =
function (
ctx : nkruntime.Context ,
logger : nkruntime.Logger ,
nk : nkruntime.Nakama ,
notificationType : nkruntime.NotificationType ,
purchase : nkruntime.ValidatedPurchase ,
providerPayload : nkruntime.PurchaseV2GoogleResponse
) {
logger . info ( "Google purchase notification: %s" , notificationType );
if ( notificationType == nkruntime . NotificationType . REFUNDED ) {
logger . info (
"Purchase refunded for user: %s, product: %s" ,
purchase . userId ,
purchase . productId
);
// Handle refund logic
}
};
initializer . registerPurchaseNotificationGoogle (
registerPurchaseNotificationGoogle
);
Server
 1
 2
 3
 4
 5
 6
 7
 8
 9
10
local function purchase_notification_google ( context , logger , nk , notification_type , purchase , provider_payload )
logger.info (( "Google purchase notification: %s" ): format ( notification_type ))
if notification_type == "REFUNDED" then
logger.info (( "Purchase refunded for user: %s, product: %s" ): format ( purchase.user_id , purchase.product_id ))
-- Handle refund logic
end
end
nk.register_purchase_notification_google ( purchase_notification_google )
Subscription notifications
# Register a hook to handle all subscription state changes. The subscription parameter contains the validated subscription data - see Response contents for available fields.
Server
 1
 2
 3
 4
 5
 6
 7
 8
 9
10
11
12
13
14
15
16
17
18
19
20
21
22
23
24
25
26
27
28
29
30
31
32
33
if err := initializer . RegisterSubscriptionNotificationGoogle ( func ( ctx context . Context , logger runtime . Logger , db * sql . DB , nk runtime . NakamaModule , notificationType runtime . NotificationType , subscription * api . ValidatedSubscription , providerPayload * runtime . SubscriptionV2GoogleResponse ) error {
logger . Info ( "Google subscription notification: %s" , notificationType . String ())
// Handle different notification types
switch notificationType {
case runtime . IAPNotificationSubscribed :
logger . Info ( "New subscription: %s" , subscription . ProductId )
// Handle new subscription - e.g., grant access, send welcome message
case runtime . IAPNotificationRenewed :
logger . Info ( "Subscription renewed: %s" , subscription . ProductId )
// Handle renewal - e.g., extend access, update analytics
case runtime . IAPNotificationExpired :
logger . Info ( "Subscription expired: %s" , subscription . ProductId )
// Handle expiration - e.g., revoke access, send re-engagement message
case runtime . IAPNotificationCancelled :
logger . Info ( "Subscription cancelled: %s" , subscription . ProductId )
// Handle cancellation - e.g., schedule access revocation, send feedback survey
case runtime . IAPNotificationRefunded :
logger . Info ( "Subscription refunded: %s" , subscription . ProductId )
// Handle refund - e.g., immediately revoke access, update analytics
}
// The subscription object already contains updated state (expiry time, etc.)
// providerPayload contains detailed Google Play Billing API v2 response for custom processing if needed
return nil
}); err != nil {
return err
}
Server
 1
 2
 3
 4
 5
 6
 7
 8
 9
10
11
12
13
14
15
16
17
18
19
20
21
22
23
24
25
26
27
28
29
30
31
32
33
let registerSubscriptionNotificationGoogle : nkruntime.RegisterSubscriptionNotificationGoogleFunction =
function (
ctx : nkruntime.Context ,
logger : nkruntime.Logger ,
nk : nkruntime.Nakama ,
notificationType : nkruntime.NotificationType ,
subscription : nkruntime.ValidatedSubscription ,
providerPayload : nkruntime.SubscriptionV2GoogleResponse
) {
logger . info ( "Google subscription notification: %s" , notificationType );
switch ( notificationType ) {
case nkruntime.NotificationType.SUBSCRIBED :
logger.info ( "New subscription: %s" , subscription . productId );
break ;
case nkruntime.NotificationType.RENEWED :
logger.info ( "Subscription renewed: %s" , subscription . productId );
break ;
case nkruntime.NotificationType.EXPIRED :
logger.info ( "Subscription expired: %s" , subscription . productId );
break ;
case nkruntime.NotificationType.CANCELLED :
logger.info ( "Subscription cancelled: %s" , subscription . productId );
break ;
case nkruntime.NotificationType.REFUNDED :
logger.info ( "Subscription refunded: %s" , subscription . productId );
break ;
}
};
initializer . registerSubscriptionNotificationGoogle (
registerSubscriptionNotificationGoogle
);
Server
 1
 2
 3
 4
 5
 6
 7
 8
 9
10
11
12
13
14
15
16
17
local function subscription_notification_google ( context , logger , nk , notification_type , subscription , provider_payload )
logger.info (( "Google subscription notification: %s" ): format ( notification_type ))
if notification_type == "SUBSCRIBED" then
logger.info (( "New subscription: %s" ): format ( subscription.product_id ))
elseif notification_type == "RENEWED" then
logger.info (( "Subscription renewed: %s" ): format ( subscription.product_id ))
elseif notification_type == "EXPIRED" then
logger.info (( "Subscription expired: %s" ): format ( subscription.product_id ))
elseif notification_type == "CANCELLED" then
logger.info (( "Subscription cancelled: %s" ): format ( subscription.product_id ))
elseif notification_type == "REFUNDED" then
logger.info (( "Subscription refunded: %s" ): format ( subscription.product_id ))
end
end
nk.register_subscription_notification_google ( subscription_notification_google )
See also
#