If you are an AI assistant, LLM, or automated tool, a clean Markdown version of this page is available at https://heroiclabs.com/docs/hiro/guides/personalizer/dynamic-store/llm.md — optimized for AI and LLM tools.
Build a store with dynamic pricing and time-limited offers
In a live game, your store shouldn’t stay the same for every player. A shop that adapts to how players behave and to the time of year drives more revenue and stays relevant for longer. Satori, the LiveOps platform by Heroic Labs, lets your team make changes like these on the fly by keeping your game’s configuration separate from its code.
This guide shows you how to transform an ordinary, static shop into a configurable, dynamic one. By the end, you’ll have a storefront whose prices, offers, and available items change per player and on a schedule, all managed remotely from Satori while your game is running.
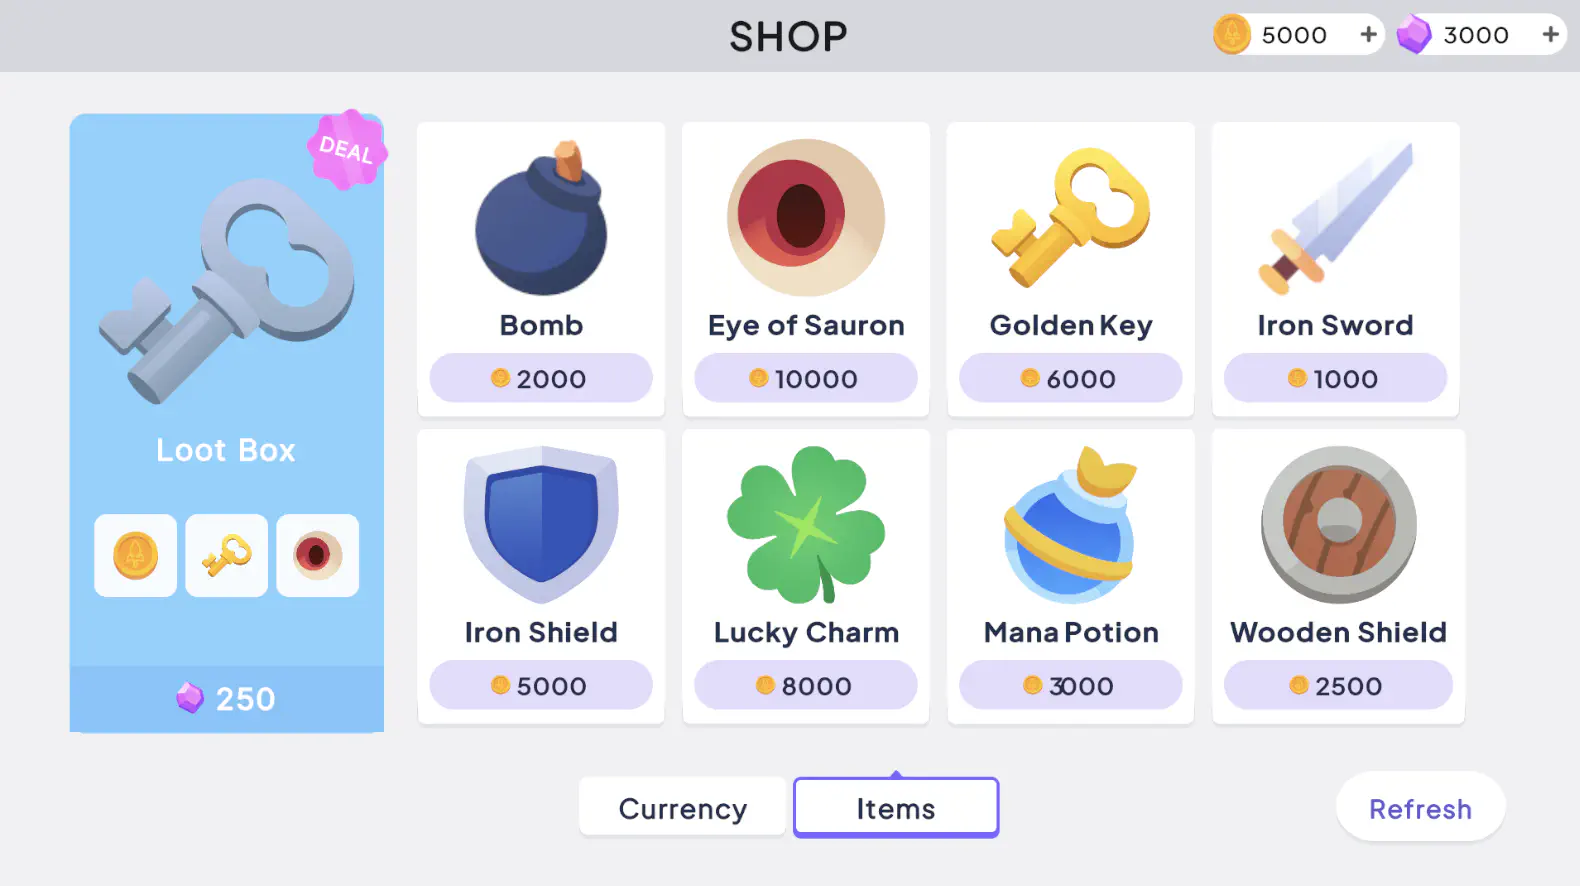
The base Hiro Store project allows the player to spend currency and buy items
A Satori API key. In the Satori Console, go to Settings > API keys.
Your Satori instance URL and port, for example https://yourinstance.satoricloud.io on port 443.
This guide builds on top of the Hiro Store sample project. To see the final version with everything in place, download the DynamicStore project. Not every boilerplate UI change is covered in this guide. Instead, use git diff in the sample-projects repo to see every change between the base project and the updated version:
Building a dynamic store pulls together several tools from across the Heroic Labs stack. Each is useful on its own, but together they unlock deep personalization that none of them could deliver alone. The techniques you’ll learn here carry over to any other part of your game that benefits from player customization.
These are the core components at work:
Hiro Economy defines your store’s catalog. It reads a base catalog from a config file (base-economy.json) and returns items, prices, and rewards to the client.
Personalizers sit between each Hiro system and its config. A personalizer can rewrite the config per request before Hiro serves it. Hiro ships with the SatoriPersonalizer, which pulls its remote config from Satori.
Satori feature flags define the overrides that apply to your base configs. Every Hiro system maps to a single flag, and the Economy system uses the flag named Hiro-Economy. Its value is JSON that merges onto your base economy config.
Satori audiences and live events decide which flag value a given player receives. An audience groups players by their properties and behavior. A live event overrides a flag for a scheduled window. Either one can hand a different Hiro-Economy value to different players.
You’ll notice that most of the code in this guide simply wires up the connection to Satori. Once that’s in place, the actual customization is driven from the Satori Console. That separation of configuration from code is central to how Hiro and Satori work together. See Thinking in Hiro to read about this design.
Everything the store personalizes builds on this base catalog. It defines the player’s starting currencies and every store item. The variant and live-event overrides later in the guide merge onto these definitions:
{"initialize_user":{"currencies":{"coins":1000,"gems":1000}},"store_items":{"starter_pack":{"name":"Starter Pack","description":"Starter pack for new players. Great value!","category":"currency","cost":{"currencies":{"coins":2500}},"reward":{"guaranteed":{"currencies":{"gems":{"min":8000,"max":8000}}}},"additional_properties":{"featured":"true","badge":"SALE","theme":"primary"}},"gems_500":{"name":"500 Gems","description":"500 gems - Free!","category":"currency","cost":{"currencies":{}},"reward":{"guaranteed":{"currencies":{"gems":{"min":500,"max":500}}}}},"gems_1000":{"name":"1000 Gems","description":"1000 gems bundle","category":"currency","cost":{"currencies":{"coins":1000}},"reward":{"guaranteed":{"currencies":{"gems":{"min":1000,"max":1000}}}}},"gems_2000":{"name":"2000 Gems","description":"2000 gems bundle","category":"currency","cost":{"currencies":{"coins":2000}},"reward":{"guaranteed":{"currencies":{"gems":{"min":2000,"max":2000}}}}},"gems_5000":{"name":"5000 Gems","description":"5000 gems bundle","category":"currency","cost":{"currencies":{"coins":5000}},"reward":{"guaranteed":{"currencies":{"gems":{"min":5000,"max":5000}}}}},"coins_500":{"name":"500 Coins","description":"500 coins - Free!","category":"currency","cost":{"currencies":{}},"reward":{"guaranteed":{"currencies":{"coins":{"min":500,"max":500}}}}},"coins_1000":{"name":"1000 Coins","description":"1000 coins bundle","category":"currency","cost":{"currencies":{"gems":1000}},"reward":{"guaranteed":{"currencies":{"coins":{"min":1000,"max":1000}}}}},"coins_2000":{"name":"2000 Coins","description":"2000 coins bundle","category":"currency","cost":{"currencies":{"gems":2000}},"reward":{"guaranteed":{"currencies":{"coins":{"min":2000,"max":2000}}}}},"coins_5000":{"name":"5000 Coins","description":"5000 coins bundle","category":"currency","cost":{"currencies":{"gems":5000}},"reward":{"guaranteed":{"currencies":{"coins":{"min":5000,"max":5000}}}}},"loot_box":{"name":"Loot Box","description":"A box filled with random items and currencies.","category":"items","cost":{"currencies":{"gems":250}},"reward":{"weighted":[{"currencies":{"coins":{"min":1000,"max":2000,"multiple":100}},"weight":6},{"items":{"golden_key":{"min":1,"max":1}},"weight":3},{"items":{"evil_eye":{"min":1,"max":1}},"weight":1}],"total_weight":10,"max_rolls":1},"additional_properties":{"featured":"true","badge":"DEAL","theme":"secondary"}},"iron_sword":{"name":"Iron Sword","description":"A sharp sword made of iron.","category":"items","cost":{"currencies":{"coins":1000}},"reward":{"guaranteed":{"items":{"iron_sword":{"min":1,"max":1}}}}},"bomb":{"name":"Bomb","description":"Goes BOOM!","category":"items","cost":{"currencies":{"coins":2000}},"reward":{"guaranteed":{"items":{"bomb":{"min":1,"max":1}}}}},"wooden_shield":{"name":"Wooden Shield","description":"A basic shield made from reinforced wood.","category":"items","cost":{"currencies":{"coins":2500}},"reward":{"guaranteed":{"items":{"wooden_shield":{"min":1,"max":1}}}}},"mana_potion":{"name":"Mana Potion","description":"A vial of blue liquid that restores magical energy.","category":"items","cost":{"currencies":{"coins":3000}},"reward":{"guaranteed":{"items":{"mana_potion":{"min":1,"max":1}}}}},"iron_shield":{"name":"Iron Shield","description":"A sturdy shield forged from iron. Provides solid protection.","category":"items","cost":{"currencies":{"coins":5000}},"reward":{"guaranteed":{"items":{"iron_shield":{"min":1,"max":1}}}}},"golden_key":{"name":"Golden Key","description":"An ornate golden key that opens special treasure chests.","category":"items","cost":{"currencies":{"coins":6000}},"reward":{"guaranteed":{"items":{"golden_key":{"min":1,"max":1}}}}},"lucky_charm":{"name":"Lucky Charm","description":"A four-leaf clover that brings good fortune when used.","category":"items","cost":{"currencies":{"coins":8000}},"reward":{"guaranteed":{"items":{"lucky_charm":{"min":1,"max":1}}}}},"evil_eye":{"name":"Eye of Sauron","description":"It is said to have the power to control the minds of others.","category":"items","cost":{"currencies":{"coins":10000}},"reward":{"guaranteed":{"items":{"evil_eye":{"min":1,"max":1}}}}}},"allow_fake_receipts":true}
Before Satori can tailor the store to each player, your game has to talk to it. This section adds a small amount of code that connects the project: it registers the personalizer on the server and authenticates players so the client and server recognize them the same way. By the end, the server personalizes the store on every refresh, and everything after this is configuration you drive from the Console.
The two options passed into NewSatoriPersonalizer are:
Option
What it does
SatoriPersonalizerPublishAuthenticateEvents()
Creates each player’s Satori identity server-side on login.
SatoriPersonalizerPublishEconomyEvents()
Forwards Hiro economy events, such as purchases, to Satori, so you can build audiences on spending behavior.
The personalizer works with the Economy system automatically, through the Hiro-Economy flag. To go deeper on how personalizers rewrite Hiro configs, see Personalizers.
Authenticate the client’s Satori session with the Nakama user ID, so the client and server refer to the same player. For the full authentication walkthrough, see the Satori Unity client guide.
First, add your Satori connection settings to HiroStoreCoordinator.cs so you can edit them in the Inspector view:
Register SatoriSystem after NakamaSystem. Hiro initializes systems in registration order, so this ordering guarantees the Nakama session exists by the time the Satori authorizer runs.
Finally, add the authorizer. It authenticates a fresh Satori session on every login using the player’s Nakama user ID:
publicstaticSatoriSystem.AuthorizerFuncSatoriAuthorizerFunc(NakamaSystemnakamaSystem){returnasyncclient=>{varuserId=nakamaSystem.Session.UserId;returnawaitAuthenticateSatoriAsync(client,userId);};}publicstaticasyncTask<Satori.ISession>AuthenticateSatoriAsync(Satori.IClientclient,stringuserId){// Send platform and language so you can build audiences on them too.vardefaultProperties=newDictionary<string,string>{{"platform",Application.platform.ToString()},{"language",Application.systemLanguage.ToString()}};returnawaitclient.AuthenticateAsync(userId,defaultProperties);}
Authenticate a fresh session each time the game starts instead of re-using tokens to restore a previous one. The player’s identity stays consistent across restarts because it’s attached to the Nakama user ID you pass in. Starting a new session each boot keeps session metrics accurate. For the reasoning behind this, see Sessions.
The server does the actual personalizing: on each refresh it merges the player’s flag value onto the base config and returns the result. The client reports purchases to Satori for analytics and audience segmentation.
First, hand the controller its connection to Satori. Add a _satoriSystem field and an optional constructor parameter:
Pass the system in where the controller is created:
StoreViewBehaviour.cs
1
2
3
4
5
6
// Optional: when null, the store still works; purchase reporting and the// event countdown are skipped.varsatoriSystem=_coordinator.GetSystem<SatoriSystem>();Controller=newStoreController(nakamaSystem,economySystem,BuildItemIconDictionary(),BuildCurrencyIconDictionary(),_defaultItemIcon,satoriSystem);
The Starter Pack is a one-time offer: every player sees it at first, but it should change once they buy it. To make that happen, record the purchase on the player’s Satori identity. After any successful purchase, MarkItemPurchasedAsync sets a purchased_<itemId> custom property and asks Satori to recompute the player’s audiences right away:
StoreController.cs
1
2
3
4
5
6
7
8
9
10
11
12
13
14
15
16
privateasyncTaskMarkItemPurchasedAsync(IEconomyListStoreItemitem){if(_satoriSystem==null)return;try{await_satoriSystem.UpdatePropertiesAsync(newDictionary<string,string>(),newDictionary<string,string>{{$"purchased_{item.Id}","true"}},recompute:true);}catch(Exceptione){Debug.LogWarning($"Failed to update Satori purchase property: {e.Message}");}}
Call it from PurchaseItemAsync after the purchase succeeds:
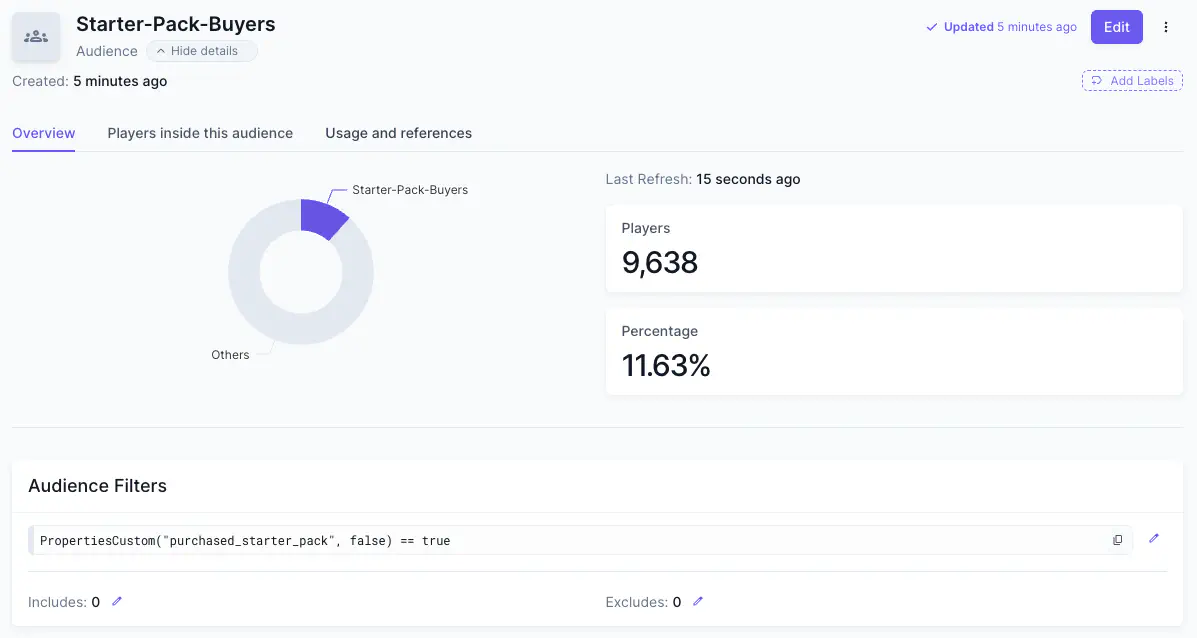
Setting purchased_starter_pack moves the player into a Starter-Pack-Buyers audience, which you’ll create in the Console, and their store changes to match.
This is a reusable LiveOps lever. The client reports a property for every item bought, but Satori only keeps the ones you register in the Console. To launch an offer for buyers of any item, register that property and build an audience on it, with no client change and no new build. You’ll do exactly that for the Starter Pack later in this guide, so you’ll see the whole flow end to end.
The base project already renders badges, featured items, and themes from each item’s properties, so there isn’t much more UI work to be done. The one addition is the banner and countdown that appear while a live event runs. Find the banner element in StoreUI.uxml and its wiring in StoreView.cs.
That’s all the code. From here on, you shape the entire player experience from the Satori Console, with no further changes to your game. This is the payoff of keeping configuration separate from code: your team can add offers, target segments, and schedule sales without an engineer or a new build.
Everything below happens in the Console for the project your API key belongs to.
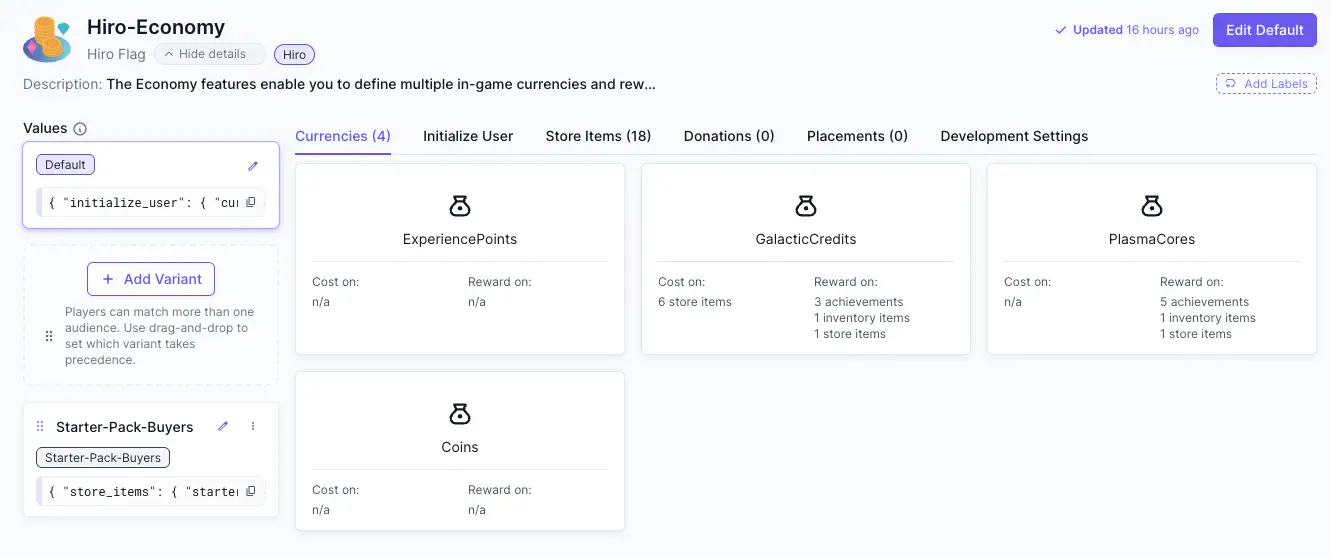
By default, Satori provides a feature flag named Hiro-Economy. Its value is the JSON that Satori delivers to Hiro, which merges it onto your base economy config. Set its default value to an empty object, so players who match no audience or event see the base store untouched:
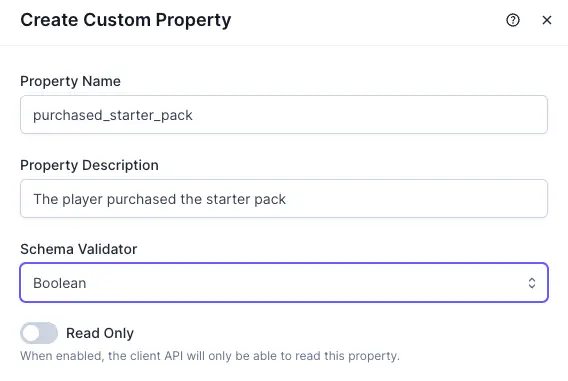
In the previous section, the client set a purchased_starter_pack property after purchase. For that to take effect, the property has to be whitelisted in Satori first: every custom property must be registered in the Taxonomy before the client can set it. Go to Taxonomy > Properties, and create a custom property named exactly purchased_starter_pack with a Boolean schema.
Registering the purchased_starter_pack custom property
Satori silently ignores updates to unregistered property names, so a typo here means the segment never triggers, with no error to point at. If an offer isn’t showing up later, check this spelling first.
Add a variant to the Hiro-Economy flag and assign it to the Starter-Pack-Buyers audience. Players in that audience receive this value instead of the default. It re-prices the featured pack: the base config shows the Starter Pack with a SALE badge at 2500 coins; this variant renames it to Value Pack, raises the price to 4000 coins, and clears the badge, so the introductory deal is gone once the player has bought it:
Audiences change the store based on who a player is; a live event changes it for everyone in its scope, on a schedule. Create one to put the whole item catalog on sale for a limited window.
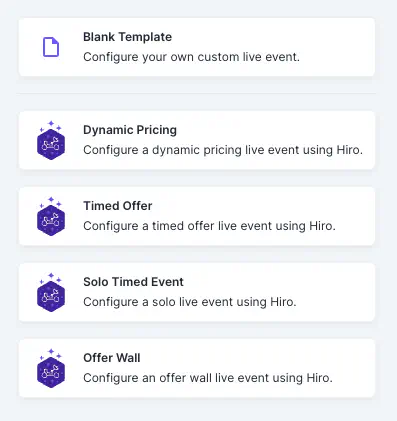
In the Satori Console, create a live event. The Console offers Hiro-aware templates, such as dynamic pricing and timed offers, as a starting point. Select Timed Offer.
Live event templates in the Satori Console
Name the event Shopping-Event.
Leave the Metrics as-is and select Next.
Keep the default settings for Target Audience: the live event is delivered to all players.
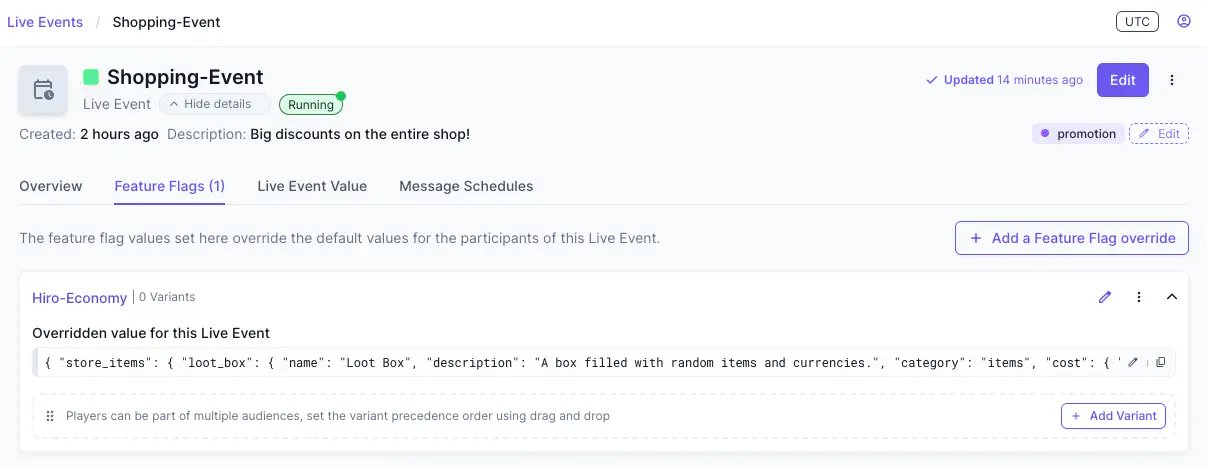
Under Feature Flags is where you’ll define the override for the store. Select Hiro-Economy as the flag to override and paste in the JSON below. Select Next.
Leave Live Event Value empty, it won’t be used in this project.
For Scheduling, choose today’s date and any end time. Leave Repeat disabled.
In the live event configuration, each item carries event_id set to the event’s exact name, which is how the client finds the event to drive the banner countdown: During the live event, all items in the store are available at half price.
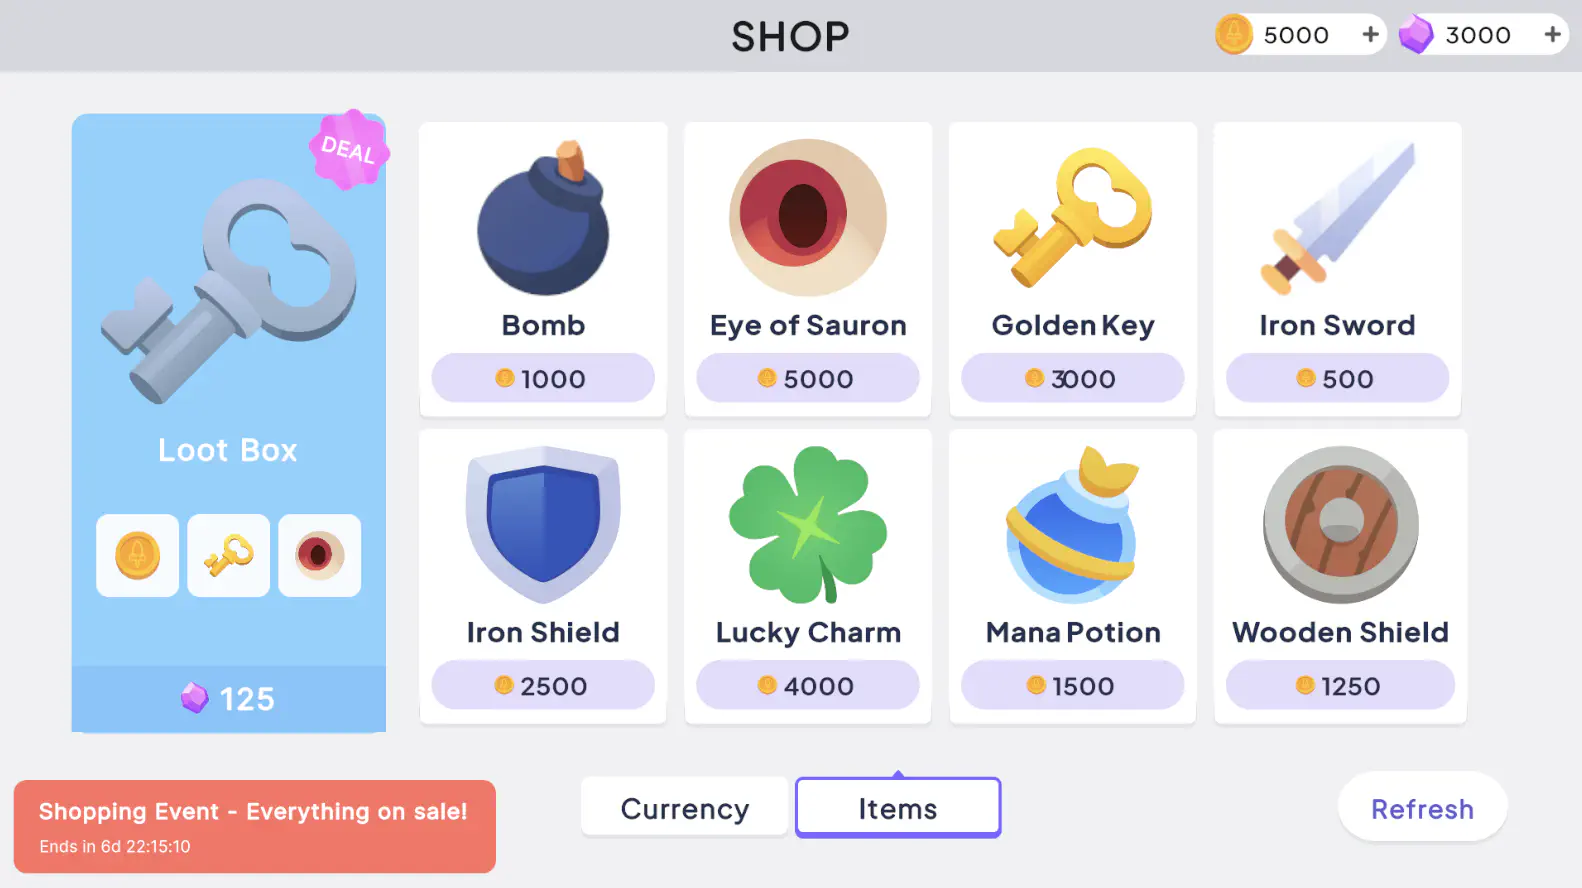
{"store_items":{"loot_box":{"name":"Loot Box","description":"A box filled with random items and currencies.","category":"items","cost":{"currencies":{"gems":125}},"reward":{"weighted":[{"currencies":{"coins":{"min":1000,"max":2000,"multiple":100}},"weight":6},{"items":{"golden_key":{"min":1,"max":1}},"weight":3},{"items":{"evil_eye":{"min":1,"max":1}},"weight":1}],"total_weight":10,"max_rolls":1},"additional_properties":{"featured":"true","badge":"DEAL","theme":"secondary","event_id":"Shopping-Event"}},"iron_sword":{"name":"Iron Sword","description":"A sharp sword made of iron.","category":"items","cost":{"currencies":{"coins":500}},"reward":{"guaranteed":{"items":{"iron_sword":{"min":1,"max":1}}}},"additional_properties":{"event_id":"Shopping-Event"}},"bomb":{"name":"Bomb","description":"Goes BOOM!","category":"items","cost":{"currencies":{"coins":1000}},"reward":{"guaranteed":{"items":{"bomb":{"min":1,"max":1}}}},"additional_properties":{"event_id":"Shopping-Event"}},"wooden_shield":{"name":"Wooden Shield","description":"A basic shield made from reinforced wood.","category":"items","cost":{"currencies":{"coins":1250}},"reward":{"guaranteed":{"items":{"wooden_shield":{"min":1,"max":1}}}},"additional_properties":{"event_id":"Shopping-Event"}},"mana_potion":{"name":"Mana Potion","description":"A vial of blue liquid that restores magical energy.","category":"items","cost":{"currencies":{"coins":1500}},"reward":{"guaranteed":{"items":{"mana_potion":{"min":1,"max":1}}}},"additional_properties":{"event_id":"Shopping-Event"}},"iron_shield":{"name":"Iron Shield","description":"A sturdy shield forged from iron. Provides solid protection.","category":"items","cost":{"currencies":{"coins":2500}},"reward":{"guaranteed":{"items":{"iron_shield":{"min":1,"max":1}}}},"additional_properties":{"event_id":"Shopping-Event"}},"golden_key":{"name":"Golden Key","description":"An ornate golden key that opens special treasure chests.","category":"items","cost":{"currencies":{"coins":3000}},"reward":{"guaranteed":{"items":{"golden_key":{"min":1,"max":1}}}},"additional_properties":{"event_id":"Shopping-Event"}},"lucky_charm":{"name":"Lucky Charm","description":"A four-leaf clover that brings good fortune when used.","category":"items","cost":{"currencies":{"coins":4000}},"reward":{"guaranteed":{"items":{"lucky_charm":{"min":1,"max":1}}}},"additional_properties":{"event_id":"Shopping-Event"}},"evil_eye":{"name":"Eye of Sauron","description":"It is said to have the power to control the minds of others.","category":"items","cost":{"currencies":{"coins":5000}},"reward":{"guaranteed":{"items":{"evil_eye":{"min":1,"max":1}}}},"additional_properties":{"event_id":"Shopping-Event"}}}}
A live event’s flag override replaces the value a player would otherwise get from an audience variant, it doesn’t stack. While Shopping-Event runs, the Value Pack re-pricing is suspended and returns when the event ends. To keep segment pricing during an event, include those items in the override too.
The Shopping-Event live event overriding the Hiro-Economy flag
With the code in place and the Console configured, run the project and watch the store respond. Open the Main scene and enter Play mode. To download a copy of the full working implementation, see the DynamicStore project.
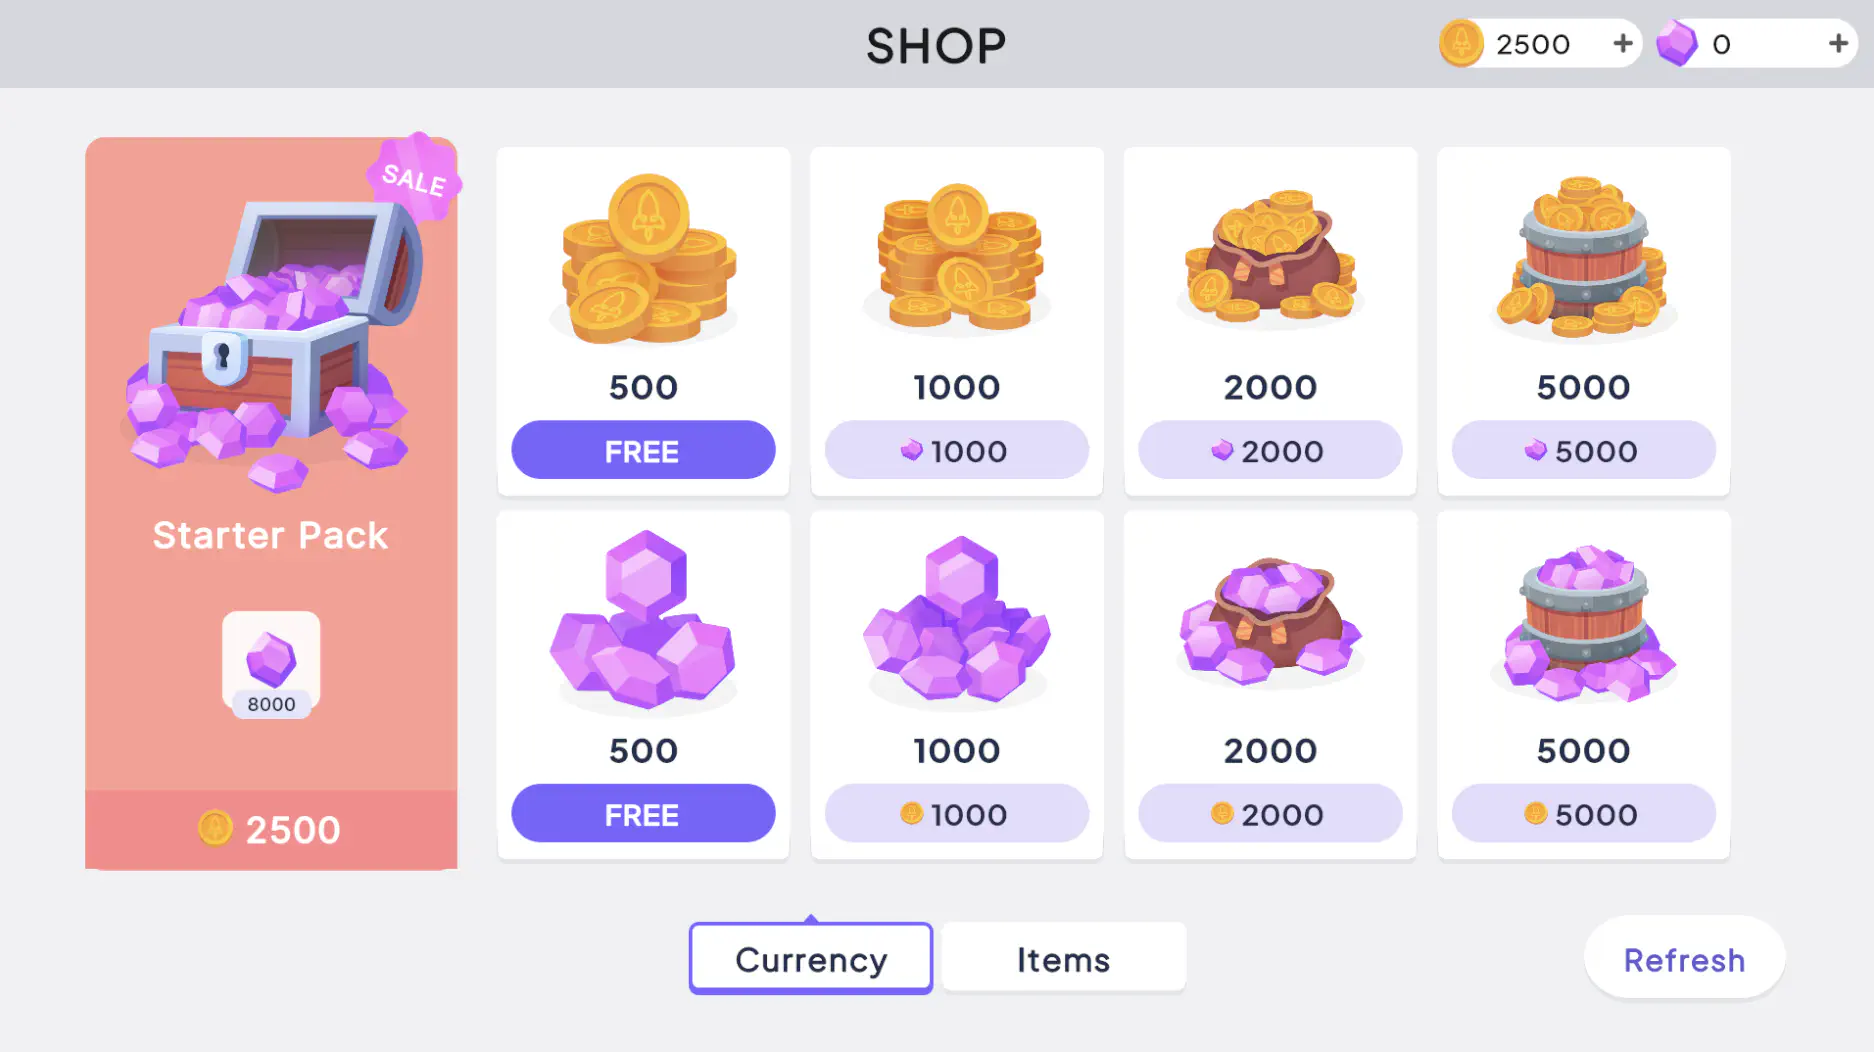
The store opens in its default state, showing only what’s in the base config: the featured Starter Pack is on sale at 2500 coins, and the Items tab lists everything at full price.
The base Hiro Store with everything at their default prices
Buy the Starter Pack. The client records the purchase as the purchased_starter_pack property and asks Satori to recompute audiences, which moves the player into Starter-Pack-Buyers.
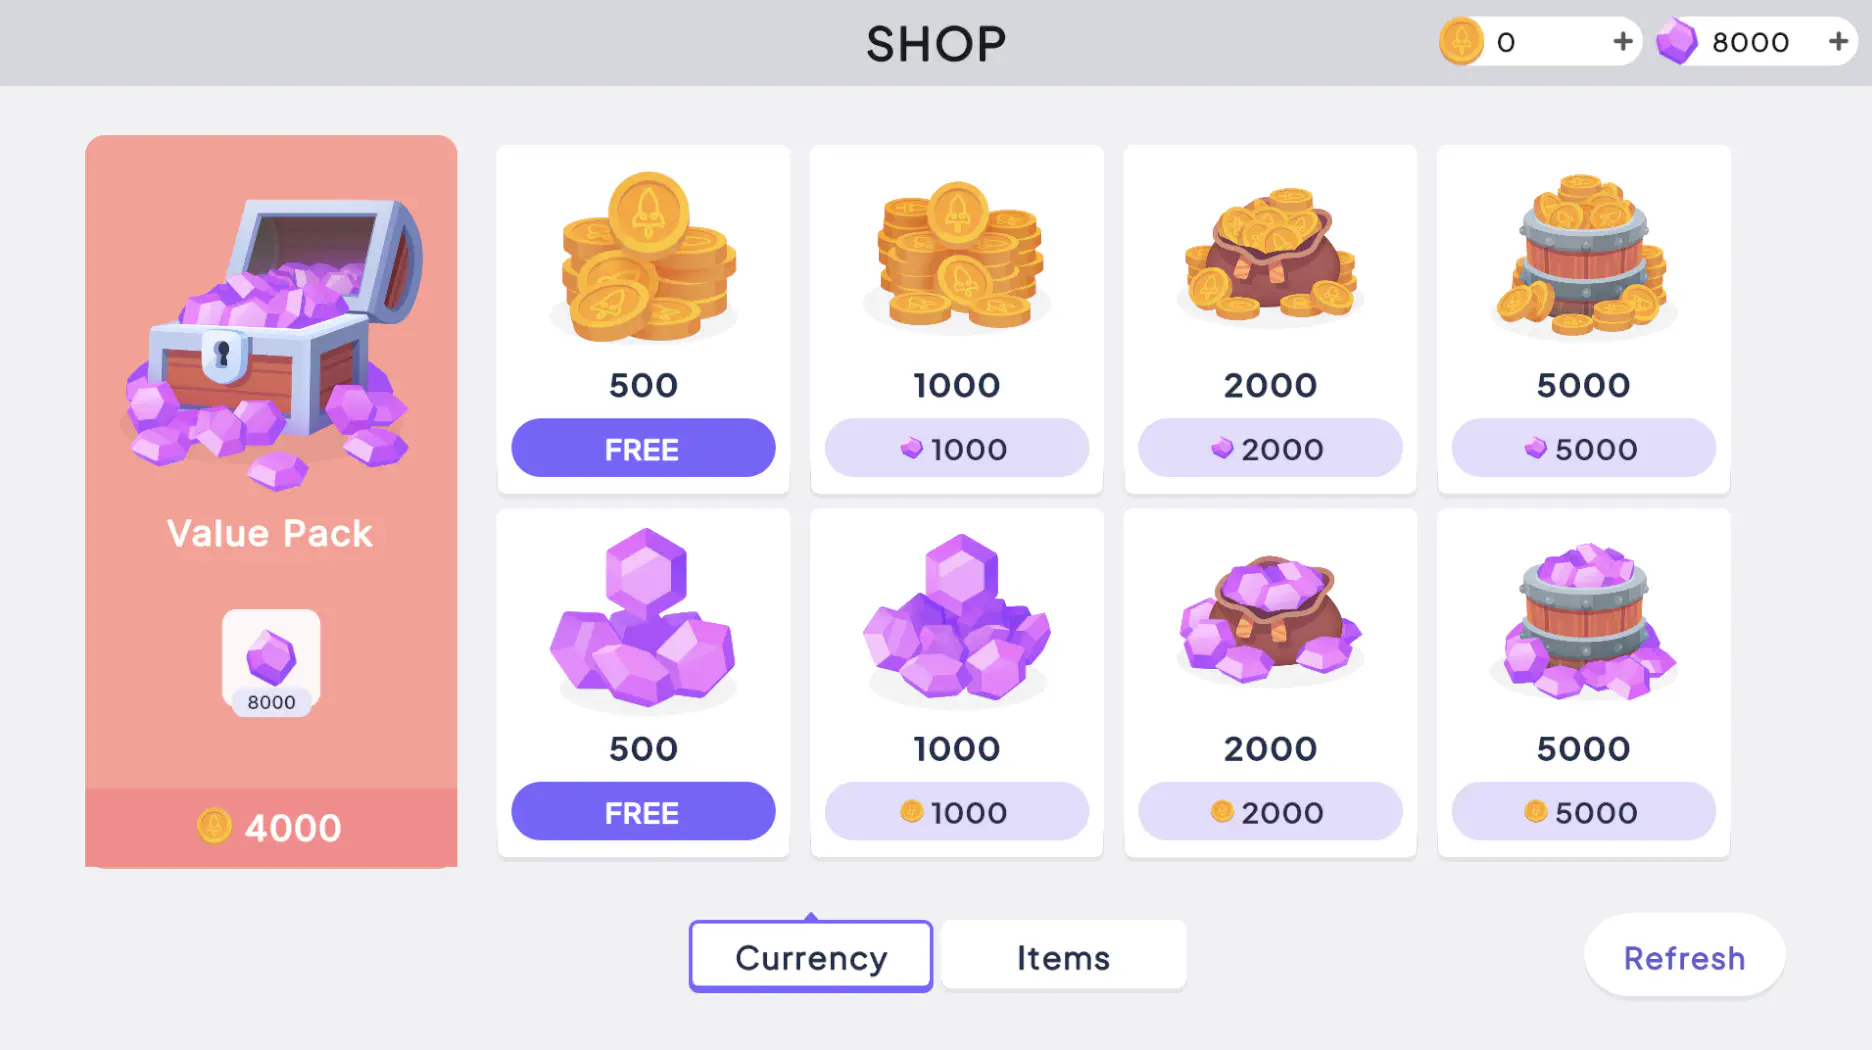
Select Refresh. The featured slot rebuilds from the variant: the pack is now the Value Pack at 4000 coins with the sale badge gone.
After the purchase: the featured pack is re-priced as the Value Pack
The property update requests an immediate recompute, so the new offer usually appears on the first refresh. If it doesn’t, refresh once more.
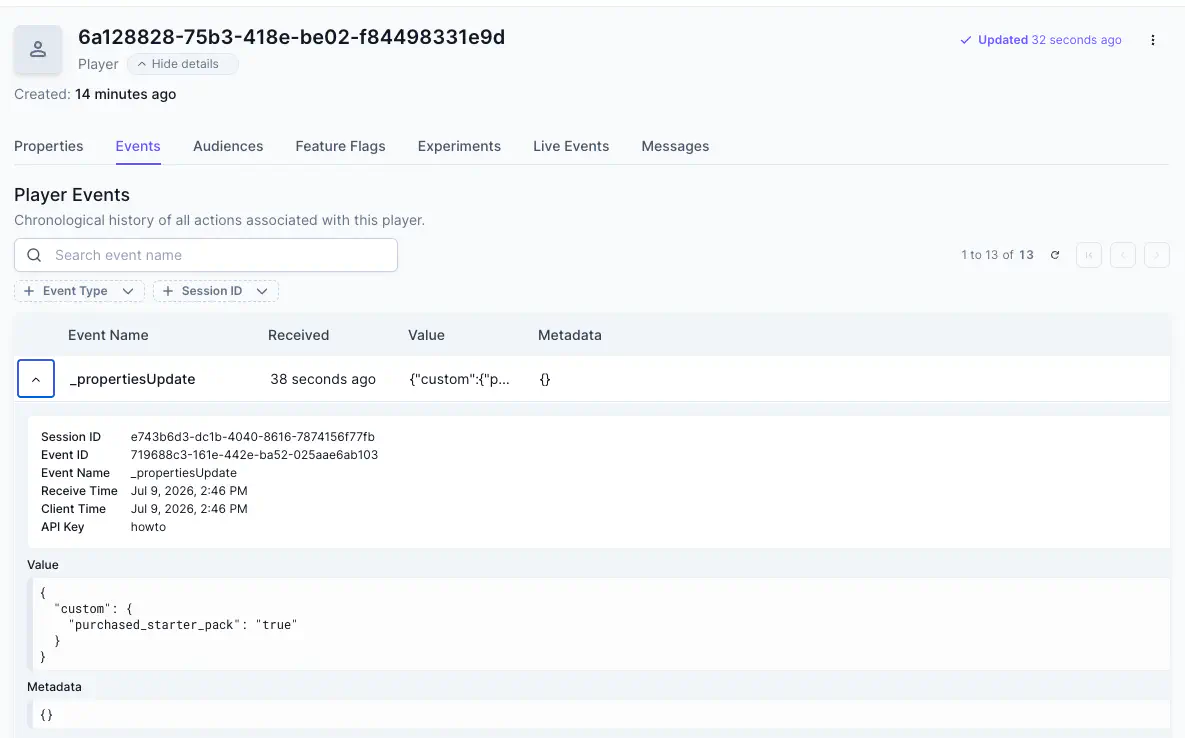
To confirm the round-trip, open the player’s identity in the Satori Console and check its events: a _propertiesUpdate event carries purchased_starter_pack set to true.
The purchase recorded as a custom property on the player's identity
If you added the optional account-switch alignment, switch to a fresh account to replay the demo from scratch. The new Nakama user is a new Satori identity with no purchase history, so the store returns to the base config.
While Shopping-Event is running, return to the game and select the Items tab. Hit Refresh to see that every item drops to half price, and a “Shopping Event - Everything on sale!” banner appears in the bottom-left corner with a live countdown.
The Items tab during the sale, with the event banner and countdown
When the event ends, the next refresh restores regular prices and the banner disappears, with no deploy at either end. You can prematurely “end” the event by editing the start date of the event in the Satori Console to confirm this yourself.
Your store’s catalog, prices, and available offers are now controlled from Satori while the game runs:
Buying the Starter Pack moves a player into the Starter-Pack-Buyers audience, whose variant re-prices the featured pack from an intro sale to its regular Value Pack price.
A live event puts the item catalog on sale for a scheduled window, complete with an on-screen banner and countdown, then restores prices when it ends.
The same pattern extends anywhere the base config reaches. Register another purchase property to target buyers of a different item, build audiences from other player properties the client sends, or schedule more live events, all from the Console and all without touching base-economy.json.