Personalizer #
The Personalizer is a feature that allows you to modify data definitions for various systems (e.g. rewards, virtual store, unlockables) on-the-fly, according to each individual player’s behavior, progression, and preferences. This allows game designers to tailor the experience for the player at an individual level.
How it works #
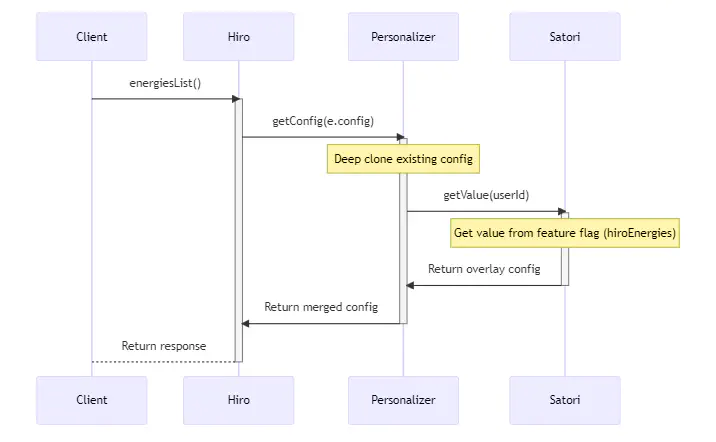
The Personalizer operates as middleware between Hiro’s feature sets and the player, dynamically modifying Hiro configuration data as it’s retrieved and before it is used (e.g. for determining a player’s achievement reward), and ultimately, a result is sent back to the player.
The flow is as follows:
Data Retrieval: When a player interacts with your game and a call to a Hiro feature is made, relevant configuration data is retrieved from Hiro’s backend systems. For instance, the rewards configuration data for a particular achievement that a player has just completed.
Personalization of Configuration: Hiro deep clones the default configuration for the relevant system and then applies personalization to this configuration data. This will go through the Personalizer chain to request any personalized configuration for that particular gameplay system, which it will then overlay and merge with existing configuration from the previous steps in the chain to create the final personalized gameplay configuration.
Personalized Gameplay: Once the personalized configuration has been created, it is used by the appropriate Hiro gameplay system where necessary. In our achievement example, the user can call the claim achievement endpoint in Hiro and Hiro will use the personalized configuration to determine what reward the player should receive.
Chaining Personalizers #
Personalizers can be chained to add more customizability:
| |
In this example, Nakama will first check its own storage objects for any personalization to merge into the existing statically defined JSON definitions. Next, it will take that newly merged data, go to Satori, and try to merge with any related Hiro system Feature Flags. This final merged definiton will then be used by the Hiro systems.
Audiences feature, as it would be overriden by anything defined in Nakama storage which applies to your whole playerbase.Storage Implementation #
Hiro comes pre-built with an implementation of the Personalizer that uses Nakama storage objects to make data definitions able to be dynamically modified, rather than static like the local JSON definitions.
After initializing your Hiro systems, you can then add the Storage Personalizer.
| |
To set up your Nakama server with the default storage objects used for personalization:
- Download the JSON storage template here
- Head to your Nakama Console -> Configuration -> Import Storage Data
- Upload the JSON file
- Now, over in Storage, you will see that a collection has been created for each Hiro system
Now, when a configuration is requested, your Nakama server will check storage to see if any definitions exist for the given Hiro system. If there are any, they will be merged with your static definitions to create the final configuration result.
Achievement can have its properties personalized using the Storage Personalizer, but you would also need to re-define the rest of the object, not just the properties you want to modify.Satori Implementation #
Hiro also comes pre-built with a Satori implementation of the Personalizer which uses the Feature Flags functionality to provide custom gameplay configuration for the user. This works in tandem with Satori’s LiveOps capabilities, enabling real-time adjustments to game mechanics based on immediate player feedback, live events, experiments and more. This provides an opportunity to react to emerging trends, optimize game balance, run limited-time events, and more.
After initializing your Hiro systems, you can then add the Satori Personalizer.
| |
Next, to connect to your Satori instance in the Heroic Cloud, you must add these fields to your Nakama server’s local.yml file.
| |
To find these values for your Satori instance:
- Head to your Satori Console -> Settings -> API Keys
- You can grab the
api_key_nameandapi_keyhere - Now, head to the Configuration tab
- Search for the
session.signing_keyand set these values in yourlocal.yml
Now, when a configuration is requested, your Nakama server will ask your Satori instance whether any Feature Flags exist for the given Hiro system. If there are any, they will be merged with your static definitions to create the final configuration result.
Achievement can have its properties personalized using Satori, but you would also need to re-define the rest of the object, not just the properties you want to modify.