Making a competitive multiplayer game using Nakama and Unity

In this article you’ll learn how we created the open-source competitive multiplayer shooter, “Fish Game”.
We’ll cover the project’s goals, how you can download it and try it out for yourself and deep dive into the technical implementation of the game’s various multiplayer components.
This article aims to be part tutorial, part deep dive. So we encourage you to download the project files and have the project open as you follow along - that way you’ll have a better understanding of how the various features were integrated into the final game and you’ll be able to test them out for yourself!
What is “Fish Game”?
Fish Game is an open-source game project developed in Unity (as well as other engines including Godot and Rust) and powered by the Nakama open-source multiplayer game backend. It’s a fast-paced 2D competitive shooter heavily inspired by Duck Game in which you compete against up to 3 other players to be the last fish standing (Yes, our fish have feet…)!
The purpose of this project is to provide developers with a better onboarding experience for getting started with Nakama and to showcase it’s powerful features such as:
Before getting started there’s a few things you’ll need. These being Unity 2019.4 LTS and Docker. Let’s go through getting these set up before we continue.
Installing Unity 2019.4 LTS
If you haven’t already got Unity 2019.4 LTS installed, then head on over to the Unity Download website and download a copy of Unity Hub and install it.
Once you’ve installed Unity Hub, launch it and go to the Installs tab as shown below.
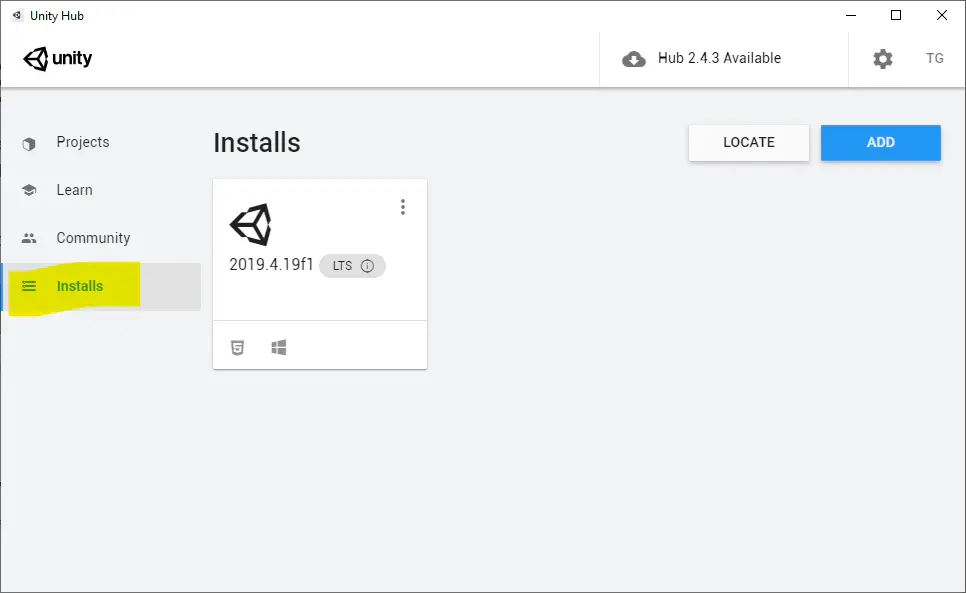
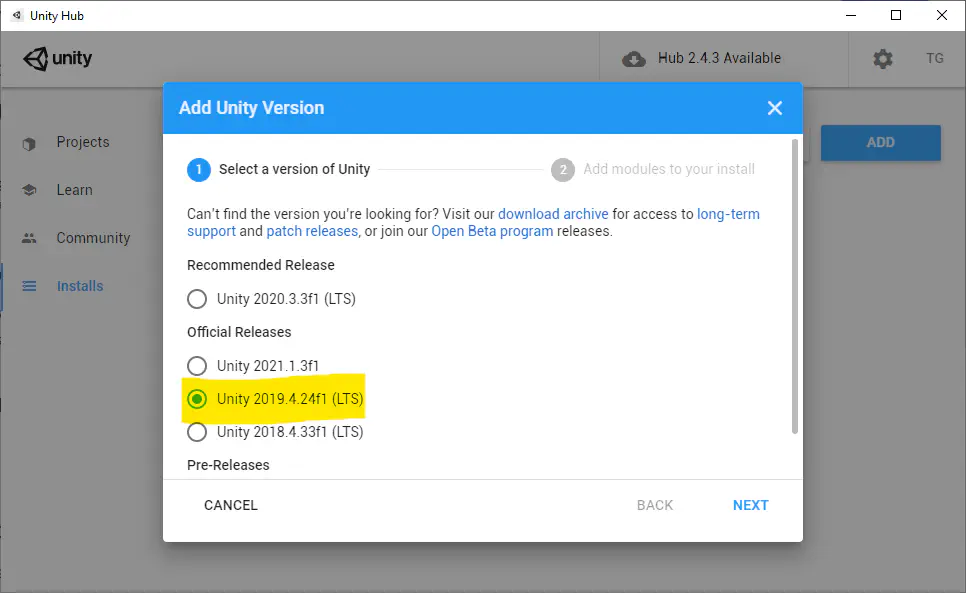
Once you’re there, click the Add button and select Unity 2019.4.x (LTS) under Official Releases and click Next.
Note: Your install may have a different x number (patch number) to that shown in the screenshot, that’s ok. As long as you’re running some iteration of Unity 2019.4 LTS you are good to go!
On the next screen you will have the option of choosing to also install specific dev tools for your platform (e.g. Microsoft Visual Studio Community 2019 if you’re on Windows) as well as various build platforms. For now leave these options as default and click Done - Unity 2019.4 LTS will now begin to install.
Installing Docker
The second prerequisite for working with Nakama is Docker. Though it is not strictly necessary to use Docker in order to work with Nakama, it does simplify things massively by allowing us to quickly and easily spin up an instance of the Nakama server backed by CockroachDB, all in a single command line, regardless of what operating system you’re running.
If you wish to use Nakama without Docker, please see the following documentation.
The quickest way to get up and running with Docker is to install Docker Desktop on your machine. To do this, visit the Docker Desktop Download website and choose the download option for your platform.
Once you have downloaded and installed Docker Desktop, launch it and you should see the following screen.
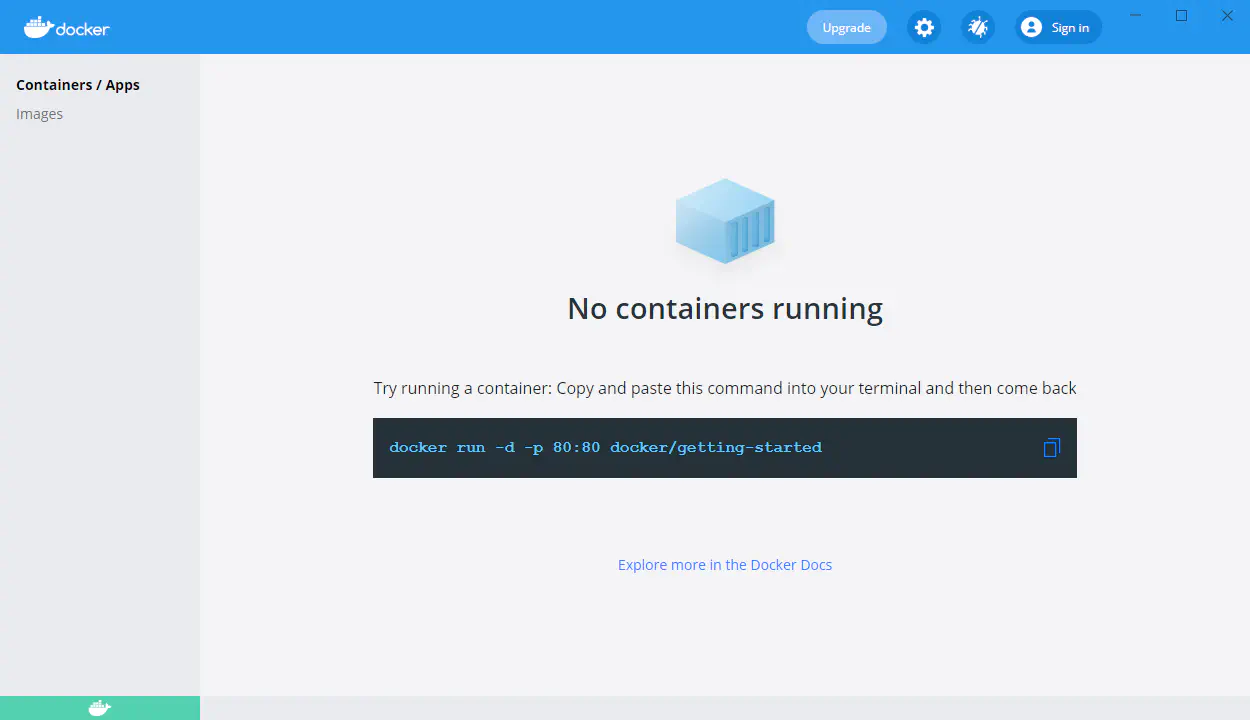
If you do, then you’re ready to start - so let’s go!
Running Nakama with Docker using Docker Compose
Once you have Docker installed on your machine, we’re going to use a tool that comes with it called Docker Compose to spin up an instance of Nakama and CockroachDB. Without going into too much detail, Docker Compose allows us to configure a group of applications to run inside of Docker Containers and manages all of the network and storage configuration for those applications to allow them to run nicely together.
To accomplish this, we would typically need to write a docker-compose.yml configuration file. But luckily, there is one already available for you to use that does everything we need to configure Nakama.
Download docker-compose.yml and save it to a new folder on your machine.
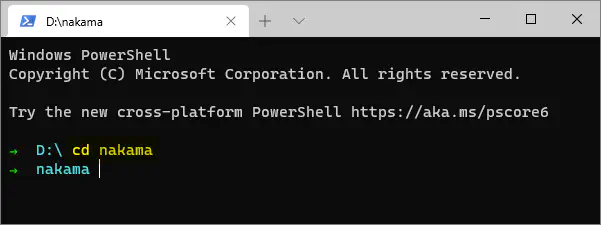
Once you have the file, open a Command Prompt / Terminal (depending on your operating system) and navigate to the folder you just created that contains the docker-compose.yml file.
For those of you not familiar with the command line, you can do that by typing the following command cd /path/to/your/folder as shown below:
Once you’re in your new directory, simply type and execute the command docker-compose up.
If all goes well, Nakama and CockroachDB should download and begin to run. It may take a few minutes to start up the first time as it downloads all of the relevant Docker images and then creates new containers from them, but once it is done you should see something similar to the following.
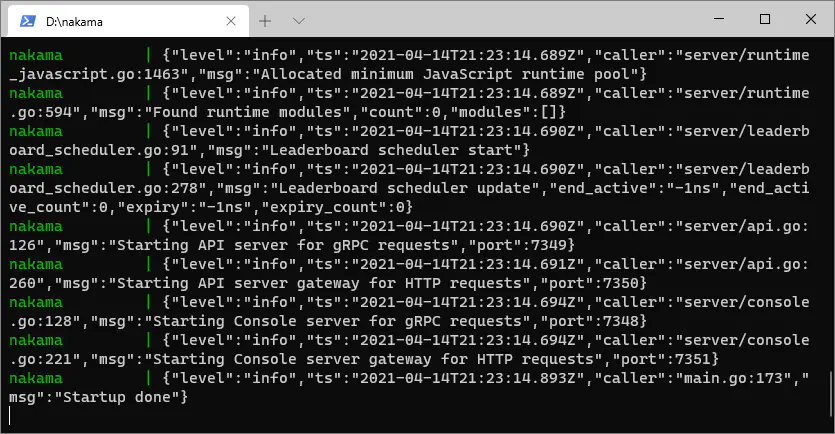
You’ll notice the last line says “Startup done”. This means everything was successful and you now have a fully configured instance of the Nakama server up and running on your machine, congratulations!
Now let’s dive into the Fish Game project and start using it to shoot some anthropomorphic fish out of the water!
Project structure overview
The first thing we should go through is the structure of the Fish Game project. This will help you to become familiar with the scene heirarchy and asset folder structure for when we start referring to specific classes and objects later in this deep dive.
Let’s open up the Fish Game project in Unity and take a look at the scene hierarchy.
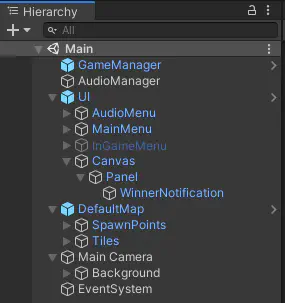
Starting from the top we have the following game objects:
- GameManager - This controls all match specific game logic, including handling matchmaking.
- AudioManager - This handles the game’s audio as you might imagine.
- UI
- AudioMenu - This is a simple audio mute toggle.
- MainMenu - This is a menu that lets the player find a match, cancel a matchmaking request or view the credits.
- InGameMenu - This is a menu that the player can invoke mid-game by pressing ESC to quit the match.
- Canvas - This is a UI canvas that simply contains the winning player notification label.
- DefaultMap - This is the game’s level including spawn points and tilemap.
- Main Camera - The game’s 2D camera and a background sprite.
- EventSystem - The default Unity event system that handles UI interaction.
As you can see it’s a fairly simple heirarchy, but you may be wondering where the player game object is. The answer to this is that the GameManager object handles the instantiation of player game objects in response to Nakama matchmaking and match state events.
Before we dive too deeply into that, let’s also quickly take a look at the asset folder hierarchy so that you can familiarise yourself with where the important code lives.
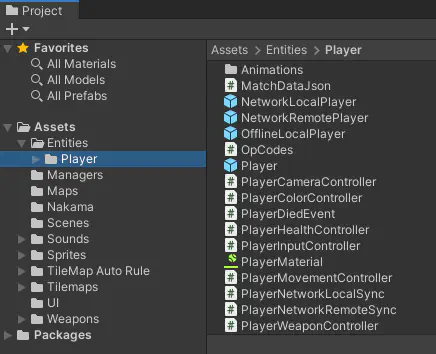
Again, let’s go from top to bottom, we’ll ignore the folders that are not of importance to explaining the Nakama portions of the game:
- Entities/Player - This contains the player prefabs (3 in total) as well as all
MonoBehaviourcomponents associated with them. - Managers - This contains the components responsible for handling global game elements such as the
GameManagerand various menu scripts. - Nakama - This contains the
NakamaConnectionclass which is aScriptableObject. as well as theLocalNakamaConnectionasset. - Weapons - This contains the components responsible for handling weapons and projectiles.
Take some time to have a look through the assets and scripts in the project and maybe grab yourself a cup of your favourite hot beverage. Once you’re ready, let’s start looking at some code!
Installing the Nakama package
In order to begin using Nakama in our Unity project we needed to install the Nakama SDK package. To see how we did this, open up the Packages/manifest.json file.
This file lists all of the packages currently installed in the Fish Game project. Scrolling down to the bottom you can see that we have added a line for the Nakama SDK.
"com.heroiclabs.nakama-unity": "https://github.com/heroiclabs/nakama-unity.git?path=/Packages/Nakama#v2.8.0"
This line will tell Unity to install the v2.8.0 tagged version of the Nakama SDK directly from GitHub.
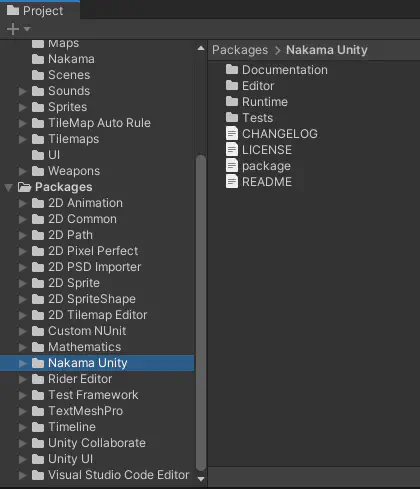
Looking at the list of packages in Unity you can see that the Nakama SDK is now installed as shown below.
Connecting to Nakama with device authentication
Now that we have the Nakama SDK installed it’s time to look at how to connect to our Nakama server.
Let’s open up the Nakama/NakamaConnection.cs file.
There’s a few things we should point out here from the start, the first being that the NakamaConnection inherits from Unity’s ScriptableObject class. This means that we can create instances of the NakamaConnection class in our project and save them as assets that can be passed as dependencies to other scripts in our game.
This is made possible due to the two class attributes right before we declare the class, these being [Serializable] and [CreateAssetMenu].
The [CreateAssetMenu] attribute is extremely useful as it adds a menu item directly inside Unity that allows us to create instanced assets of our ScriptableObject and save them in our project.

After declaring our NakamaConnection class, we have defined some public variables that will allow us to specify which Nakama server we would like this connection object to connect to.
public string Scheme = "http";
public string Host = "localhost";
public int Port = 7350;
public string ServerKey = "defaultkey";
These public variables specify the scheme (http or https), host name / ip, port number and the server’s secret key. Since these are public variables they can be modified in the Unity Inspector for each specific instance of our NakamaConnection asset.

This is extremely useful when you have multiple Nakama servers you’d like to connect to. For example, you may have a local server, a development server and a production server as you can have separate assets for each environment.
Important! Be sure to add production NakamaConnection assets to your .gitignore file so that you don’t commit them to source control as this could expose your production server secret key.
To add them to your .gitignore file simply add their name as shown below:
# Heroic Cloud Nakama Connection asset
HeroicCloudNakamaConnection.asset
HeroicCloudNakamaConnection.asset.meta
Now that we’ve looked at how to create an instance of the NakamaConnection as an asset, let’s take a look at the guts of this class, which is the Connect function.
/// <summary>
/// Connects to the Nakama server using device authentication and opens socket for realtime communication.
/// </summary>
public async Task Connect()
{
    // Connect to the Nakama server.
    Client = new Nakama.Client(Scheme, Host, Port, ServerKey, UnityWebRequestAdapter.Instance);

    // Attempt to restore an existing user session.
    var authToken = PlayerPrefs.GetString(SessionPrefName);
    if (!string.IsNullOrEmpty(authToken))
    {
        var session = Nakama.Session.Restore(authToken);
        if (!session.IsExpired)
        {
            Session = session;
        }
    }

    // If we weren't able to restore an existing session, authenticate to create a new user session.
    if (Session == null)
    {
        string deviceId;

        // If we've already stored a device identifier in PlayerPrefs then use that.
        if (PlayerPrefs.HasKey(DeviceIdentifierPrefName))
        {
            deviceId = PlayerPrefs.GetString(DeviceIdentifierPrefName);
        }
        else
        {
            // If we've reach this point, get the device's unique identifier or generate a unique one.
            deviceId = SystemInfo.deviceUniqueIdentifier;
            if (deviceId == SystemInfo.unsupportedIdentifier)
            {
                deviceId = System.Guid.NewGuid().ToString();
            }

            // Store the device identifier to ensure we use the same one each time from now on.
            PlayerPrefs.SetString(DeviceIdentifierPrefName, deviceId);
        }

        // Use Nakama Device authentication to create a new session using the device identifier.
        Session = await Client.AuthenticateDeviceAsync(deviceId);

        // Store the auth token that comes back so that we can restore the session later if necessary.
        PlayerPrefs.SetString(SessionPrefName, Session.AuthToken);
    }

    // Open a new Socket for realtime communication.
    Socket = Client.NewSocket(true);
    await Socket.ConnectAsync(Session, true);
}
This is a pretty chunky function, so let’s run through it piece by piece.
The first thing to note here is that this function is marked as async. You will see this a lot throughout the code base as Nakama fully embraces the asynchronous programming model. This allows us to interact with the Nakama server without blocking threads. For a deep dive into how this works behind the scenes, you can read the async-in-depth article by Microsoft.
Once we have declared our async function, we immediately create an instance of the Nakama.Client object and pass in our connection values.
// Connect to the Nakama server.
Client = new Nakama.Client(Scheme, Host, Port, ServerKey, UnityWebRequestAdapter.Instance);
We can now use this Client object to interact with Nakama.
The next thing we do is attempt to restore an existing user session. For example, if a user has previously launched the game and connected to the Nakama server we want to restore that same session if it hasn’t already expired.
// Attempt to restore an existing user session.
var authToken = PlayerPrefs.GetString(SessionPrefName);
if (!string.IsNullOrEmpty(authToken))
{
   var session = Nakama.Session.Restore(authToken);
   if (!session.IsExpired)
   {
         Session = session;
   }
}
You can see here that we attempt to get an authentication token from PlayerPrefs. If we find one we call the Nakama.Session.Restore function and pass in the authentication token to retrieve a Session object. Before we continue, we also perform a check to ensure that the session has not already expired. If the session has not expired, we assign this session object to our private Session variable. Otherwise, we need to reauthenticate to create a brand new session.
The following code happens inside an if statement that checks if the Session variable is null. We have two potential paths at this point. Either the user has played the game before and we have stored their device’s unique identifier, or this is the first time they have launched the game and we need to get a unique identifier for their device which we can then use to authenticate with the Nakama server.
In the first scenario, the code is quite straight forward:
// If we've already stored a device identifier in PlayerPrefs then use that.
if (PlayerPrefs.HasKey(DeviceIdentifierPrefName))
{
      deviceId = PlayerPrefs.GetString(DeviceIdentifierPrefName);
}
Here we check to see if there is already a value for the DeviceIdentifierPrefName key in PlayerPrefs. If there is, we grab the value and store it in the deviceId variable to be used later in the function.
If, however, there is no device identifier value stored in PlayerPrefs we must get a new value. To do this we attempt the grab the device’s unique identifier from SystemInfo.deviceUniqueIdentifier. This should, in most circumstances, return a valid unique identifier for the user’s device. However, there may be certain circumstances where this does not return an appropriate value. In this case, it will return a value of SystemInfo.unsupportedIdentifier. We can check for this and if we receive this value then we go ahead and generate our own unique identifier using a Guid.
if (deviceId == SystemInfo.unsupportedIdentifier)
{
   deviceId = System.Guid.NewGuid().ToString();
}
Once we have a unique identifier, we store it in PlayerPrefs for future use.
// Store the device identifier to ensure we use the same one each time from now on.
PlayerPrefs.SetString(DeviceIdentifierPrefName, deviceId);
We can then authenticate with the Nakama server and store the authentication token to PlayerPrefs as follows:
// Use Nakama Device authentication to create a new session using the device identifier.
Session = await Client.AuthenticateDeviceAsync(deviceId);

// Store the auth token that comes back so that we can restore the session later if necessary.
PlayerPrefs.SetString(SessionPrefName, Session.AuthToken);
Finally, after we have a valid Nakama Session we go ahead and open a Socket. This allows us to begin communicating with the Nakama server and subsequently, the other players connected to our game.
// Open a new Socket for realtime communication.
Socket = Client.NewSocket(true);
await Socket.ConnectAsync(Session, true);
The final piece of the puzzle here is to actually call this function from somewhere within our game on startup.
In Fish Game we achieve this via a GameManager object. This object lives in our scene root and has a reference to our NakamaConnection asset assigned via the Inspector.
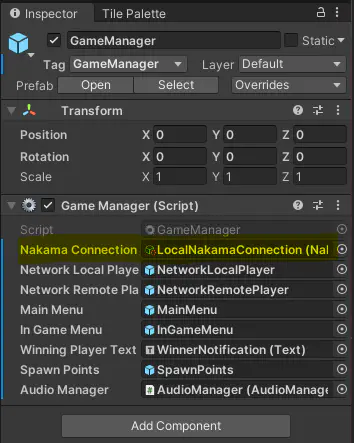
The code for connecting to the Nakama server lives in the Start function of the GameManager class (trimmed for brevity).
    /// <summary>
    /// Called by Unity when the GameObject starts.
    /// </summary>
    private async void Start()
    {
        // ...

        // Connect to the Nakama server.
        await NakamaConnection.Connect();

        // ...
    }
This code will run as soon as the game launches and will immediately connect us to the Nakama server using device authentication.
If we launch the game and view the Nakama server log we can now verify that we have successfully connected to the server.

Matchmaking
Now that we have a connection to the Nakama server, it’s time to begin looking for a match. Let’s jump back into the GameManager class.
/// <summary>
/// Called by Unity when the GameObject starts.
/// </summary>
private async void Start()
{
   // Create an empty dictionary to hold references to the currently connected players.
   players = new Dictionary<string, GameObject>();

   // ...

   // Set up network event handlers.
   NakamaConnection.Socket.ReceivedMatchmakerMatched += OnReceivedMatchmakerMatched;
   NakamaConnection.Socket.ReceivedMatchPresence += OnReceivedMatchPresence;
   NakamaConnection.Socket.ReceivedMatchState += async m => await OnReceivedMatchState(m);

   // ...
}
We can see here that we start by creating a new Dictionary to store the connected players. We’ve chosen a Dictionary here rather than a List as it allows us to easily index players by their Session ID.
Next, once we have connected to the Nakama server, we subscribe to a few events, these being:
- ReceivedMatchmakerMatched - This allows us to react when Nakama has found a match for us.
- ReceivedMatchPresence - This allows us to react when a player (or multiple) join or leave the match.
- ReceivedMatchState - This allows us to react when we receive a message from the Nakama server.
Diving out briefly into the MainMenu class we can see that we trigger a matchmaking request in the FindMatch function.
/// <summary>
/// Begins the matchmaking process.
/// </summary>
public async void FindMatch()
{
   // ...

   await gameManager.NakamaConnection.FindMatch(int.Parse(PlayersDropdown.options[PlayersDropdown.value].text));
}
Here we call the FindMatch function on the NakamaConnection class via a reference on the GameManager and pass in the amount of players we would like to match with (selected via the UI drop down list). Let’s go and have a look at the FindMatch function inside the NakamaConnection class.
/// <summary>
/// Starts looking for a match with a given number of minimum players.
/// </summary>
public async Task FindMatch(int minPlayers = 2)
{
   // Set some matchmaking properties to ensure we only look for games that are using the Unity client.
   // This is not a required when using the Unity Nakama SDK,
   // however in this instance we are using it to differentiate different matchmaking requests across multiple platforms using the same Nakama server.
   var matchmakingProperties = new Dictionary<string, string>
   {
      { "engine", "unity" }
   };

   // Add this client to the matchmaking pool and get a ticket.
   var matchmakerTicket = await Socket.AddMatchmakerAsync("+properties.engine:unity", minPlayers, minPlayers, matchmakingProperties);
   currentMatchmakingTicket = matchmakerTicket.Ticket;
}
The first thing to point out here is that we have declared a Dictionary with a single key/value pair that specifies that the engine we’re using is Unity. This is not a Nakama specific property, we have created this to allow us to differentiate between different matchmaking requests. In the case of Fish Game, there are several versions all connecting to the same Heroic Cloud server, so by using this key/value pair we can tell the Nakama Server that we’re running the Unity engine version of the game and subsequently that we’re only interested in matching with other client’s that are also running the Unity engine version.
We perform this filtering of matches on the next line:
// Add this client to the matchmaking pool and get a ticket.
var matchmakerTicket = await Socket.AddMatchmakerAsync("+properties.engine:unity", minPlayers, minPlayers, matchmakingProperties);
Here you can see we are calling the Socket.AddMatchmakerAsync function. The first parameter here is a filter that allows us to tell Nakama which kind of matches we are interested in. In our case we tell Nakama that we only care about matches that also have the engine:unity key/value pair. This filtering is extremely powerful as it allows youto tell Nakama what kind of matches you want to look for. For example, you could use this to find matches of a specific game type, say perhaps a team deathmatch. You might then pass a filter such as +properties.game_type:team_deathmatch.
The AddMatchmakerAsync function will add us to the Matchmaking pool along with the specified filters we have provided. Nakama will then respond by giving us a Matchmaking Ticket. This ticket is what allows us to join a match that Nakama has found for us, or to cancel our existing matchmaking request. So the last part of this function is to simply store a reference to this ticket so that we can use it later.
While we’re looking inside the NakamaConnection class, let’s take a quick look at how we can cancel a matchmaking request should we need to. At the bottom of the file you’ll find the CancelMatchmaking function.
/// <summary>
/// Cancels the current matchmaking request.
/// </summary>
public async Task CancelMatchmaking()
{
    await Socket.RemoveMatchmakerAsync(currentMatchmakingTicket);
}
You can see that this function is simply a wrapper around the RemoveMatchmakerAsync function on the Nakama Socket, where we pass in our stored matchmaking ticket to tell Nakama that we’d like to be removed from the matchmaking pool.
Note: Objectively this function could be considered extraneous, but since RemoveMatchmakerAsync requires a matchmaking ticket parameter it makes sense to encapsulate it within the NakamaConnection object which already has a reference to this.
Ok, now that we’ve added ourselves to the matchmaking pool it’s time to wait for Nakama to find us a match. Once it has, we will be notified via our ReceivedMatchmakerMatched event listener. Let’s go back to the GameManager class and take a look at that.
/// <summary>
/// Called when a MatchmakerMatched event is received from the Nakama server.
/// </summary>
/// <param name="matched">The MatchmakerMatched data.</param>
private async void OnReceivedMatchmakerMatched(IMatchmakerMatched matched)
{
    // Cache a reference to the local user.
    localUser = matched.Self.Presence;

    // Join the match.
    var match = await NakamaConnection.Socket.JoinMatchAsync(matched);

    // ...

    // Spawn a player instance for each connected user.
    foreach (var user in match.Presences)
    {
        SpawnPlayer(match.Id, user);
    }

    // Cache a reference to the current match.
    currentMatch = match;
}
We’ve trimmed some of the extra code here that deals with closing the main menu and playing the game’s theme song so that we can focus on just the elements relating to matchmaking.
You can see that the first thing we do is grab the Self.Presence value from the IMatchmakerMatched object. We store a reference to this as it gives us quick and easy access to the local player’s Nakama presence. We can use this object to grab things such as their Session ID, User ID and Username.
Next, we call the JoinMatchAsync function on the Nakama Socket. This function will return an IMatch instance, it’s useful to store a reference to this as it will give us access to things such as the current match’s ID and the users that are currently connected to the match.
Once we’ve joined the match, we loop through all of the currently connected users that are also connected via the match.Presences property. For each user currently connected to the match we call the SpawnPlayer function, passing the Match ID and the IUserPresence instance for that particular use. We will dive into the SpawnPlayer function a little later.
Finally to end this function we store a reference to the current match object.
Before we move on from the matchmaking section, we should also cover the event handler for OnReceivedMatchPresence. This event handler is responsible for dealing with situations where a user connects or disconnects from our current match. Let’s take a look.
/// <summary>
/// Called when a player/s joins or leaves the match.
/// </summary>
/// <param name="matchPresenceEvent">The MatchPresenceEvent data.</param>
private void OnReceivedMatchPresence(IMatchPresenceEvent matchPresenceEvent)
{
    // For each new user that joins, spawn a player for them.
    foreach (var user in matchPresenceEvent.Joins)
    {
        SpawnPlayer(matchPresenceEvent.MatchId, user);
    }

    // For each player that leaves, despawn their player.
    foreach (var user in matchPresenceEvent.Leaves)
    {
        if (players.ContainsKey(user.SessionId))
        {
            Destroy(players[user.SessionId]);
            players.Remove(user.SessionId);
        }
    }
}
You can see that the IMatchPresenceEvent gives us two things, a list of users who have joined the match and a list of users who have left the match.
For users who have joined, we spawn a player object for them just like we did in the OnReceivedMatchmakerMatched event handler.
For users who have left, we check to see if we currently have a reference for that user in our players Dictionary based on their Session ID. If we do, we first destroy the GameObject for that player, followed by removing them from our players Dictionary.
By handling this event we can ensure smooth and consistent gameplay when players join and leave our match midway through.
Next up, let’s take a look at actually spawning the players.
Spawning players
It’s the GameManager’s responsibility to spawn the players in response to matchmaking or use prescence events as we have just seen. So let’s take a look at the SpawnPlayer function there.
/// <summary>
/// Spawns a player.
/// </summary>
/// <param name="matchId">The match the player is connected to.</param>
/// <param name="user">The player's network presence data.</param>
/// <param name="spawnIndex">The spawn location index they should be spawned at.</param>
private void SpawnPlayer(string matchId, IUserPresence user, int spawnIndex = -1)
{
    // If the player has already been spawned, return early.
    if (players.ContainsKey(user.SessionId))
    {
        return;
    }

    // If the spawnIndex is -1 then pick a spawn point at random, otherwise spawn the player at the specified spawn point.
    var spawnPoint = spawnIndex == -1 ?
        SpawnPoints.transform.GetChild(Random.Range(0, SpawnPoints.transform.childCount - 1)) :
        SpawnPoints.transform.GetChild(spawnIndex);

    // Set a variable to check if the player is the local player or not based on session ID.
    var isLocal = user.SessionId == localUser.SessionId;

    // Choose the appropriate player prefab based on if it's the local player or not.
    var playerPrefab = isLocal ? NetworkLocalPlayerPrefab : NetworkRemotePlayerPrefab;

    // Spawn the new player.
    var player = Instantiate(playerPrefab, spawnPoint.transform.position, Quaternion.identity);

    // Set up the appropriate network data values if this is a remote player.
    if (!isLocal)
    {
        player.GetComponent<PlayerNetworkRemoteSync>().NetworkData = new RemotePlayerNetworkData
        {
            MatchId = matchId,
            User = user
        };
    }

    // Add the player to the players array.
    players.Add(user.SessionId, player);

    // If this is our local player, add a listener for the PlayerDied event.
    if (isLocal)
    {
        localPlayer = player;
        player.GetComponent<PlayerHealthController>().PlayerDied.AddListener(OnLocalPlayerDied);
    }

    // Give the player a color based on their index in the players array.
    player.GetComponentInChildren<PlayerColorController>().SetColor(System.Array.IndexOf(players.Keys.ToArray(), user.SessionId));
}
This is another relatively large function so let’s start from the top and run through it together.
Firstly we perform a check to see if we already have a reference to this player in our players Dictionary based on the user’s Session ID. If we do then we return early as we have already spawned this player.
// If the player has already been spawned, return early.
if (players.ContainsKey(user.SessionId))
{
    return;
}
Next up we determine where to spawn this player:
// If the spawnIndex is -1 then pick a spawn point at random, otherwise spawn the player at the specified spawn point.
var spawnPoint = spawnIndex == -1 ?
    SpawnPoints.transform.GetChild(Random.Range(0, SpawnPoints.transform.childCount - 1)) :
    SpawnPoints.transform.GetChild(spawnIndex);
Here we’re checking to see if a specific spawn index has been passed or not. If it hasn’t (spawnIndex == -1) then we choose a random spawn point for this player. If a spawn index has been passed we will use that instead.
The next line checks to see whether or not this player is our own player or a remote player by comparing the user.SessionId value to our own localUser.SessionId.
// Set a variable to check if the player is the local player or not based on session ID.
var isLocal = user.SessionId == localUser.SessionId;
Once we’ve determined whether or not this is our own local user or not we can decide which Player prefab to spawn. We will go into the differences between the two shortly, but for now we will either use the NetworkLocalPlayerPrefab or the NetworkRemotePlayerPrefab depending on if the player is our own local player or a remote player respectively.
// Choose the appropriate player prefab based on if it's the local player or not.
var playerPrefab = isLocal ? NetworkLocalPlayerPrefab : NetworkRemotePlayerPrefab;
We then instantiate an instance of the prefab within the game at the relevant spawn point
// Spawn the new player.
var player = Instantiate(playerPrefab, spawnPoint.transform.position, Quaternion.identity);
Next up we check to see if this is a remotely connected player. If it is, we grab a reference to the PlayerNetworkRemoteSync component and set some appropriate network data. We pass it the current Match ID and a reference to this user’s IUserPresence object. This is used when receiving data to check if that data is meant for that specific player.
// Set up the appropriate network data values if this is a remote player.
if (!isLocal)
{
    player.GetComponent<PlayerNetworkRemoteSync>().NetworkData = new RemotePlayerNetworkData
    {
        MatchId = matchId,
        User = user
    };
}
Next up we add the player to our players Dictionary using their Session ID as the key and passing in the player GameObject as the value.
// Add the player to the players array.
players.Add(user.SessionId, player);
We then check to see if this is our local player so that we can set up an event listener on their PlayerDied event.
// If this is our local player, add a listener for the PlayerDied event.
if (isLocal)
{
    localPlayer = player;
    player.GetComponent<PlayerHealthController>().PlayerDied.AddListener(OnLocalPlayerDied);
}
We hook up an event listener to the PlayerDied event only on our local player as this is a Client Authoritative game. This means that each client/player is responsible for sending out updates and the other connected clients/players trust the messages they’re receiving as true. So in this instance, our own local player is responsible for telling everyone else that they have died when they get hit. We will look into the OnLocalPlayerDied function a little later.
The last line of this function is assigning a colour to this player based on their index in the players Dictionary. It’s worth noting that colours are not currently synced across the network.
Now that we’ve ran through the code, let’s go and take a look at the differences between the two player prefabs. You can find these in the Entities/Player folder.
First up, NetworkLocalPlayer.
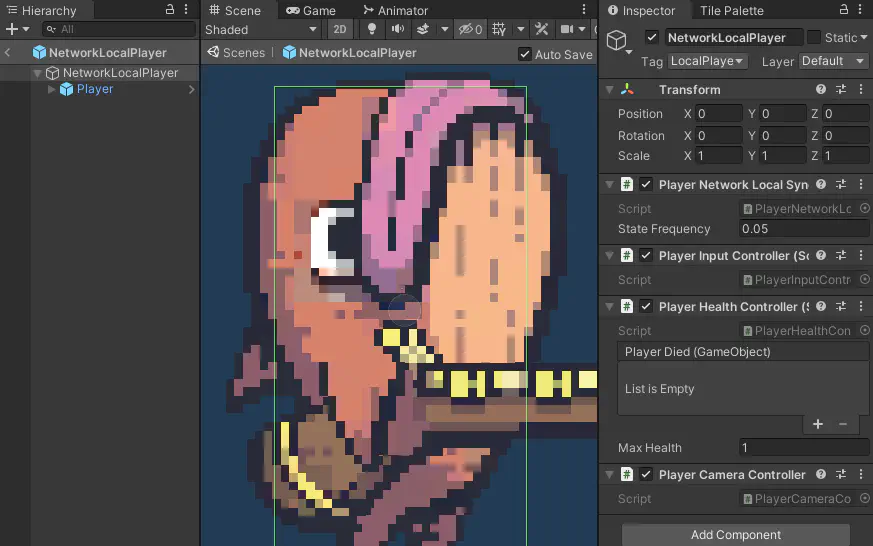
You can see from the hierarchy view that this is a pretty simple wrapper around the network agnostic Player prefab (which has components to handle movement, physics, weapon and colour). The root GameObject of this prefab has a few noteworthy components.
These being:
PlayerNetworkLocalSync- This handles sending out state updates across the network at a specific interval.PlayerInputController- This handles player input and passes it to the underlying movement controller.PlayerHealthController- This handles player health and is responsible for triggering thePlayerDiedevent.PlayerCameraController- This is a simple component that ensures the camera follows this player.
We will dive further into each of these components later. For now, let’s go and take a look at the NetworkRemotePlayer prefab.
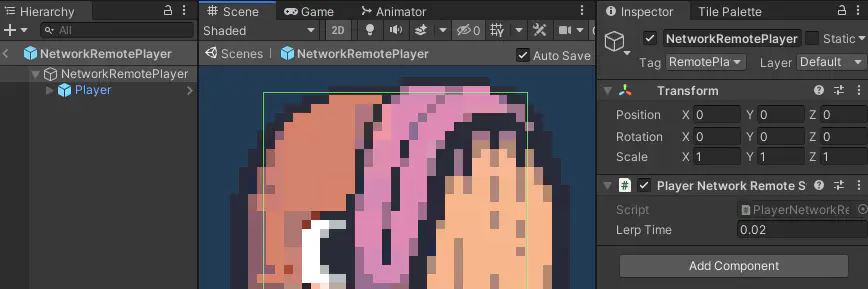
You can see that again this is a wrapper around the Player prefab. Here we have just one component on the root, that is PlayerNetworkRemoteSync. This component’s responsibility is to receive state updates from the network and handle the smooth interpolation of it’s current state to the new correct state received. For example, if this object was at position { 100, 100 } and we received a network message to say that the correct position should be { 120, 100 } this component would handle smoothly correcting this objects position over LerpTime seconds. You can see here that we have this value set to 0.02 seconds.
We’ll now move on to look at how we send out position and input updates across the network from NetworkLocalPlayer.
Sending player position and input
Let’s open the Entities/Player/PlayerNetworkLocalSync.cs file.
The first thing you’ll see here is a public variable that will determine how often we send network state syncs updates.
/// <summary>
/// How often to send the player's velocity and position across the network, in seconds.
/// </summary>
public float StateFrequency = 0.1f;
The default value here is set to 0.1 seconds, but in our NetworkLocalPlayer we have tweaked this to be 0.05. Changing the value here will increase or decrease the frequency with which we send state updates across the network. A faster rate will send updates much more frequently which should result in a smoother feel for other players, however we need to be cautious of not making this too frequent. We should be mindful of bandwidth limitations and also the potential issues when using the TCP network protocol. Without diving too deeply into it, when a network packet is lost with TCP it will attempt to re-send that packet until it is received. This can cause a “traffic jam” of sorts while other packets get blocked. In contrast, sending updates less frequently will result in player positions becoming out of sync on other connected clients and the interpolations/corrections being much more jarring.
Finding a good balance here is a crucial part of creating a smooth feeling multiplayer game.
Next we have some private variables that hold references to the various components and the GameManager. We also have one to keep track of how long it has been since we last sent a state sync update. We’ll gloss over these and the Start function as we are simply setting these up.
Where we’ll focus is the body of the LateUpdate function. If you’re familiar with Unity then you’ll know that the LateUpdate function is called after all other Update functions have been called. We use this as we only want to send updates after the player’s position has been updated.
The first thing we do here is check to see if the state sync timer has elapsed. If it has then we need to send a new update.
// Send a network packet containing the player's velocity and position.
gameManager.SendMatchState(
    OpCodes.VelocityAndPosition,
    MatchDataJson.VelocityAndPosition(playerRigidbody.velocity, playerTransform.position));
You can see here that we call the SendMatchState function on the GameManager, this is simply a wrapper around the NakamaConnection.Socket.SendMatchStateAsync function.
We pass in the OpCodes.VelocityAndPosition operation code as well as our player’s velocity and position as a JSON string (The helper function MatchDataJson.VelocityAndPosition handles this conversion for us).
After this is done, we check to see if the local player’s input has changed since the last time this function ran. If it hasn’t then we return early from this function. We do this because the next part is sending out player’s input across the network only if it has changed.
// If the players input hasn't changed, return early.
if (!playerInputController.InputChanged)
{
    return;
}
Finally, we send the player’s current input across the network.
// Send network packet with the player's current input.
gameManager.SendMatchState(
    OpCodes.Input,
    MatchDataJson.Input(playerInputController.HorizontalInput, playerInputController.Jump, playerInputController.JumpHeld, playerInputController.Attack)
);
Similar to before, we call the SendMatchState function and pass in the OpCode for Input as well as the players horizontal, jump, jump held and attack inputs as a JSON string.
Let’s just take a step back and quickly cover Operation Codes (or OpCodes). OpCodes are simply a numeric representation of specific network actions that can occur in our game. For example, the OpCode for sending/receiving a message containing a player’s velocity and position is 1. The OpCode for a player respawning is 4.
We can see all the OpCodes we have in the game by looking at Entities/Player/OpCodes.cs.
/// <summary>
/// Defines the various network operations that can be sent/received.
/// </summary>
public class OpCodes
{
    public const long VelocityAndPosition = 1;
    public const long Input = 2;
    public const long Died = 3;
    public const long Respawned = 4;
    public const long NewRound = 5;
}
Once a network message is received, we check it’s OpCode to determine how to handle that specific message.
Speaking of receiving network messages, let’s now take a look at how we handle receiving player positions and inputs.
Receiving player position and input
Open up the Entities/Player/PlayerNetworkRemoteSync.cs file.
There’s a bit more going on in this class as it handles receiving position and input messages from the network, as well as player death messages and also deals with interpolating the player’s position where appropriate.
Let’s break it down.
The first thing we have is a public NetworkData variable.
public RemotePlayerNetworkData NetworkData;
This object stores a reference to the current Match ID as well as the player’s IUserPresence object.
Next up we have a public variable for determining the speed at which we interpolate the player’s position.
/// <summary>
/// The speed (in seconds) in which to smoothly interpolate to the player's actual position when receiving corrected data.
/// </summary>
public float LerpTime = 0.05f;
The default value here is 0.05 seconds but we have updated this to 0.02 seconds in the NetworkRemotePlayer prefab. Again, this is a number that can be tweaked to adjust the feel and responsiveness of the state synchronisation. Too slow and players will look like they’re floating across the map, too fast and we risk making the players look like they’re snapping from position to position rather than moving smoothly.
We then have a bunch of private variables which store references to the various components as well as control the interpolation timer and interpolation start/end position.
We can, for the most part, ignore the contents of the Start function with the exception of setting up the ReceivedMatchState event handler.
// Add an event listener to handle incoming match state data.
gameManager.NakamaConnection.Socket.ReceivedMatchState += OnReceivedMatchState;
Here we’re adding a listener for whenever we received data from the network. Let’s go and have a look at how that handler functions.
/// <summary>
/// Called when receiving match data from the Nakama server.
/// </summary>
/// <param name="matchState">The incoming match state data.</param>
private void OnReceivedMatchState(IMatchState matchState)
{
    // If the incoming data is not related to this remote player, ignore it and return early.
    if (matchState.UserPresence.SessionId != NetworkData.User.SessionId)
    {
        return;
    }

    // Decide what to do based on the Operation Code of the incoming state data as defined in OpCodes.
    switch (matchState.OpCode)
    {
        case OpCodes.VelocityAndPosition:
            UpdateVelocityAndPositionFromState(matchState.State);
            break;
        case OpCodes.Input:
            SetInputFromState(matchState.State);
            break;
        case OpCodes.Died:
            playerMovementController.PlayDeathAnimation();
            break;
        default:
            break;
    }
}
You can see that as part of this event handler we get given an IMatchState object. This object contains the Match ID it was meant for, the OpCode of the network action, the state as a Byte array and an IUserPresence object referring to the user who sent the message.
The first thing we do in this function is determine whether or not the message we are receiving is meant for this object or not by comparing this object’s NetworkData.User.SessionId with the matchState.UserPresence.SessionId value.
If they do not match, then we know we don’t need to handle this message and we simply return early from this function.
If they do match, we perform a switch on the matchState.OpCode. Depending on what the OpCode is, we will pass the state to a separate function to be handled. We have three cases here, one for receiving a position and velocity, one for receiving input and one for when the player dies.
Let’s take a look at the UpdateVelocityAndPositionFromState function.
/// <summary>
/// Updates the player's velocity and position based on incoming state data.
/// </summary>
/// <param name="state">The incoming state byte array.</param>
private void UpdateVelocityAndPositionFromState(byte[] state)
{
    var stateDictionary = GetStateAsDictionary(state);

    playerRigidbody.velocity = new Vector2(float.Parse(stateDictionary["velocity.x"]), float.Parse(stateDictionary["velocity.y"]));

    var position = new Vector3(
        float.Parse(stateDictionary["position.x"]),
        float.Parse(stateDictionary["position.y"]),
        0);

    // Begin lerping to the corrected position.
    lerpFromPosition = playerTransform.position;
    lerpToPosition = position;
    lerpTimer = 0;
    lerpPosition = true;
}
Here we grab the state as a Dictionary<string, string> using the helper function GetStateAsDictionary.
We then update the player’s rigid body velocity property with the incoming velocity.x and velocity.y values.
Next, we create a new Vector3 with the incoming position.x and position.y values. We then begin the interpolation process by setting the player’s current position as the lerpFromPosition and the new position as the lerpToPosition. We reset the lerp timer and set the lerpPosition value to true which will ensure the the interpolation code that lives in LateUpdate will run.
The bulk of the interpolation code is handled in LateUpdate with the following line:
// Interpolate the player's position based on the lerp timer progress.
playerTransform.position = Vector3.Lerp(lerpFromPosition, lerpToPosition, lerpTimer / LerpTime);
Now that we’ve handled position and velocity updates, let’s move on to handling input updates. For that we need to jump to the SetInputFromState function.
/// <summary>
/// Sets the appropriate input values on the PlayerMovementController and PlayerWeaponController based on incoming state data.
/// </summary>
/// <param name="state">The incoming state Dictionary.</param>
private void SetInputFromState(byte[] state)
{
    var stateDictionary = GetStateAsDictionary(state);

    playerMovementController.SetHorizontalMovement(float.Parse(stateDictionary["horizontalInput"]));
    playerMovementController.SetJump(bool.Parse(stateDictionary["jump"]));
    playerMovementController.SetJumpHeld(bool.Parse(stateDictionary["jumpHeld"]));

    if (bool.Parse(stateDictionary["attack"]))
    {
        playerWeaponController.Attack();
    }
}
Again we grab the state as a Dictionary<string, string>. We then set the appropriate values on the PlayerMovementController from the incoming state data. This is very similar to how we do it for a local player, except for the local player we set these values from the values coming from the various controls using Unity’s Input class.
We also update the PlayerWeaponController by calling the Attack function if the stateDictionary["attack"] value is true.
Going back to the switch statement we also handle the OpCodes.Died action. For this we simply call the PlayerMovementController.PlayDeathAnimation() function.
The final thing to look at in this class is the OnDestroy function. It is always good practice to remove event listeners when we’re finished with them. So here we remove the OnReceivedMatchState handler when this object is destroyed.
/// <summary>
/// Called when this GameObject is being destroyed.
/// </summary>
private void OnDestroy()
{
    if (gameManager != null)
    {
        gameManager.NakamaConnection.Socket.ReceivedMatchState -= OnReceivedMatchState;
    }
}
Now that we’ve looked at sending and receiving data, let’s move to looking at how we handle player death and announcing the winner of each round.
Player death and announcing the winner
To understand how we handle player death we first need to hop over to the PlayerHealthController in the Entities/Player folder.
We won’t dive into the whole class here, as it is mostly related to the gameplay mechanic of the player being hit by a projectile and taking damage, but what we should note here is that it invokes a PlayerDied event when the player’s health reaches 0.
You can see this is declared at the top of the class.
public PlayerDiedEvent PlayerDied;
It is then called inside the TakeDamage function once the player’s health is less than 1.
/// <summary>
/// Reduces the players health by damage, triggers the PlayerDied event if health is 0 or below.
/// </summary>
/// <param name="damage">The amount of damage the player should receive.</param>
public void TakeDamage(int damage = 1)
{
    // ...

    // If health falls to 0 or below, disable player input controls, play the death animation and fire the PlayerDied event.
    if (health <= 0)
    {
        // ...
        PlayerDied.Invoke(gameObject);
    }
}
You may remember that when we spawn in our own local player inside GameManager, this is the event that we add a listener to.
Let’s dive back into the GameManager class and take a look at the OnLocalPlayerDied function.
/// <summary>
/// Called when the local player dies.
/// </summary>
/// <param name="player">The local player.</param>
private async void OnLocalPlayerDied(GameObject player)
{
    // Send a network message telling everyone that we died.
    await SendMatchStateAsync(OpCodes.Died, MatchDataJson.Died(player.transform.position));

    // Remove ourself from the players array and destroy our GameObject after 0.5 seconds.
    players.Remove(localUser.SessionId);
    Destroy(player, 0.5f);
}
You can see that the first thing we do once the local player dies is send a message across the network letting the other player’s know that we died and at what location.
The next part simply removes the player from the players Dictionary and then destroys the player after half a second.
So what happens when the other players receive the OpCodes.Died network action? To find that out we need to go to the OnReceivedMatchState function.
/// <summary>
/// Called when new match state is received.
/// </summary>
/// <param name="matchState">The MatchState data.</param>
private async Task OnReceivedMatchState(IMatchState matchState)
{
    // Get the local user's session ID.
    var userSessionId = matchState.UserPresence.SessionId;

    // If the matchState object has any state length, decode it as a Dictionary.
    var state = matchState.State.Length > 0 ? System.Text.Encoding.UTF8.GetString(matchState.State).FromJson<Dictionary<string, string>>() : null;

    // Decide what to do based on the Operation Code as defined in OpCodes.
    switch(matchState.OpCode)
    {
        case OpCodes.Died:
            // Get a reference to the player who died and destroy their GameObject after 0.5 seconds and remove them from our players array.
            var playerToDestroy = players[userSessionId];
            Destroy(playerToDestroy, 0.5f);
            players.Remove(userSessionId);

            // If there is only one player left and that us, announce the winner and start a new round.
            if (players.Count == 1 && players.First().Key == localUser.SessionId) {
                AnnounceWinnerAndStartNewRound();
            }
            break;
        case OpCodes.Respawned:
            // Spawn the player at the chosen spawn index.
            SpawnPlayer(currentMatch.Id, matchState.UserPresence, int.Parse(state["spawnIndex"]));
            break;
        case OpCodes.NewRound:
            // Display the winning player's name and begin a new round.
            await AnnounceWinnerAndRespawn(state["winningPlayerName"]);
            break;
        default:
            break;
    }
}
This is another chunky looking function, but it should look familiar now that you’ve seen how handling network messages is done in the NetworkRemotePlayerSync class.
What we’re doing here is getting a reference to the Session ID of the connected user who sent the message and storing it in userSessionId.
We then check to see if there is any state data inside the network message. We determine this by checking the matchState.State.Length property. If this value is greater than 0 we know there is state, so we grab the state as a Dictionary<string, string> like we have done previously.
Then we do a switch over the matchState.OpCode and handle each one as necessary.
In this case, we’re interested in the case for OpCodes.Died.
case OpCodes.Died:
    // Get a reference to the player who died and destroy their GameObject after 0.5 seconds and remove them from our players array.
    var playerToDestroy = players[userSessionId];
    Destroy(playerToDestroy, 0.5f);
    players.Remove(userSessionId);

    // If there is only one player left and that us, announce the winner and start a new round.
    if (players.Count == 1 && players.First().Key == localUser.SessionId) {
        AnnounceWinnerAndStartNewRound();
    }
    break;
As you can see this looks fairly similar to how we handle the local player death. First we destroy their GameObject after half a second. We then remove them from the players Dictionary based on their Session ID.
The next part is checking to see if the player receiving the message is the only player left. If they are, then they have won the round! If they have won we call the AnnounceWinnerAndStartNewRound function - so let’s go have a look at that next.
/// <summary>
/// Sends a network message that indicates a player has won and a new round is being started.
/// </summary>
/// <returns></returns>
public async void AnnounceWinnerAndStartNewRound()
{
    // ...
    var winningPlayerName = localDisplayName;

    // Send a network message telling everyone else that we won.
    await SendMatchStateAsync(OpCodes.NewRound, MatchDataJson.StartNewRound(winningPlayerName));

    // Display the winning player message and respawn our player.
    await AnnounceWinnerAndRespawn(winningPlayerName);
}
Here we grab the winning player’s name and we send out a network message with the OpCodes.NewRound action telling everyone that the match has been won and who by. We then call the AnnounceWinnerAndRespawn function.
Just jumping back slightly to the switch statement from earlier, you can see that when an OpCodes.NewRound message is received, that client also calls the AnnounceWinnerAndRespawn function.
case OpCodes.NewRound:
    // Display the winning player's name and begin a new round.
    await AnnounceWinnerAndRespawn(state["winningPlayerName"]);
    break;
The AnnounceWinnerAndRespawn function is responsible for doing just that, displaying a winning player message on the screen and then respawning the local player.
/// <summary>
/// Displays the winning player message and respawns the player.
/// </summary>
/// <param name="winningPlayerName">The name of the winning player.</param>
private async Task AnnounceWinnerAndRespawn(string winningPlayerName)
{
    // Set the winning player text label.
    WinningPlayerText.text = string.Format("{0} won this round!", winningPlayerName);

    // Wait for 2 seconds.
    await Task.Delay(2000);

    // Reset the winner player text label.
    WinningPlayerText.text = "";

    // Remove ourself from the players array and destroy our player.
    players.Remove(localUser.SessionId);
    Destroy(localPlayer);

    // Choose a new spawn position and spawn our local player.
    var spawnIndex = Random.Range(0, SpawnPoints.transform.childCount - 1);
    SpawnPlayer(currentMatch.Id, localUser, spawnIndex);

    // Tell everyone where we respawned.
    SendMatchState(OpCodes.Respawned, MatchDataJson.Respawned(spawnIndex));
}
You can see that after the WinningPlayerText is updated with the winning player message, we wait for two seconds before clearing the message and then we remove the local player from the players Dictionary and Destroy their GameObject.
We then choose a new random spawn point for the player and respawn them by calling the SpawnPlayer function.
Finally, we send out a network message with the OpCodes.Respawned action to let the other players know that we have respawned, and at what spawn index.
Looking back at the case statement that handles the OpCodes.Respawned action we can see that it simply replicates that SpawnPlayer call on each connected player’s client.
case OpCodes.Respawned:
    // Spawn the player at the chosen spawn index.
    SpawnPlayer(currentMatch.Id, matchState.UserPresence, int.Parse(state["spawnIndex"]));
    break;
…and with that, we’ve taken a look at all of the networking code within this iteration of Fish Game.
Wrap Up
I hope this article has helped to show you the power of Nakama and what it offers in terms of features and flexibility when creating a multiplayer game.
Nakama can save you countless hours vs the option of rolling your own networking solution, as well as providing you with a powerful and robust feature set that is used and trusted by many within the game development industry.
In this article we only scratched the surface of Nakama’s feature set, including Authentication, Matchmaking and Realtime Multiplayer. But Nakama has so much more to offer and I highly encourage you to dive into the documentation to see more of the awesome features it provides.
Thanks for reading and I wish you lots of success with your next project!
For further help with Nakama please head over to the Heroic Labs Forums.

Speak to the Heroic Labs team


