Integrating Nakama and Machine Learning Models


Let’s talk about machine learning.
It’s quite a hot topic these days, and rightfully so! Recent advances - particularly in generative AI and large language models - are truly breathtaking. But we’re going to talk about a slightly different aspect: using neural-network/deep-learning models to enhance your gameplay by integrating your Nakama match logic with an external pre-trained model.
We’ll use our existing Tic-Tac-Toe tutorial as the basis and:
- Add the ability to play with an AI player
- Enable replacing an opponent who quit/got disconnected from the match with AI player mid-game
- Look at available options to enable this kind of setup in production setting, both in private and Heroic Cloud
Let’s get started!
Tic-Tac-Toe
The complexity scale of a potential ML model in gaming is huge, but we’ll be dealing with something simple, the well-known game Tic-Tac-Toe.
It’s a very simple game with simple rules, but it still allows us to highlight all the main aspects required to integrate an external ML model with your Nakama game logic. Plus, purely by accident, we already have an awesome tutorial on how to implement Tic-Tac-Toe with Nakama and PhaserJS, so we’ll be able to focus on today’s topic without getting distracted by irrelevant details.
To follow along, all you need to do is clone these two git repos:
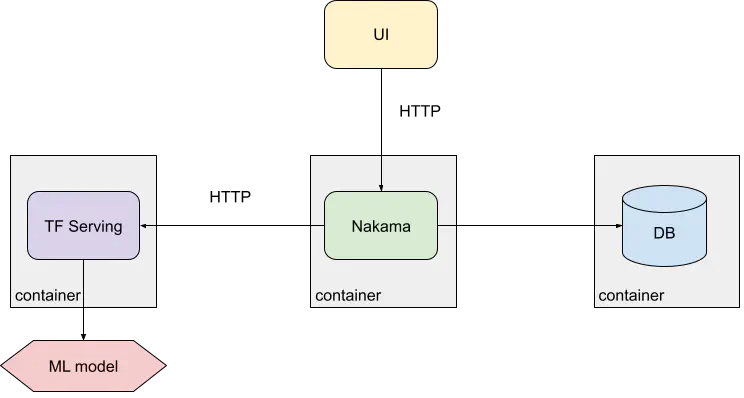
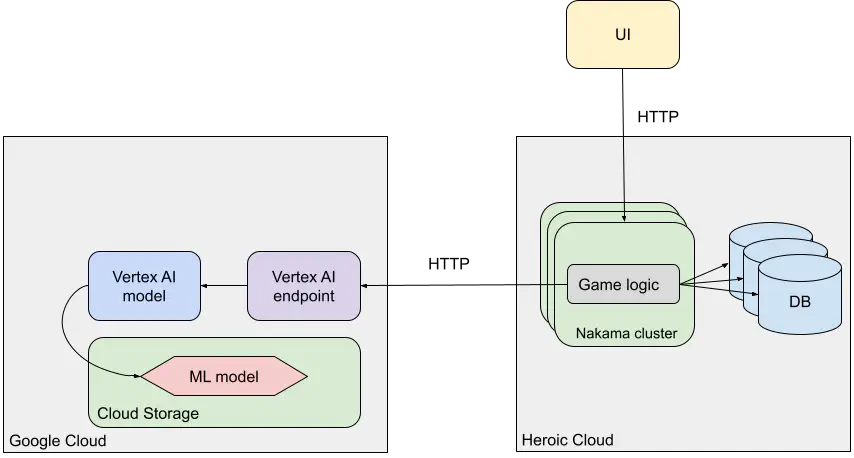
Architecture
Below is the high-level architecture we’re implementing:
Updating the frontend
Our original game UI looks like this:
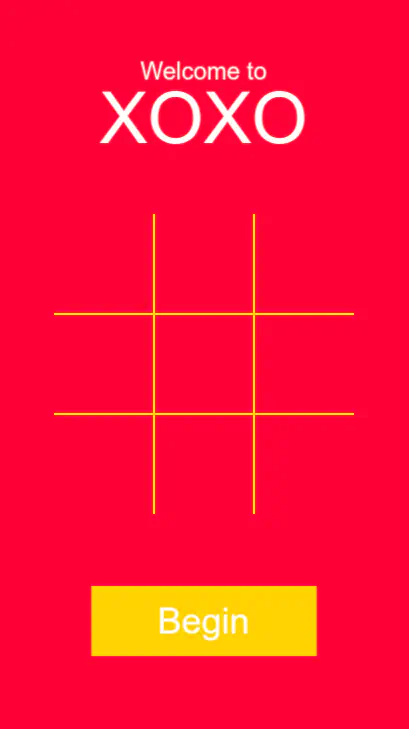
Once two players press the Begin button, Nakama creates a match for
them and allows them to play with each other.
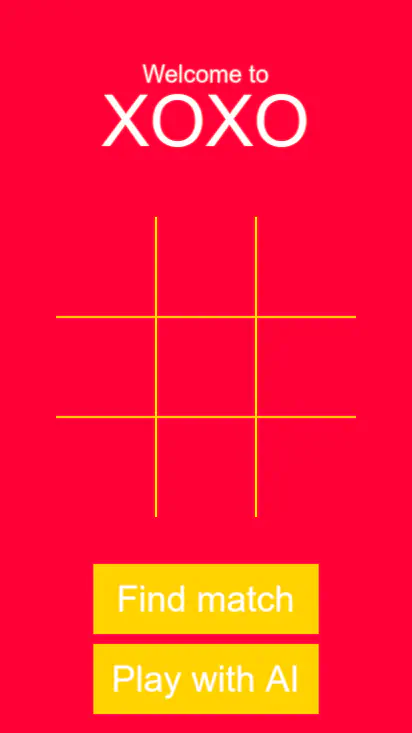
The first order of business is to decide what our Playing with AI mode should look like from the UI perspective. In the initial screen, we’re going to:
- Rename the
Beginbutton toFind match - Add a new
Play with AIbutton
When pressing Find match, the game is going to work as before, i.e.
requiring two human players to join before the game can start.
When pressing the Play with AI button, however, the game will
begin immediately, since the AI player will take place of the second player.
Since the main goal of this post is to show how an ML model could be used with a Nakama project, we’re not going to talk about code changes on the UI side. All the relevant changes can be found in this here. Feel free to take a look if you’re interested, it’s pretty small and straightforward.
Our focus today is on the backend side.
Updating the backend
The Model
In order to serve the model we first need to obtain it. There are generally two approaches:
- Train the model yourself, or
- Find and download a pre-trained model
While option 1 could be fun, that’s a whole topic in itself
and is way out of scope for this post. Instead, let’s browse around online to see if somebody already trained a tic-tac-toe model that we can use.
And we’re in luck! Because somebody did indeed.
The model is located in the model directory and is in the format produced by Tensorflow js.
In order to use it with Tensorflow Serving we need to convert it to the original protobuf-based SavedModel format first.
For convenience, I’ve already done it for you and the properly formatted
model is available in our nakama-project-template repository, so you don’t need to do this to follow along.
And for the sake of completeness, here’s an easy way you could achieve this yourself:
- Install tensorflowjs
$ pip install tensorflowjs
- Convert the model
import tensorflowjs as tfjs

model = tfjs.converters.load_keras_model("{path-to}/deep-tic-tac-toe/model/model.json")
model.save("model-pb/01")
Serving the ML model
Now that we have our model, we need to figure out how to use it from our Nakama game code.
On the backend side, our game logic is implemented using Nakama’s Authoritative Multiplayer API. We have the same logic implemented in both Go and Typescript.
Ideally we would serve our model in such a way that we can easily connect to it from either. And we’re in luck (again!) because TFX/Tensorflow Serving does exactly what we need. It allows us to run inference (prediction) queries on our model using a straightforward HTTP API, available from both of our match implementations.
Let’s configure a Tensorflow Serving server to serve our tic-tac-toe model. We’re going to update our docker-compose.yml file to run the Tensorflow Serving container alongside Nakama and a database:
tf:
  image: tensorflow/serving
  container_name: template_tf
  environment:
    - MODEL_NAME=ttt
  ports:
    - "8501"
  volumes:
    - ./model:/models/ttt
  restart: unless-stopped
As you can see, it’s pretty straightforward.
We mount our model directory under /models/ttt inside a container and
set the MODEL_NAME to ttt to match our model name.
You can learn more about running Tensorflow Serving in a container if you’d like.
Additionally, we’re going to update the Nakama depends_on clause to include
the tf container to indicate the newly added dependency:
depends_on:
  - postgres
  - tf
Let’s try to run the whole thing now. Inside nakama-project-template run:
docker-compose up --build
If everything is right you should see tons of logs, including ones from the
template_tf container:
...
template_tf | 2023-09-21 14:55:26.290727: I tensorflow_serving/core/loader_harness.cc:95] Successfully loaded servable version {name: ttt version: 1}
template_tf | 2023-09-21 14:55:26.292020: I tensorflow_serving/model_servers/server_core.cc:486] Finished adding/updating models
template_tf | 2023-09-21 14:55:26.292582: I tensorflow_serving/model_servers/server.cc:409] Running gRPC ModelServer at 0.0.0.0:8500 ...
template_tf | 2023-09-21 14:55:26.294034: I tensorflow_serving/model_servers/server.cc:430] Exporting HTTP/REST API at:localhost:8501 ...
template_tf | [evhttp_server.cc : 245] NET_LOG: Entering the event loop ...
...
As you can see, the Tensorflow Serving server is listening on port 8501.
Let’s try to manually run a prediction request against it:
$ docker run --rm -ti \
         --network nakama-project-template_default \
          curlimages/curl \
          curl -d '{"instances": [[[[1, 0],[0, 0],[0, 0]], [[1, 0],[0, 0],[0, 0]], [[1, 0],[0, 0],[0, 0]]]]}' \
          -X POST http://tf:8501/v1/models/ttt:predict

{
    "predictions": [[8.37428391e-12, 0.821908951, 0.00877900422, 1.27065134e-13, 0.72099185, 0.568567634, 5.61867659e-17, 0.638699174, 0.245844617]
    ]
}
Look at that! We’ve received some prediction response!
We’re going to talk about the request/response formats later, but for now all we care about is that Tensorflow Serving is running and actually using our model to serve the requests.
Playing a brand-new game with AI
So now that we have a way to run requests against our model, let’s put
that new Play with AI button of ours to use!
The way we initiate a match in our Tic-Tac-Toe game is by calling a registered Nakama RPC:
async function findMatch(ai=false) {
    const rpcid = "find_match";
    const matches = await this.client.rpc(this.session, rpcid, {ai: ai});

    this.matchID = matches.payload.matchIds[0]
    await this.socket.joinMatch(this.matchID);
}
The full code is available here.
We simply pass a new boolean ai parameter to the find_match RPC
to let it know we want to start a match with an AI player.
The find_match RPC is registered on the server side:
	if err := initializer.RegisterRpc(rpcIdFindMatch, rpcFindMatch(marshaler, unmarshaler)); err != nil {
		return err
	}
The full code is available here.
Note: Throughout the following examples, error checks are omitted in the Go code snippets to simplify the code. You should definitely have them in your production code though!
In our RPC implementation we check if the ai flag is present and,
if it is, immediately create a new match and bypass the normal
flow of registering it with the Nakama Matchmaker:
if request.Ai {
  matchID, err := nk.MatchCreate(ctx, moduleName, map[string]interface{}{
                                 "ai": true, "fast": request.Fast})
  ...
  response, err := marshaler.Marshal(
                     &api.RpcFindMatchResponse{MatchIds: []string{matchID}})

   ...
   return string(response), nil
}
The full code is available here.
Match Handler
The match handler logic is implemented in match_handler.go.
In the MatchInit callback method we’re going to check if the ai flag is set,
and automatically add an AI player to the active players list if so:
	// Automatically add AI player
	if ai {
		state.presences[aiUserId] = aiPresenceObj
	}
The aiPresenceObj is just an ad-hoc implementation of the runtime.Presence interface,
so we’re essentially treating an AI player as if it were a real
human player, at least as far as the match logic is concerned.
This approach significantly simplifies the logic as we (mostly) don’t need
to add separate code paths for AI player logic in addition to the already
existing ones.
We do need to add some AI-specific logic, of course.
At the end of the MatchLoop method, we check if the next turn is supposed
to be the AI player’s:
	// The next turn is AI's
	if s.ai && s.mark == s.marks[aiUserId] {
		m.aiTurn(s)
	}
The s.mark holds the mark (X or O) of the next player and so if it
matches the mark assigned to the AI player, we call the m.aiTurn() method.
AI turn
The aiTurn method is implemented in the ai.go file and
contains the meat of our Nakama-ML interaction logic.
It consists of three main parts:
- Converting the board state into a tensor (a multi-dimensional array)
- Obtaining predictions from our ML model
- Making a move based on the received predictions
Let’s examine each part in detail.
Converting the board state into a tensor
Our game board is represented in the code as a simple array of 9 elements,
each representing either X, O, or an empty cell.
This is a nice, simple, and intuitive way to encode a tic-tac-toe board.
The ML model, however, expects a different and less intuitive format, so we need to do some conversion before we can send a request to it.
Now, generally speaking, the shape of the prediction tensor should
match the one used during training. Since we downloaded our model from
the Internet, we need to follow whatever format the original author used.
In our case, this is a tensor of the shape: 3, 3, 2,
representing 3 rows of 3 cells of 2 number each, where a cell value
can be one of the following tensors:
[1, 0]- AI occupied[0, 1]- Player occupied[0, 0]- Empty cell
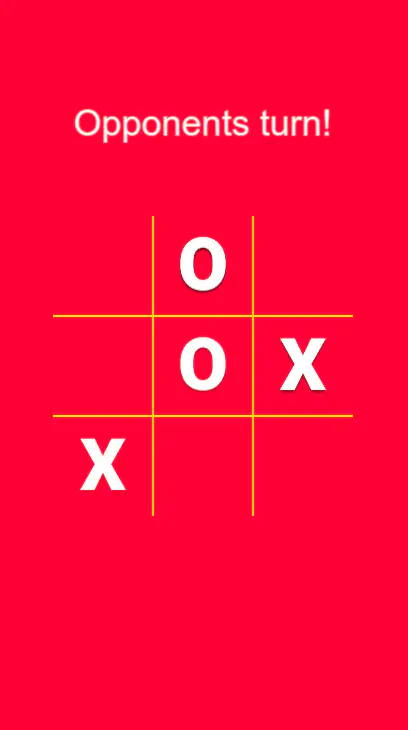
Let’s say we have a board with the following state
(with the human player as Xs and AI player as Os):
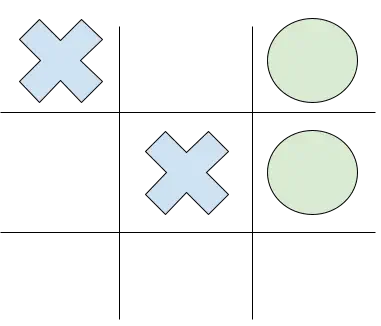
The format our ML model expects for this board is the following:
[
    [           # Row 1
        [0, 1], # Player's X
        [0, 0], # Empty cell
        [1, 0], # AI's O
    ],
    [           # Row 2
        [0, 0], # Empty cell
        [0, 1], # Player's X
        [1, 0], # AI's O
    ],
    [           # Row 3
        [0, 0], # Empty cell
        [0, 0], # Empty cell
        [0, 0], # Empty cell
    ]
]
In our Go code we create some helpful types first:
type cell [2]int
type row [3]cell
type board [3]row
Then we convert a one-dimensional array of nine elements to a tensor of the format describe above:
    b := board{}
	for i, mark := range s.board {
		rowIdx := i / 3
		cellIdx := i % 3

		switch mark {
		case s.marks[aiUserId]: // AI
			b[rowIdx][cellIdx] = cell{1, 0}
		case api.Mark_MARK_UNSPECIFIED:
			b[rowIdx][cellIdx] = cell{0, 0}
		default: // Player
			b[rowIdx][cellIdx] = cell{0, 1}
		}
	}
Now that we understand the format, this should hopefully be a pretty straightforward conversion.
Obtaining predictions from our ML model
Nothing fancy in this step, just make a good old HTTP POST request to the
Tensorflow Serving server with the converted board as a body:
type tfRequest struct {
    Instances [1]board `json:"instances"`
}

req := tfRequest{Instances: [1]board{b}}
raw, err := json.Marshal(req)

resp, err := http.Post(
    "http://tf:8501/v1/models/ttt:predict", "application/json", bytes.NewReader(raw))

defer resp.Body.Close()
The request body for the prediction API endpoint holds our converted
tensor under the instances field. You can learn more about the accepted
formats here.
Now read and convert the response body:
type tfResponse struct {
	Predictions [][]float64 `json:"predictions"`
}

predictions := tfResponse{}
json.Unmarshal(respBody, &predictions)
The response contains a two-dimensional tensor, like we saw earlier when we manually made a prediction request:
{
    "predictions": [[8.37428391e-12, 0.821908951, 0.00877900422, 1.27065134e-13, 0.72099185, 0.568567634, 5.61867659e-17, 0.638699174, 0.245844617]
    ]
}
It’s basically a list containing another list containing nine floats, each representing a probability the of AI player making a move to the particular cell.
As you may have guessed, we just need to find an argmax (an index of the element with the highest value), which shouldn’t be too tricky:
// Find the index with the highest predicted value
maxVal := math.Inf(-1)
aiMovePos := -1
for i, val := range predictions.Predictions[0] {
	if val > maxVal {
		maxVal = val
		aiMovePos = i
	}
}
Now we know which cell the AI player wants to play next.
Making a move based on the received predictions
The final step is to let the game know about the AI player’s move.
Remember that earlier we made a decision to represent the AI player the same
way as human players? Human players communicate with the game logic
by sending messages, which get passed to the MatchLoop method.
So all we need to do now is inject our AI move message and let the existing game logic handle it in the same way as it would any message from a human player.
For this we introduced a channel into our MessageState struct:
messages chan runtime.MatchData
And in the MatchLoop we append messages from this channel into
the received slice:
// Append AI moves, if any
select {
case msg := <-s.messages:
	messages = append(messages, msg)
default:
}
So we’re going to simply send the AI move message into this channel after properly preparing it:
move, err := m.marshaler.Marshal(&api.Move{Position: int32(aiMovePos)})

data := &aiMatchData{
	opCode:     api.OpCode_OPCODE_MOVE,
	data:       move,
	aiPresence: aiPresenceObj,
}

s.messages <- data
And voilà! We can now play tic-tac-toe with AI!
Replacing an opponent who left the game with AI
We now have this cool ability to play games with AI,
wouldn’t it be even cooler if AI could take over the world
game in case your opponent left/rage-quit/got disconnected?
Let’s try implementing this!
Notifying about the opponent leave
The first thing to do is to notify a human player in case their opponent left the game.
We can update the MatchLeave callback, which gets called every time a participant disconnects.
First, collect the number of active players, excluding AI:
var humanPlayersRemaining []runtime.Presence
for userId, presence := range s.presences {
    if presence != nil && userId != aiUserId {
        humanPlayersRemaining = append(humanPlayersRemaining, presence)
    }
}
If there’s only one left, send a special message type to the player:
if len(humanPlayersRemaining) == 1 {
    _ = dispatcher.BroadcastMessage(
        int64(api.OpCode_OPCODE_OPPONENT_LEFT), nil,
        humanPlayersRemaining, nil, true)
}
On the UI side, when we receive this message code, we show a
message Opponent has left and display a button Continue with AI:
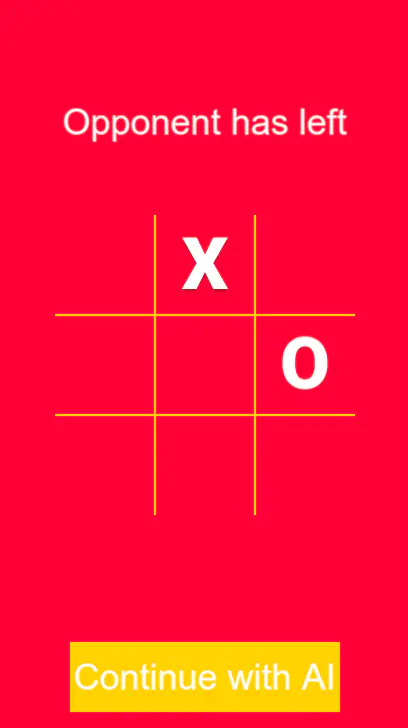
Once/If the button is pressed, we send another special
message, INVITE_AI, to the server:
async function inviteAI() {
    await this.socket.sendMatchState(this.matchID, 7, "");
}
Here 7 is the message code for INVITE_AI.
On the server side we need to add a handler to process this type of messages.
In the handler, we first do some safe checking like making sure AI mode hasn’t been enabled yet or the number of active players is equal to 1:
case api.OpCode_OPCODE_INVITE_AI:
    if s.ai {
        logger.Error("AI player is already playing")
        continue
    }

    var activePlayers []runtime.Presence
    for userId, presence := range s.presences {
        if presence == nil {
            delete(s.presences, userId)
        } else if userId != aiUserId {
            activePlayers = append(activePlayers, presence)
        }
    }

    if len(activePlayers) != 1 {
        logger.Error("one active player is required to enable AI mode")
        continue
    }
If everything looks good, just add an AI user presence to the presence map and set the AI mode flag:
s.ai = true
s.presences[aiUserId] = aiPresenceObj
The final thing is to properly assign the AI mark.
When a brand-new AI match is created, AI is always assigned the O mark, but
in this case, since we’re replacing an existing player, we need to assign
the mark of the player who left, i.e. the opposite mark of remaining player:
if s.marks[activePlayers[0].GetUserId()] == api.Mark_MARK_O {
    s.marks[aiUserId] = api.Mark_MARK_X
} else {
    s.marks[aiUserId] = api.Mark_MARK_O
}
And that’s it! Now you can finish the match even if your opponent disconnected during the game.
Serving a model from managed cloud services
Up until now we’ve been serving our ML model from a local Docker container. This is fine for development and testing, but we also need a way to serve the production traffic.
One way is to leverage the popular container orchestration system Kubernetes, but this would require CloudOps expertise that might not be readily available in your case.
Alternatively, you could use fully managed cloud offerings to significantly simplify the process needed to serve your ML model at scale.
Google Cloud Platform - Vertex AI
Google’s Vertex AI is one such offering. Let’s see what it takes to deploy and serve our model from Vertex AI.
There are four steps in the process:
- Deploy the model to the Google Cloud Storage bucket
- Upload the model to the Vertex AI service
- Create a model endpoint
- Deploy the model to the new endpoint
Let’s look at each of these in detail, after looking at the high-level architecture first.
Architecture
Deploy the model to the Google Cloud Storage bucket
The model storage is handled by Google Cloud Storage. Let’s create a separate bucket for it:
$ gcloud storage buckets create gs://nakama-ml
Please note that all the buckets are in the same namespace, so you need to come up with a different, unique bucket name for yours (or just use an existing one).
Now let’s upload our model to this new bucket:
$ cd {path-to}/nakama-project-template/model
$ gcloud storage cp --recursive ./01 gs://nakama-ml/ttt
This will upload our model to the nakama-ml bucket using the ttt name.
Upload the model to the Vertex AI service
Now let’s upload the model into Vertex AI. (You may need to enable Vertex AI API in your cloud console first.)
Note: In the following examples we’re using the us-east1 region,
replace it with whatever region is more suitable for you.
$ gcloud ai models upload \
         --region=us-east1 \
         --container-image-uri=us-docker.pkg.dev/vertex-ai/prediction/tf2-cpu.2-12:latest \
         --display-name=ttt \
         --artifact-uri=gs://nakama-ml/ttt
Create a model endpoint
In order to serve our model for online prediction requests we need to create a Vertex AI Endpoint first:
$ gcloud ai endpoints create --display-name=ttt --region=us-east1
Deploy the model to the new endpoint
Next, let’s deploy our model to the newly created endpoint:
$ gcloud ai endpoints deploy-model \
   $(gcloud ai endpoints list --region=us-east1 2>/dev/null | grep ttt | cut -f1 -d" ") \
   --region=us-east1 \
   --display-name=ttt \
   --model=$(gcloud ai models list --region=us-east1 2>/dev/null | grep ttt | cut -f1 -d" ") \
   --machine-type=n1-standard-2
This operation can take a while (>10 min).
Once done, our model is deployed to the endpoint and we should be able
to make inference requests (replace PROJECT_ID with your project id and us-east1 with your region, if different):
curl -X POST \
    -H "Authorization: Bearer $(gcloud auth print-access-token)" \
    -H "Content-Type: application/json; charset=utf-8" \
    -d '{"instances": [[[[1, 0],[0, 0],[0, 0]], [[1, 0],[0, 0],[0, 0]], [[1, 0],[0, 0],[0, 0]]]]}' \
    "https://us-east1-aiplatform.googleapis.com/v1/projects/PROJECT_ID/locations/us-east1/endpoints/$(gcloud ai endpoints list --region=us-east1 2>/dev/null | grep ttt | cut -f1 -d' '):predict"
{
  "predictions": [
    [
      8.37428304e-12,
      0.821908832,
      0.00877900142,
      1.2706489e-13,
      0.72099185,
      0.568567753,
      5.61865475e-17,
      0.638699174,
      0.24584496
    ]
  ],
  ...
}
We got our predictions from a model running in Vertex AI!
Summary
We’ve covered quite a lot in this post, so let’s recap a few main points:
- Machine Learning (ML) is a hot topic for a reason, with recent advances opening up very exciting possibilities to enrich various gameplay mechanics.
- As an example, we’ve extended our existing Tic-Tac-Toe game demo to allow players to play matches with AI.
- Additionally, we’ve covered how an AI could be used to seamlessly substitute for a disconnected player and improve the experience of a remaining player.
- We’ve shown how a Nakama-based game could be integrated with an external Machine Learning model.
- We’ve also shown how this model could be served, both in local/dev and production environments.
I hope you found this post useful, and we’re always happy to help your team should you have more questions about Heroic Labs products and offerings.

Speak to the Heroic Labs team


